Serverless Framework (with GCP), MongoDB (Atlas), Cloud Build and more!
Tags:soen serverless gcp tutorial Google Cloud Function (also known as Lambda functions in the context of AWS) is arguably one of the easiest to use yet most useful service in the GCP suite. However, ease of use does not necessarily translate into ease of doing it correctly! It is incredibly simple to hack together a solution, but such will such a solution be easy to maintain? Will it be easy to add collaborators to this project? In this article, I will describe my experience of trying to set up a solution for a side project of mine, all while trying to ensure that my solution is as elegant and easy to maintain as possible.
What am I trying to achieve?
As a busy person, I find it difficult to keep up with the affairs of the world. Instead of being completely ignorant of what’s happening, perhaps getting informed of just the most important event or two that happened in each day is good enough?
So the details/requirements of my plan is something like this
- Regularly get news articles of topics that I am interested in from the Internet
- Use a Google Cloud Function to achieve the above
- Store details of these news articles in MongoDB
- Use Google Cloud Build to build a deployment pipeline
- Use Serverless framework to handle integration with GCP
- Use Google Secret Manager to handle MongoDB credentials
- Use Google Cloud Key Management service to handle credentials of deployment service account
- Routinely run some sort of analysis on the news articles scraped at the end of the day, only articles that are worth my time should be presented to me (TO BE IMPLEMENTED…)
Enough talk, let’s start already!
And now, I shall illustrate exactly what I have done, step by step. I will try to include as many images and explanations along the way to make it as easy to understand as possible for someone new to this.
Create GCP Project
Before we start, we shall first create a GCP project. You may also use an existing project, the choice is yours.
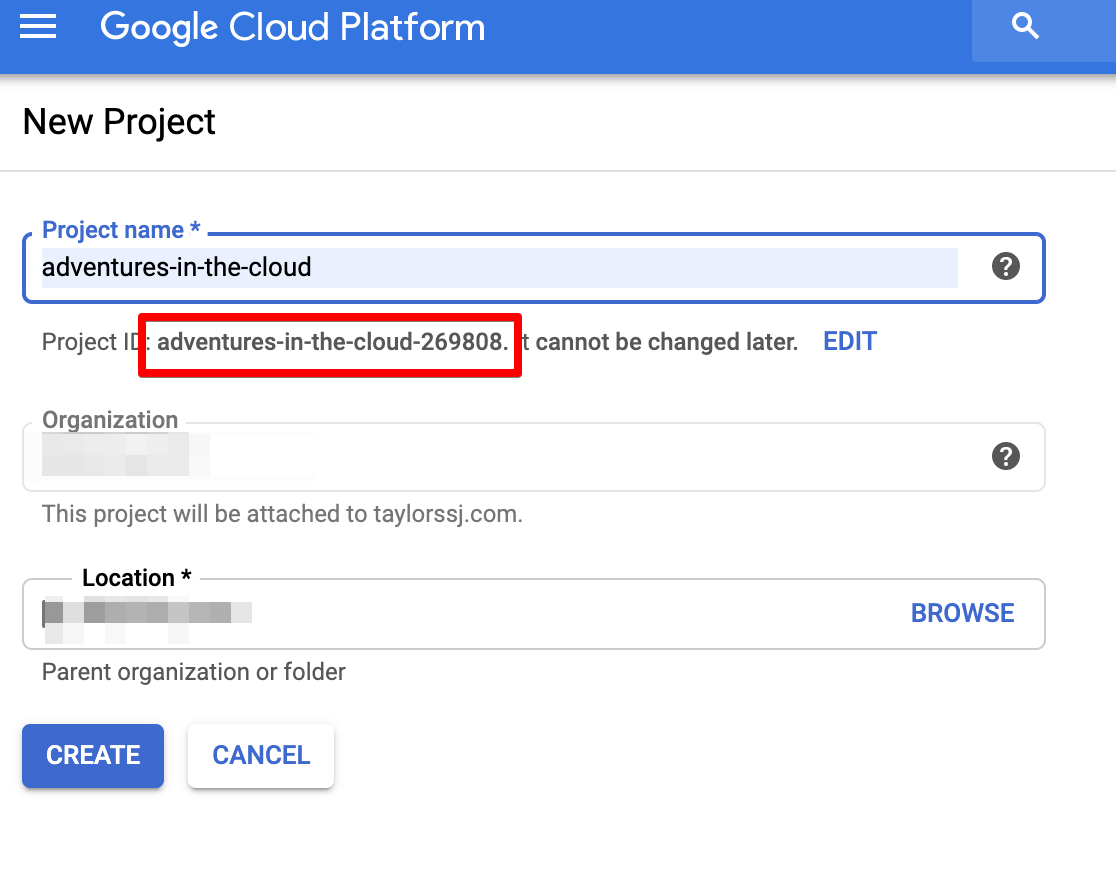
Everything that we do next will be then under the context of this project. One should also take note of the project ID as it will be required later.
MongoDB Atlas
For my use case, I expect the need to store lots of data, i.e. it would be necessary to have a database for this. At the same time, I was also interested in implementing a modern database solution, and hence I decided to give MongoDB a go. And since MongoDB Atlas (a cloud MongoDB service) offers a free tier, it was the perfect opportunity for me to try it out. The rest of this MongoDB tutorial will illustrate me setting up a free tier solution, a real enterprise-grade solution will require a free extra steps (not all of which are supported by the free tier, of which I shall point out momentarily).
Create Cluster
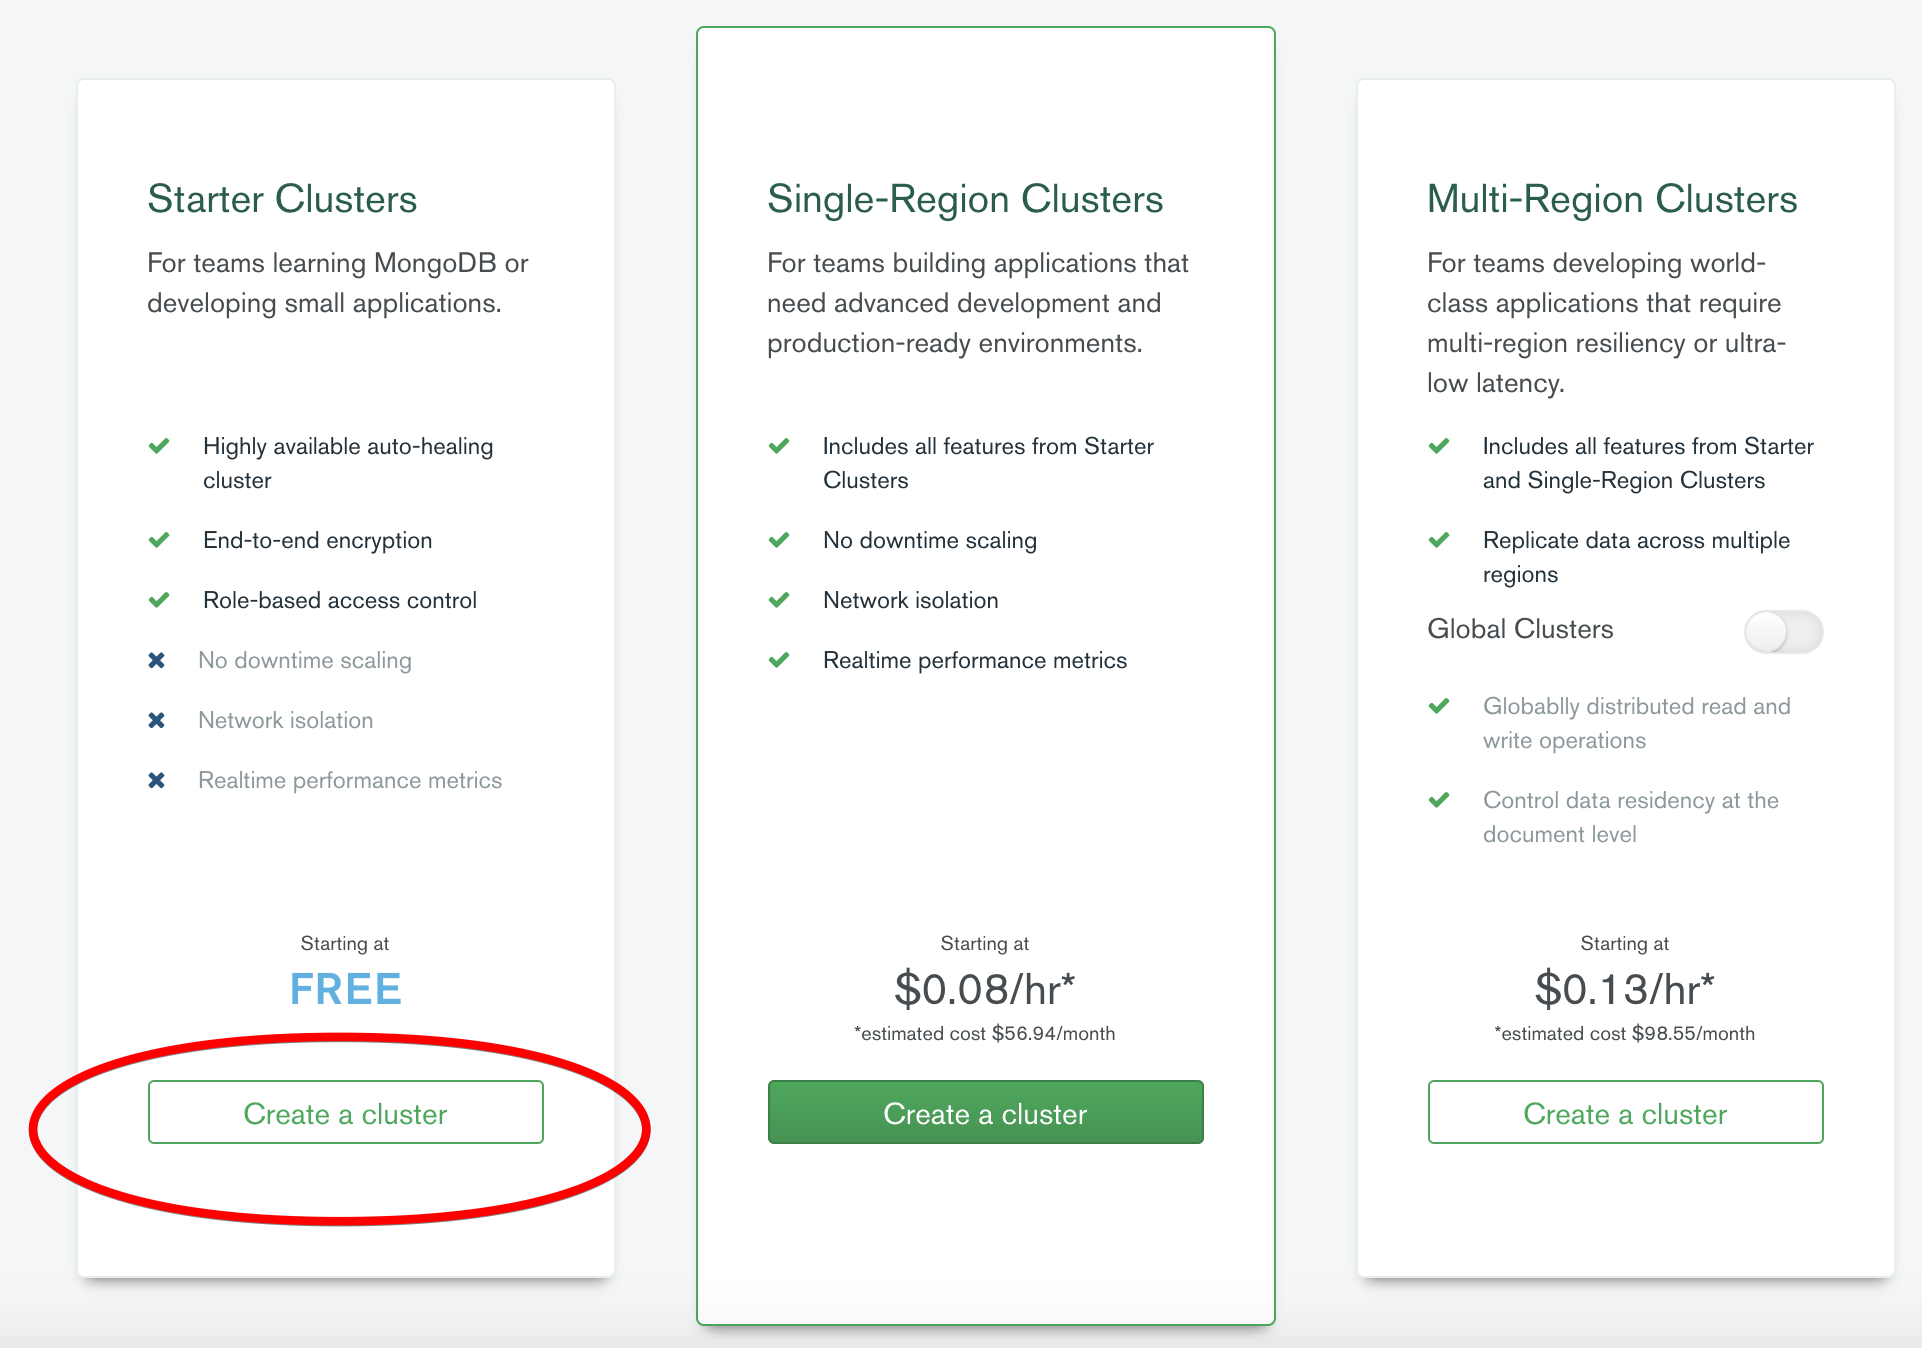
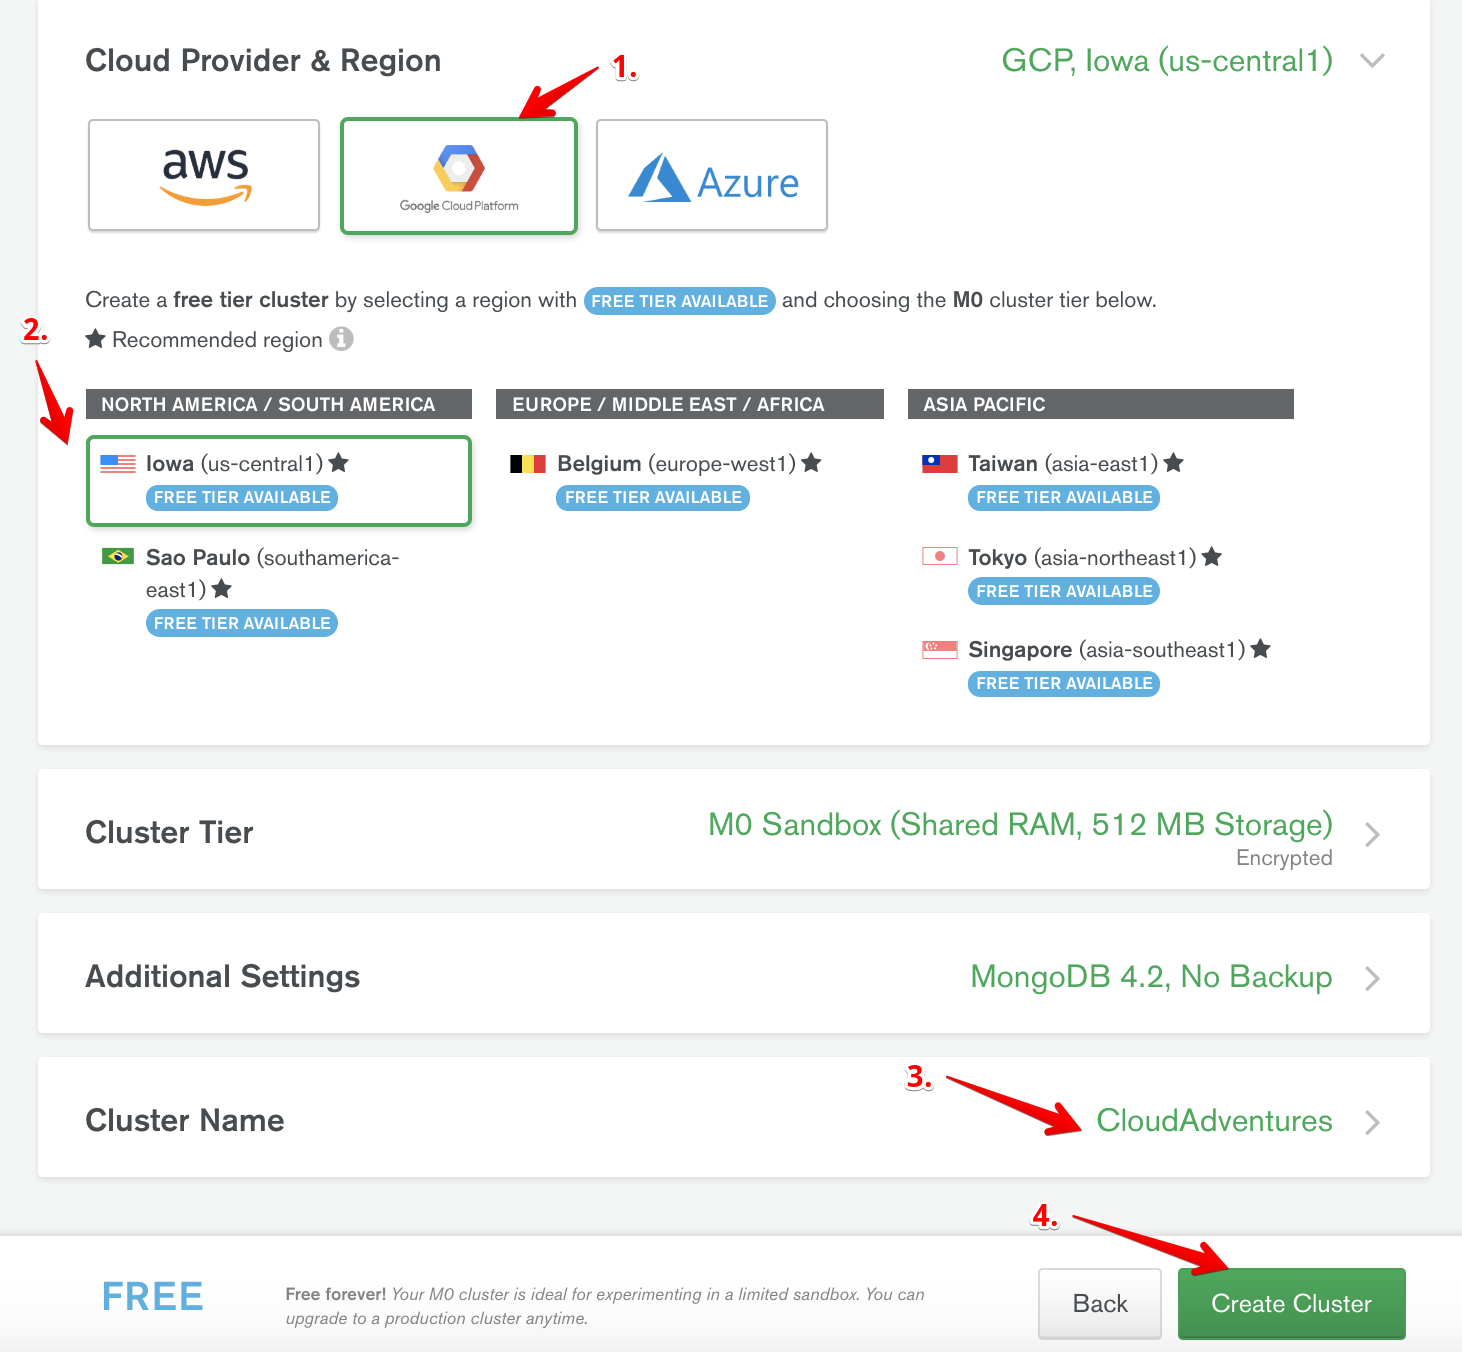
After logging into your account, we first start off by opting to create a free cluster. Here, there are several things we need to do
- Select your cloud service provider (I went with GCP).
- Select the region in which your cluster should be deployed (Choose a region close to the region of your cloud function).
- Give your cluster a name.
- Create your cluster!
Whitelist IPs
While your cluster is being created, we need to configure the network access to our cluster.
- Click on Network Access on the tab on the left.
- Click Add IP Address.
- Enter credentials for new user.
- Add user.
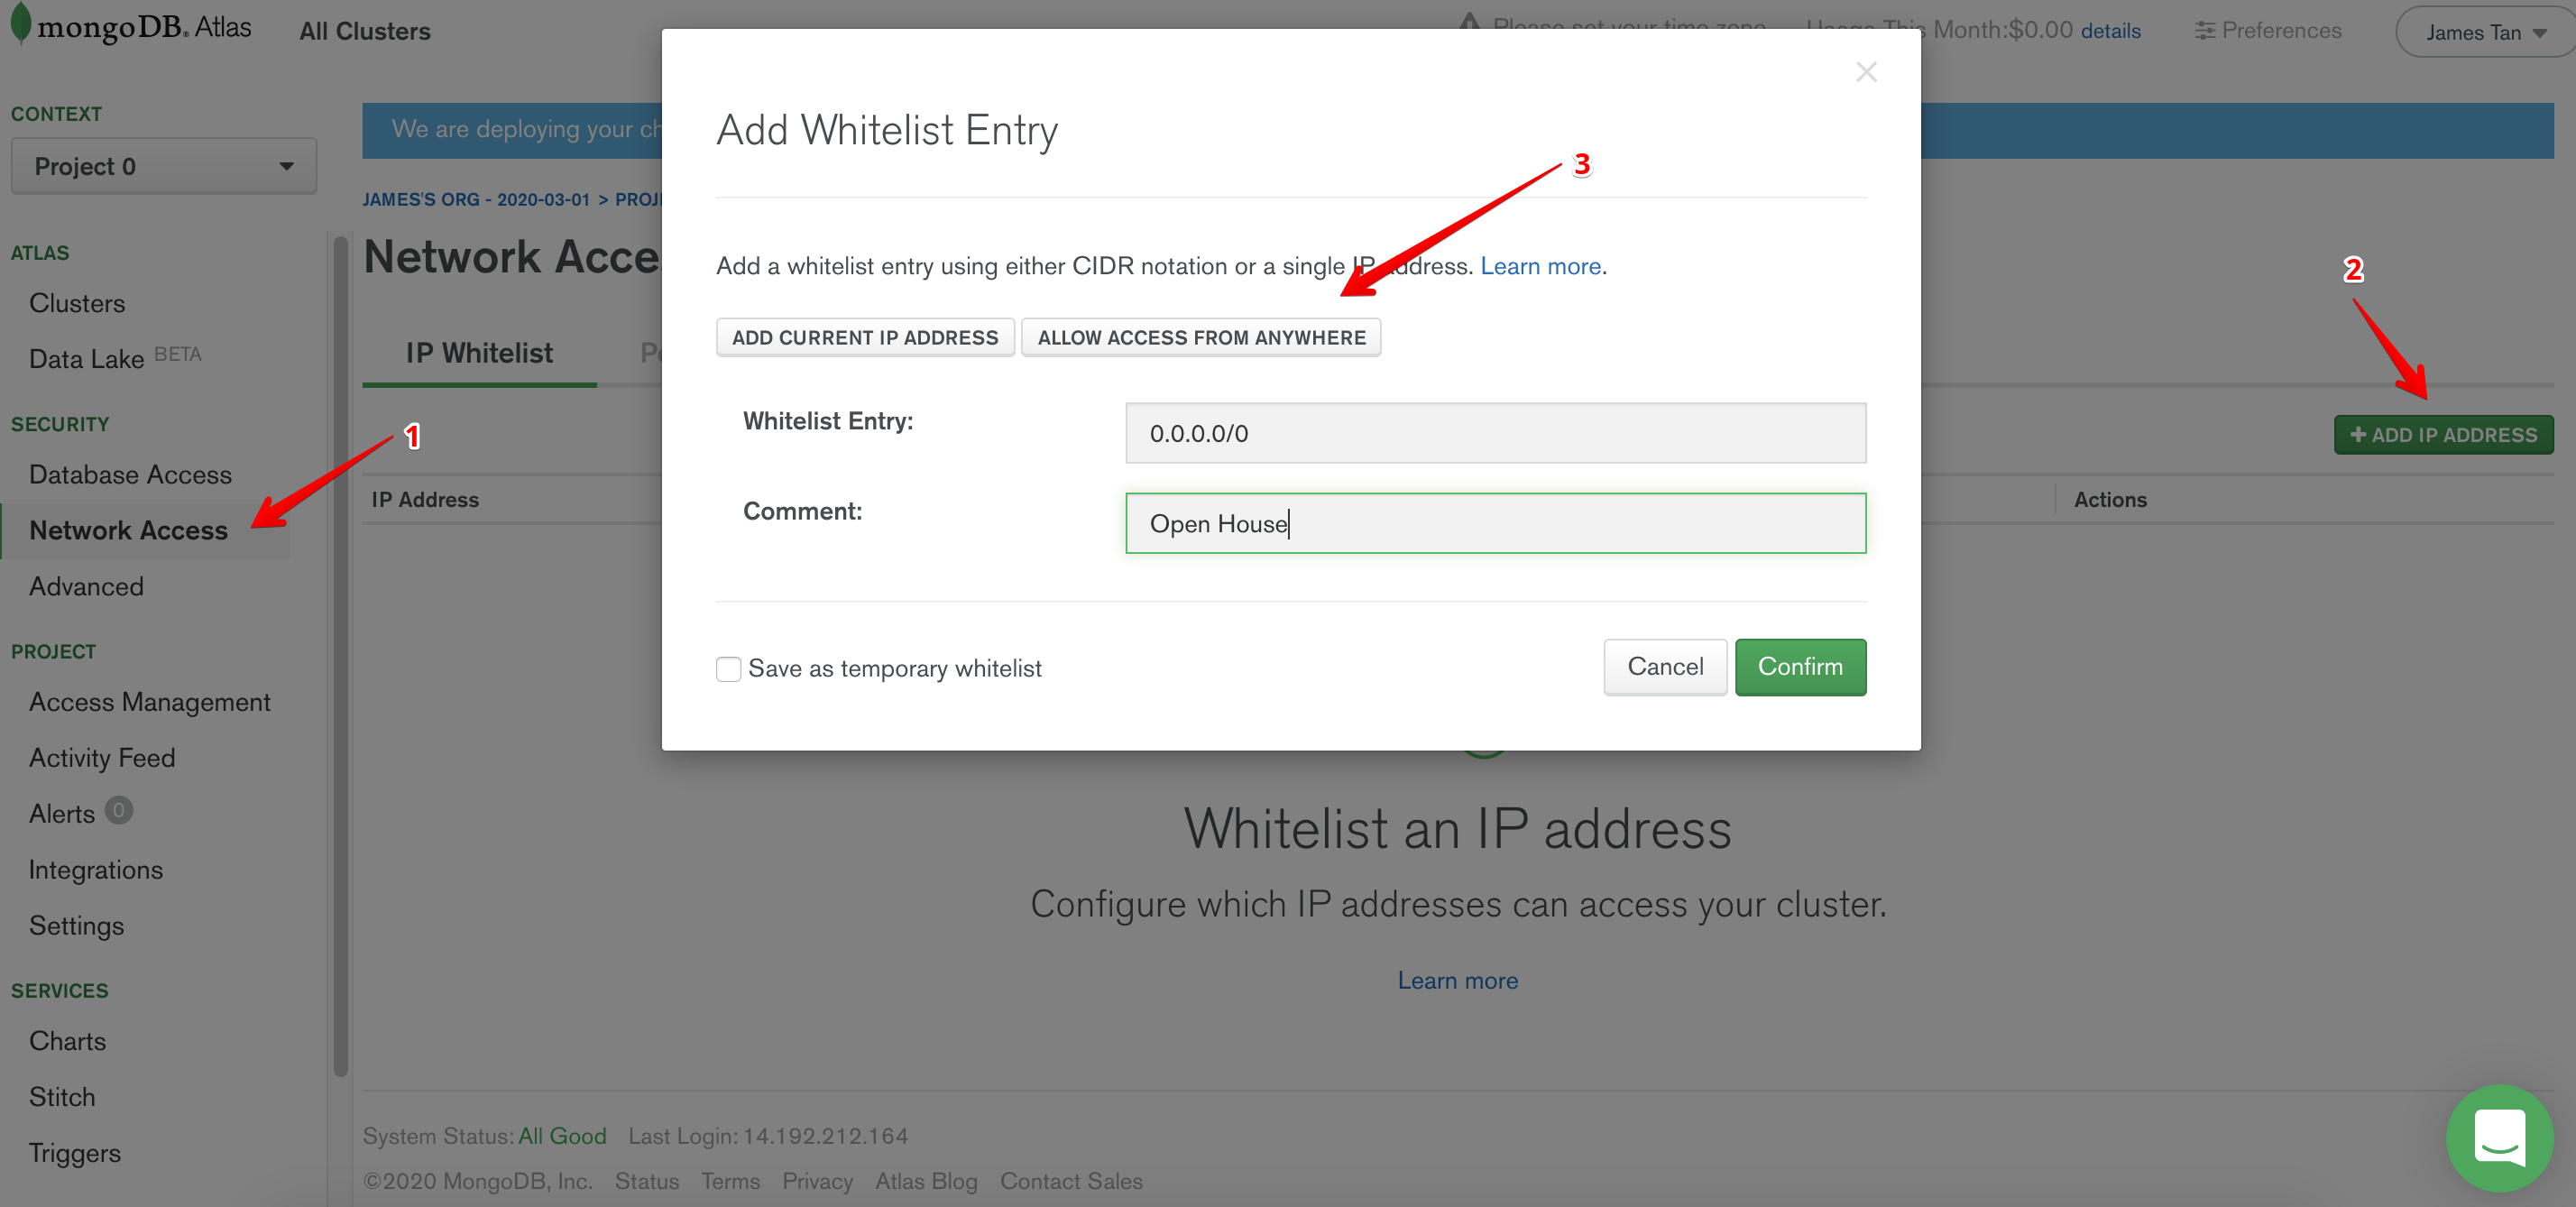
One might question me right here, “Wait a second, whitelisting IPs? And you are whitelisting just about every possible IP?”
This is an extremely valid question. However, there are a couple of caveats that one needs to be aware of. Since we are using Google Cloud Function (GCF) for this, there will not be a single static IP address that connects to our database. One solution to this is by routing traffic of our GCF through a VPC connector, Atlas supports the peering of your VPC with theirs, therefore only allowing traffic from within your VPC to access the database. BUT! This feature is unfortunately not supported in the free tier, a more secure solution is definitely possible within a real production environment, but for the purposes of our tutorial whitelisting all IPs will have to do for now.
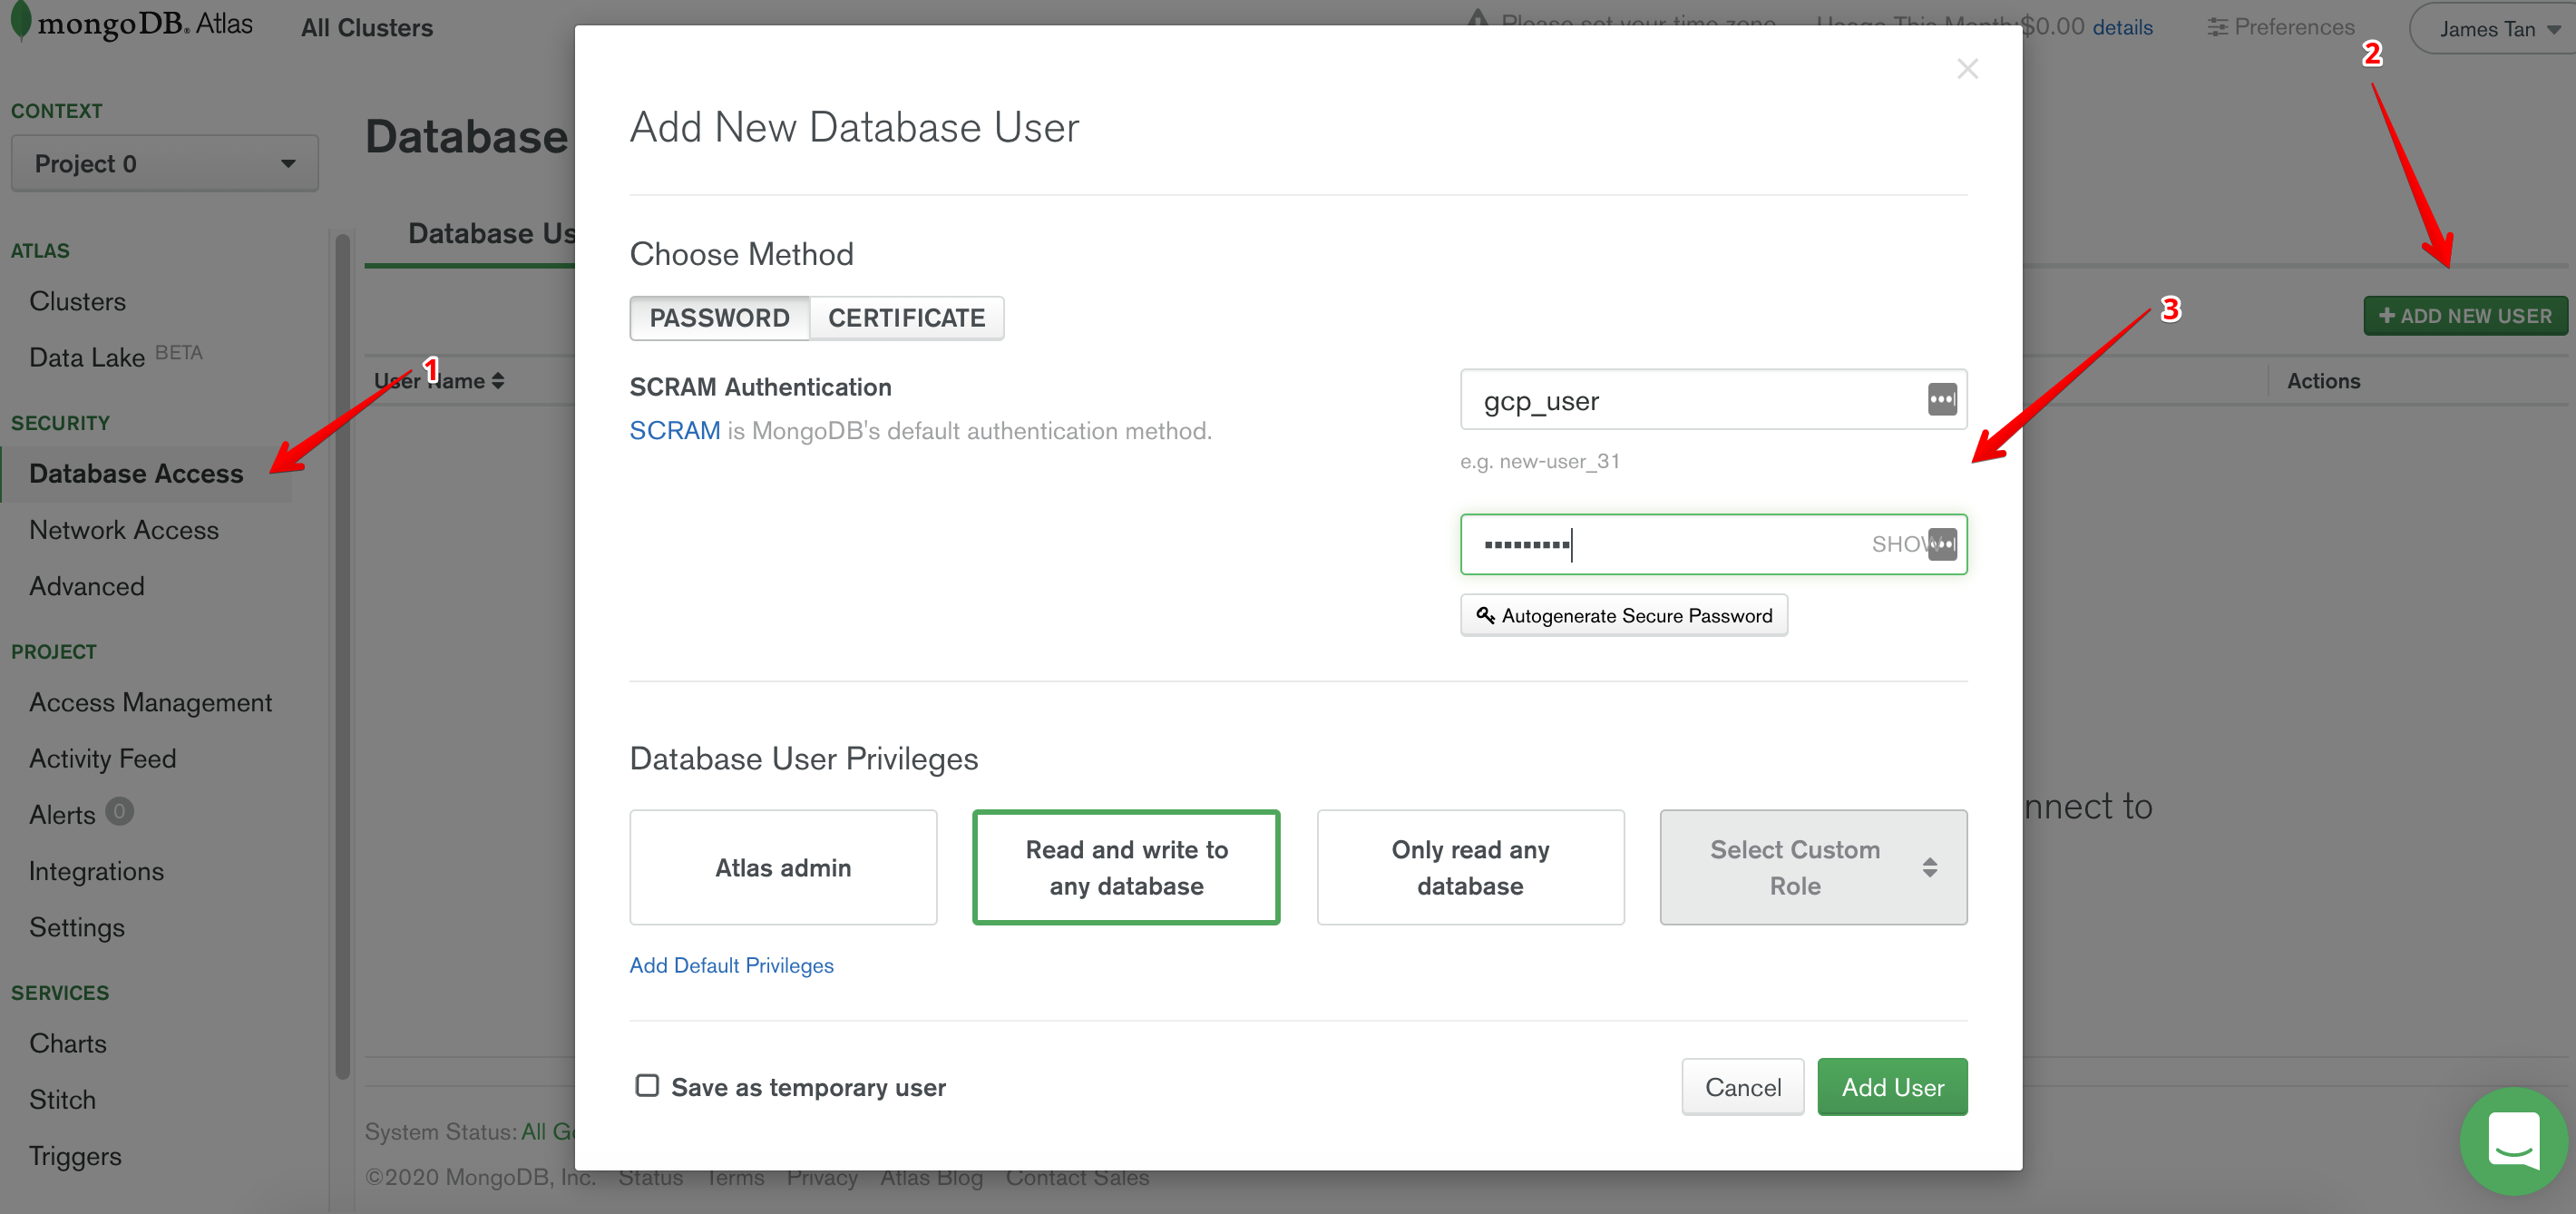
Create Users
Next, we have to create users for our new cluster.
- Click on Database Access on the tab on the left.
- Click Add New User.
- Click on Allow Access From Anywhere.
- Confirm.
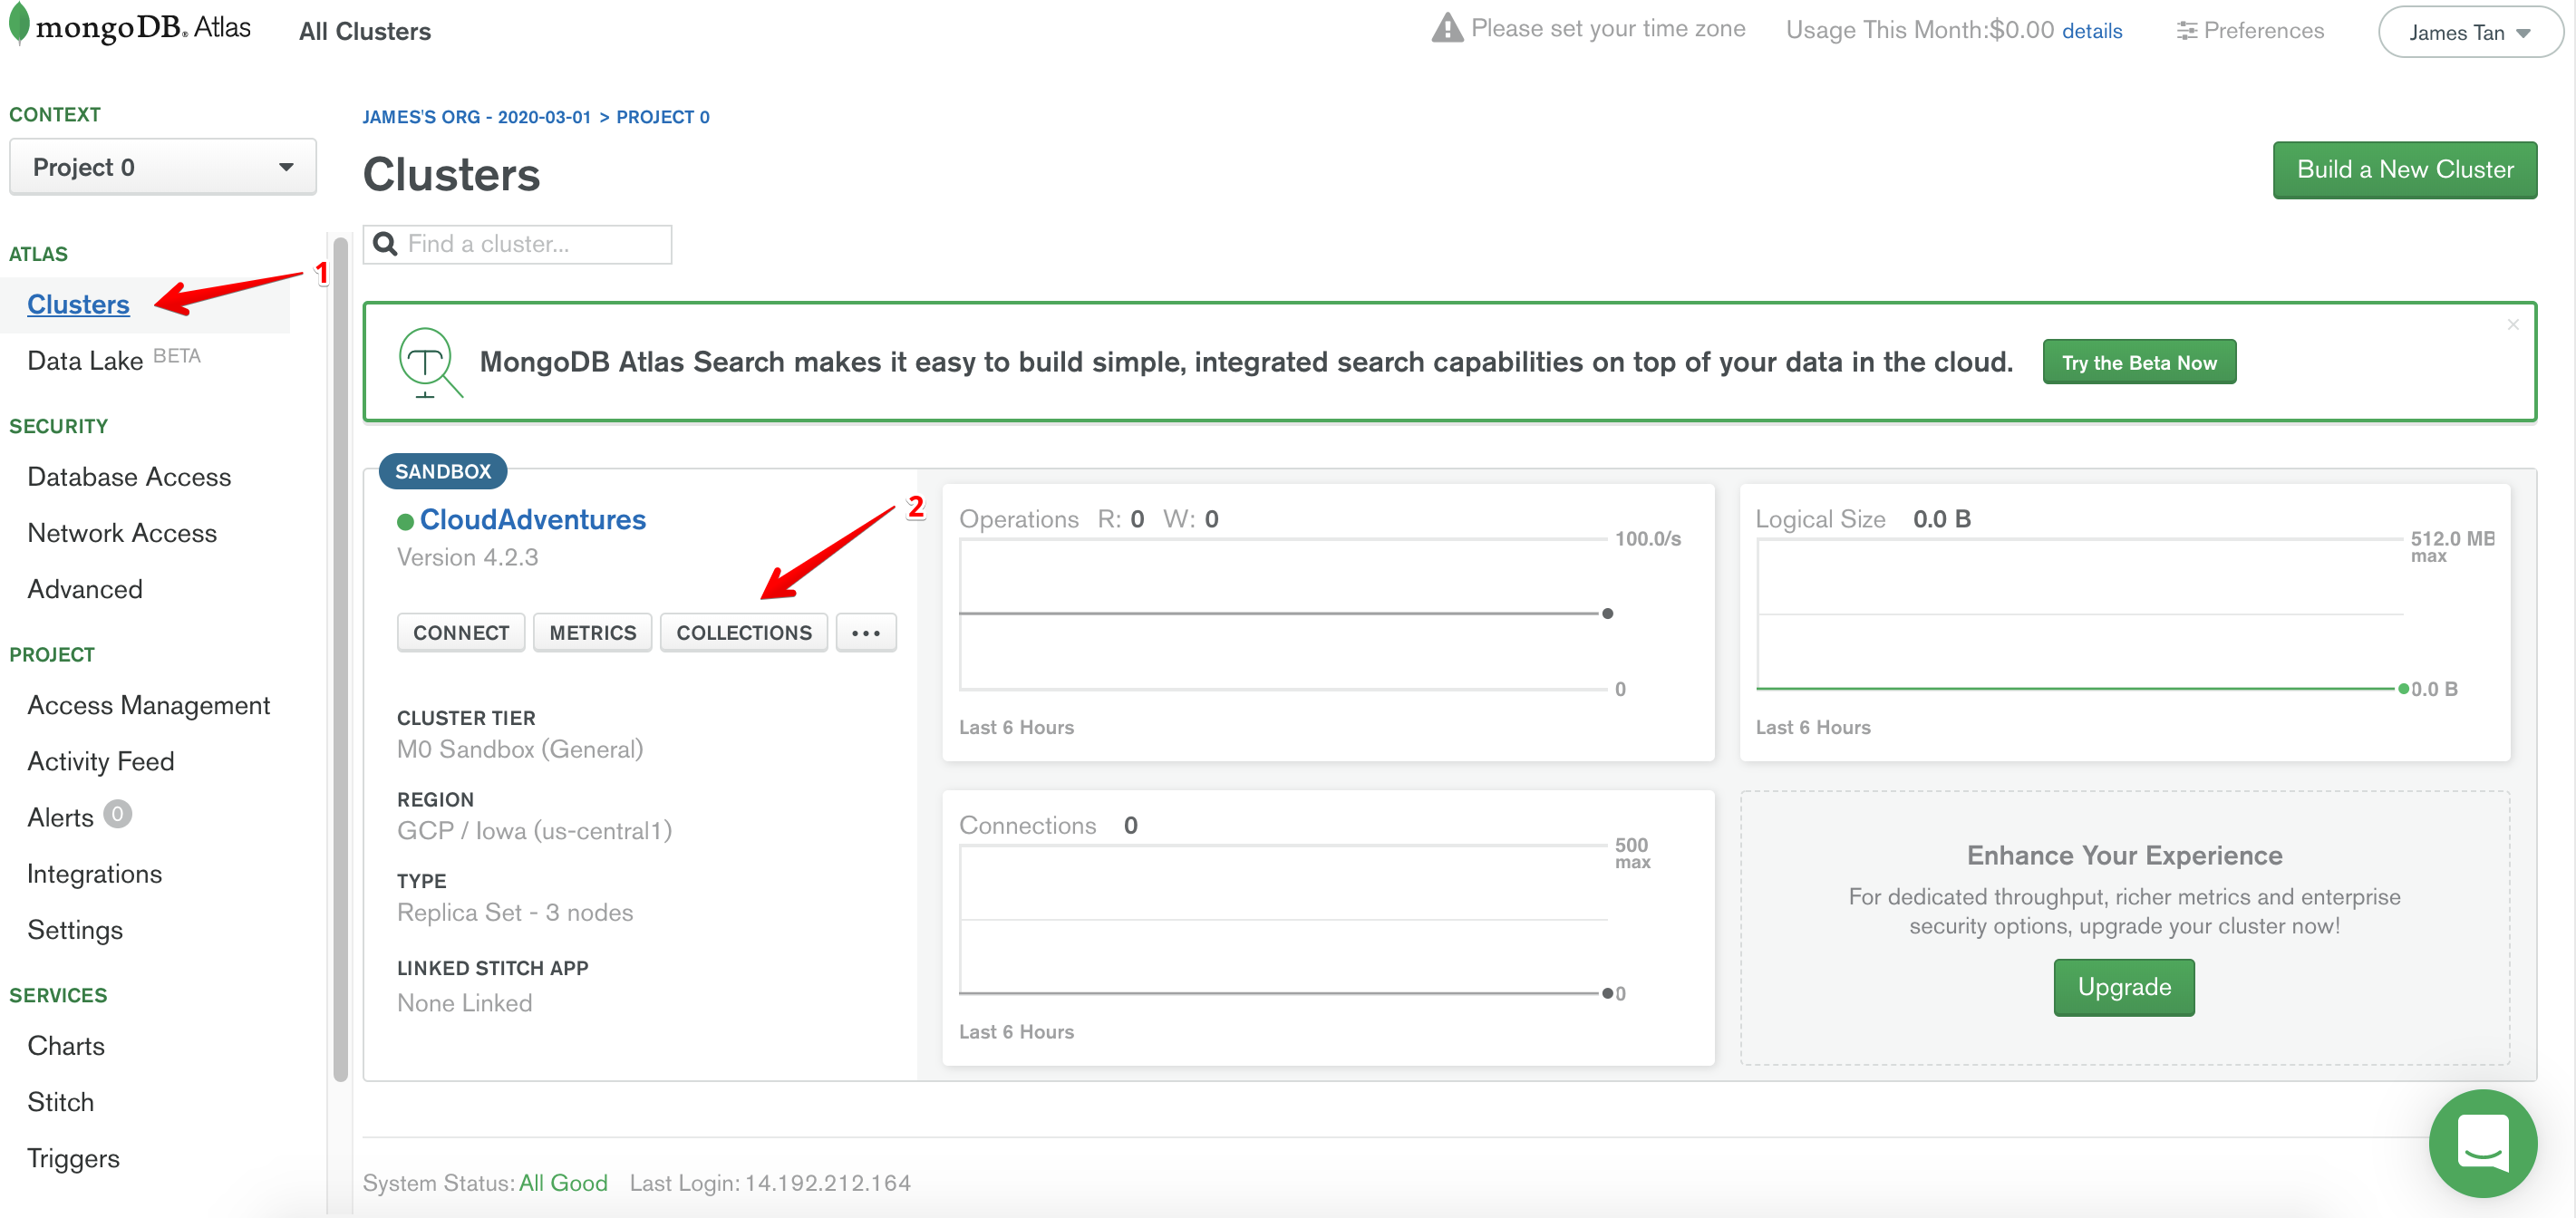
Create Database and Collection
By now, our cluster should have been successfully created. We now need to create a new database in our cluster.
- Click on Clusters.
- Click on Collections.
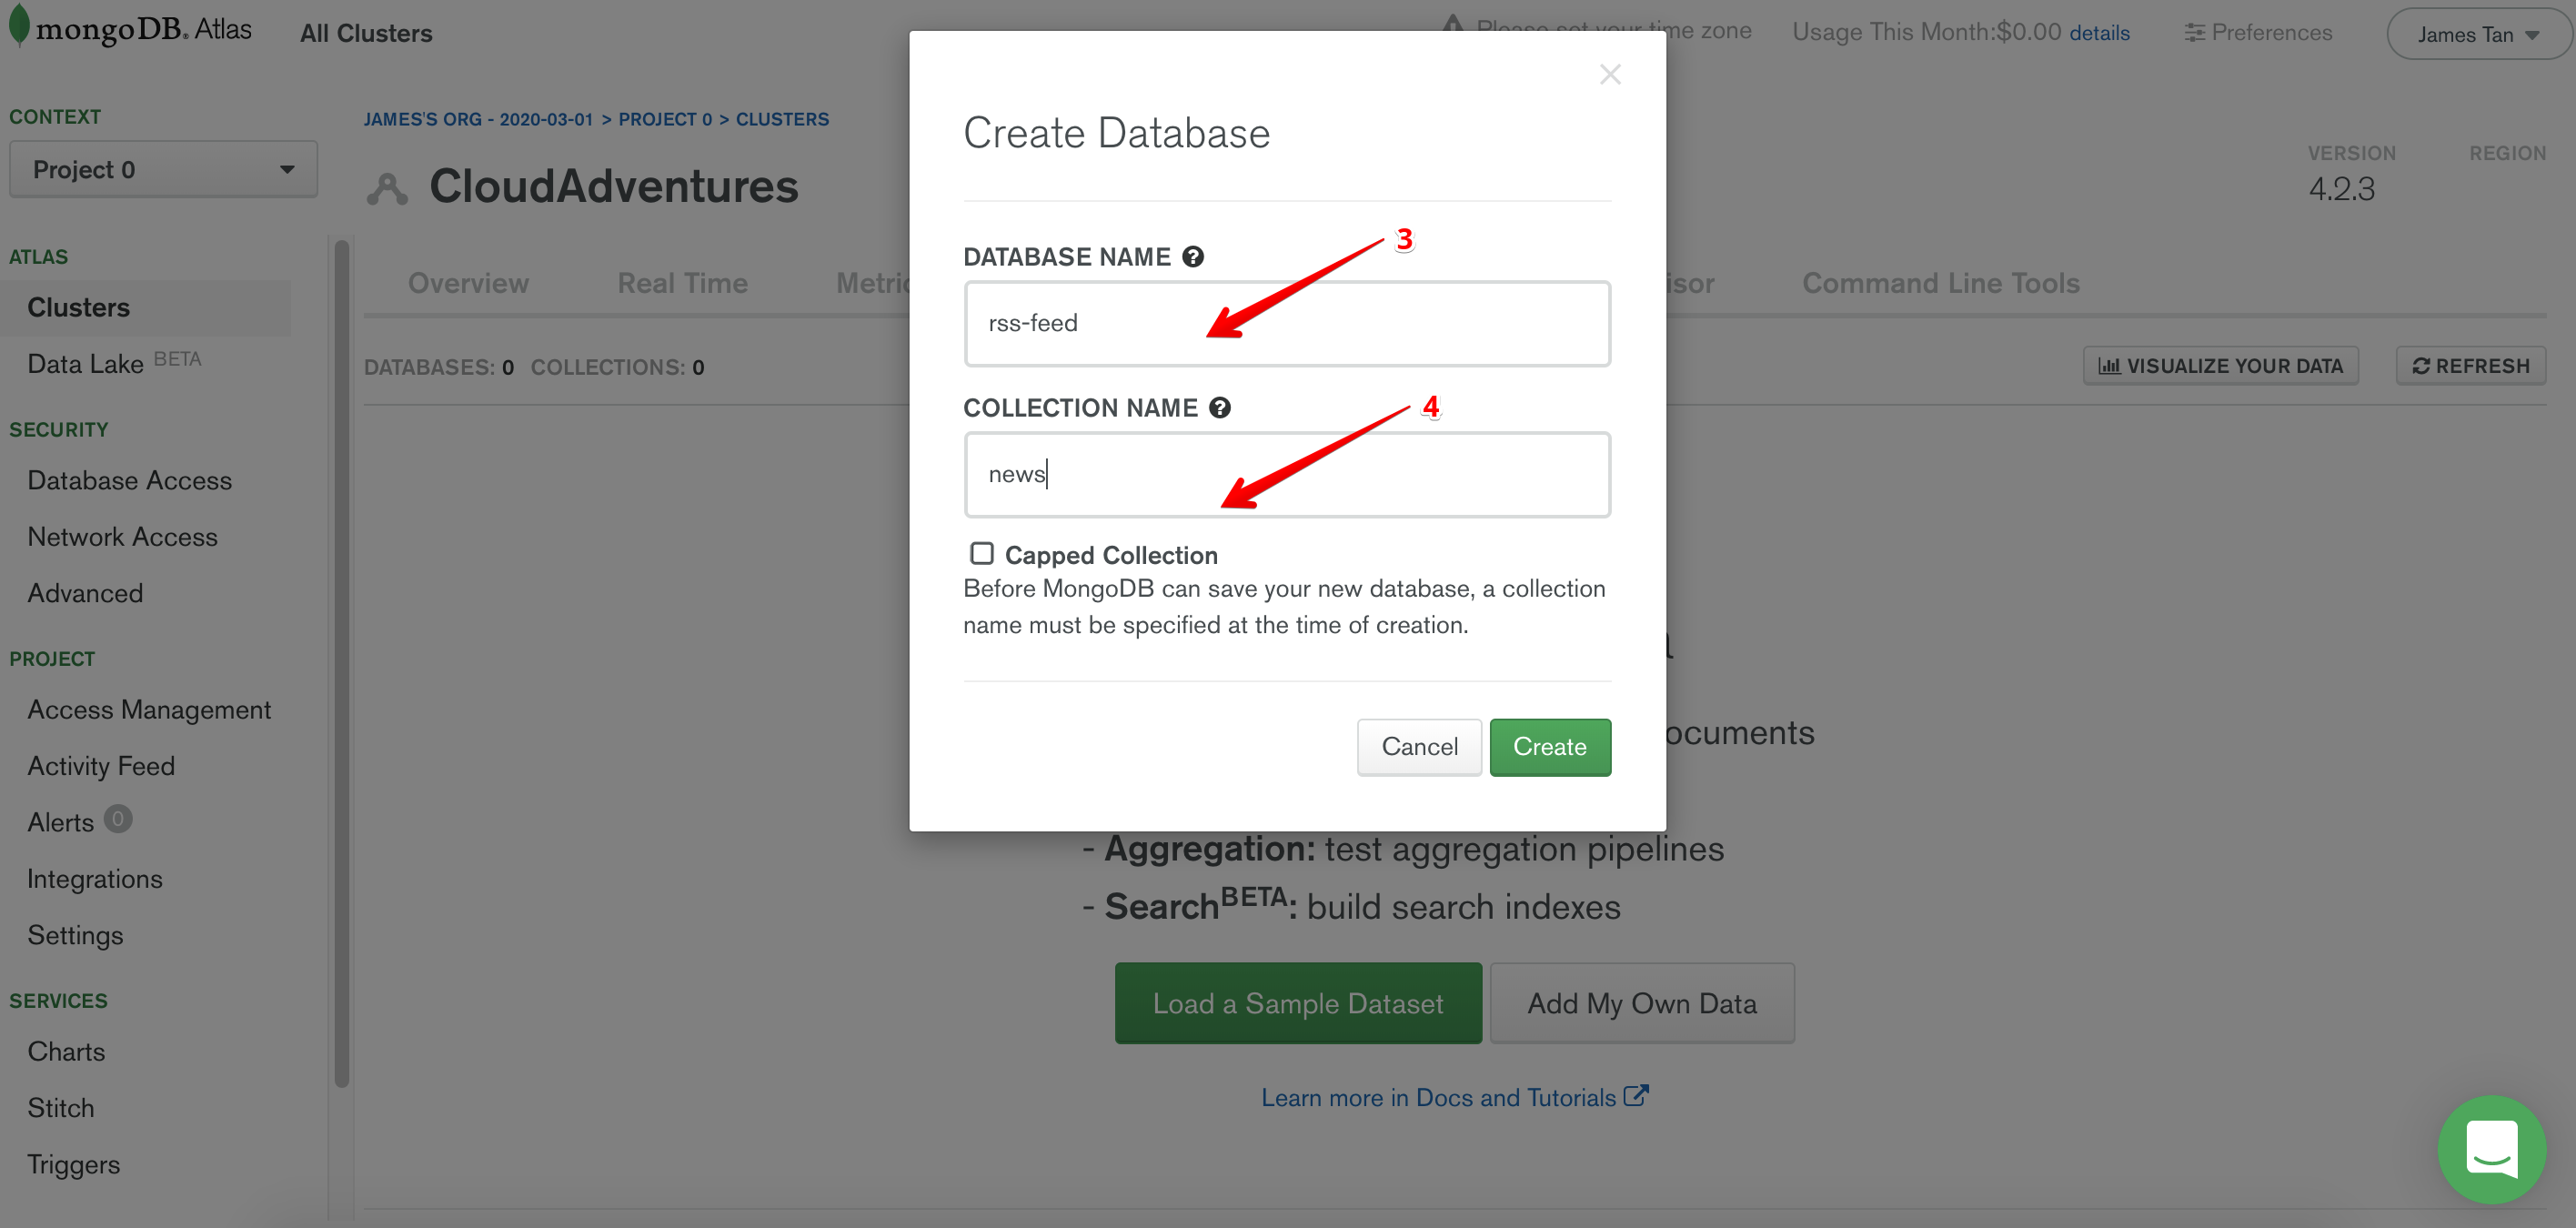
- Enter a database name of your choice.
- Enter a collection name of your choice.
- Create!
The rest of the tutorial will assume the choices that I have made here.
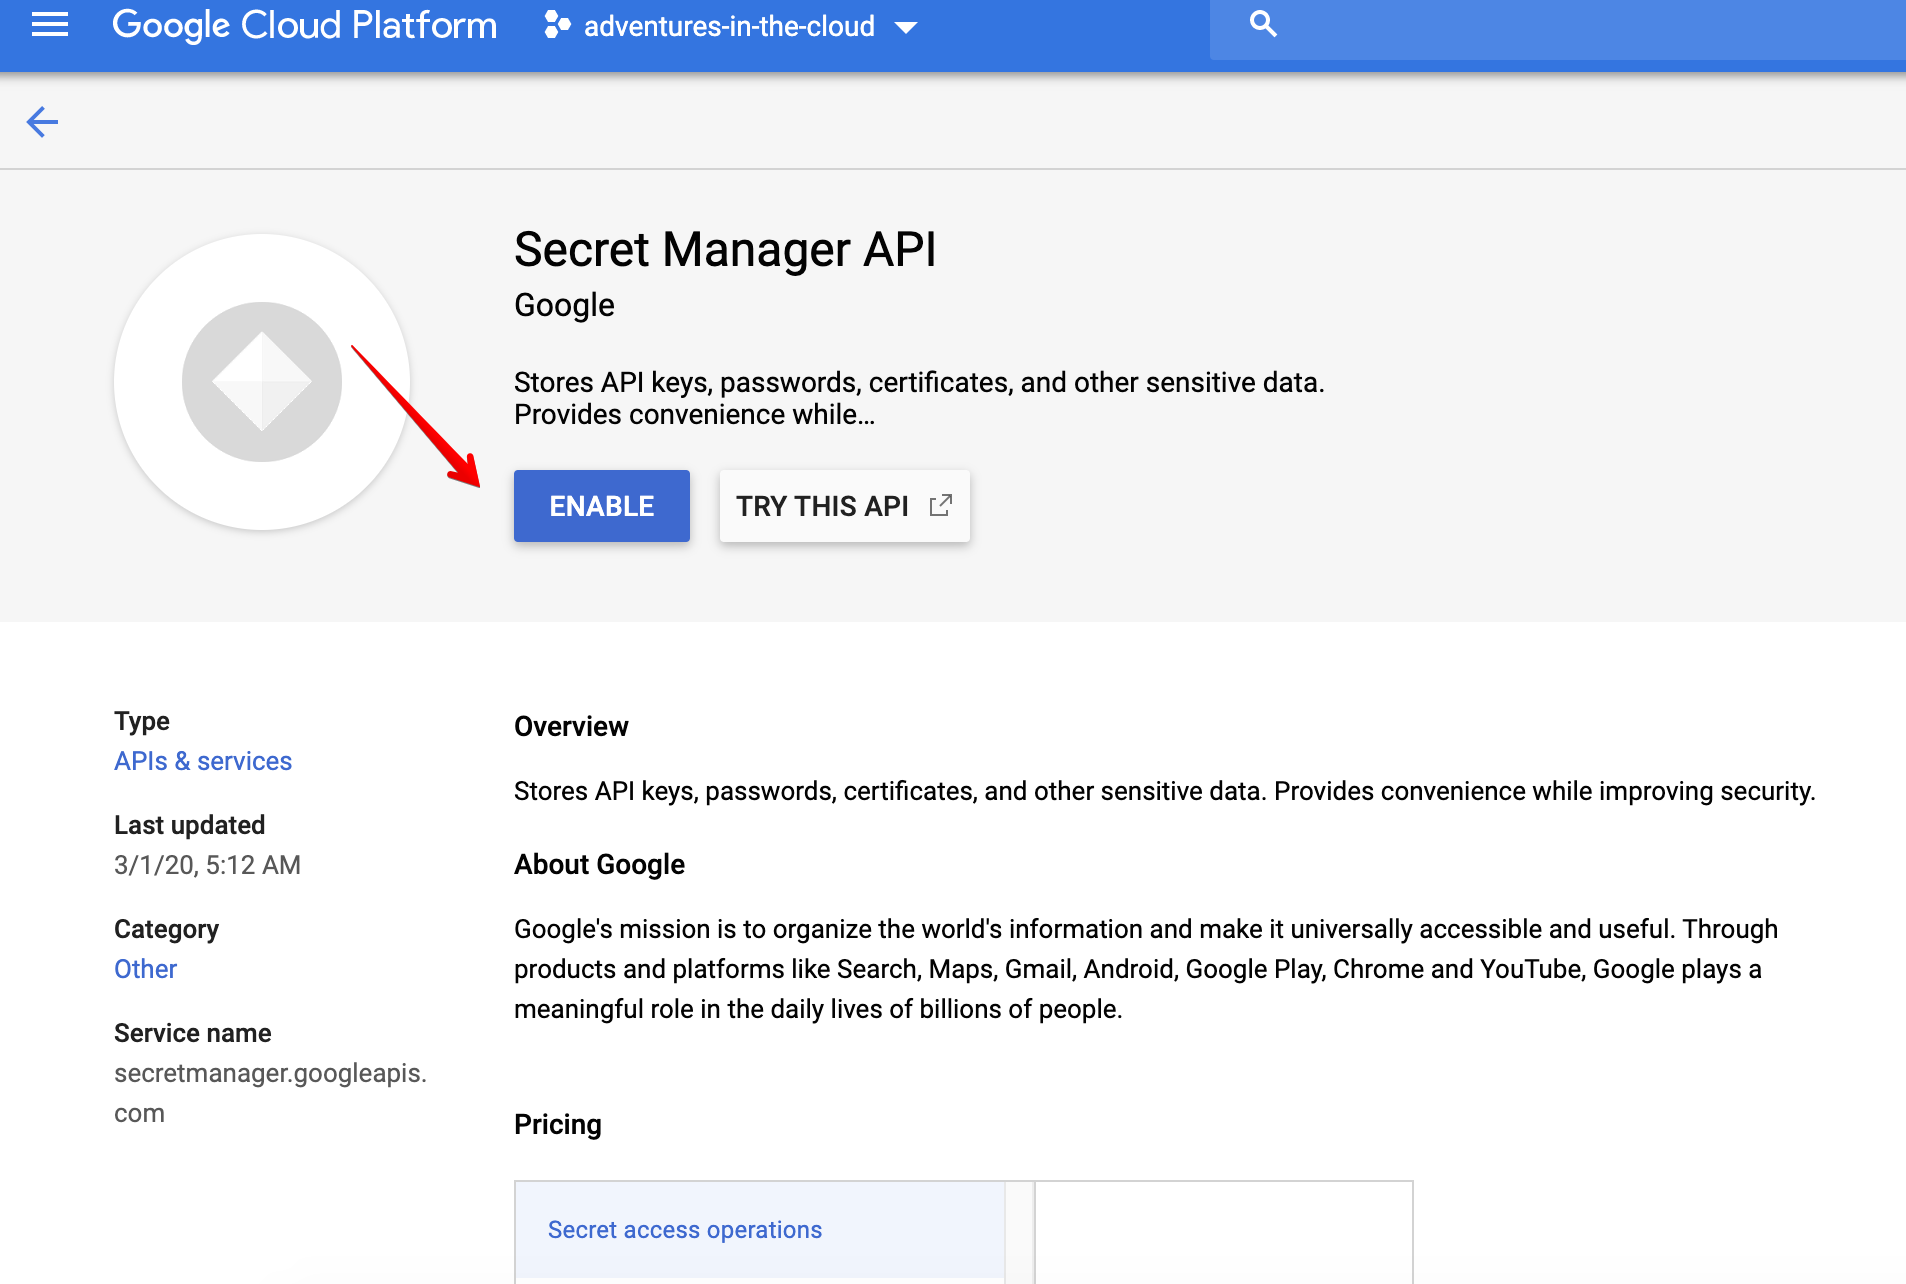
Credentials
Just about everything related to MongoDB has been setup, but there remains one thing, i.e. our credentials. Obviously we do not want our credentials to be lying around in plain text withn our code/repository. Hence, we shall store our credentials within Google Secret Manager. Before we are allowed to use any new service within GCP, we will need to enable it. Since this will be true for every subsequent service that we use, I shall not mention it again. If you are unable to reach this screen, try searching for it with queries such as secret manager api, cloud storage api, cloud function api etc
Now, we can create a secret within Secret Manager containing our credentials. The secret value should just be a JSON object containing the relevant information we need to connect to our database.
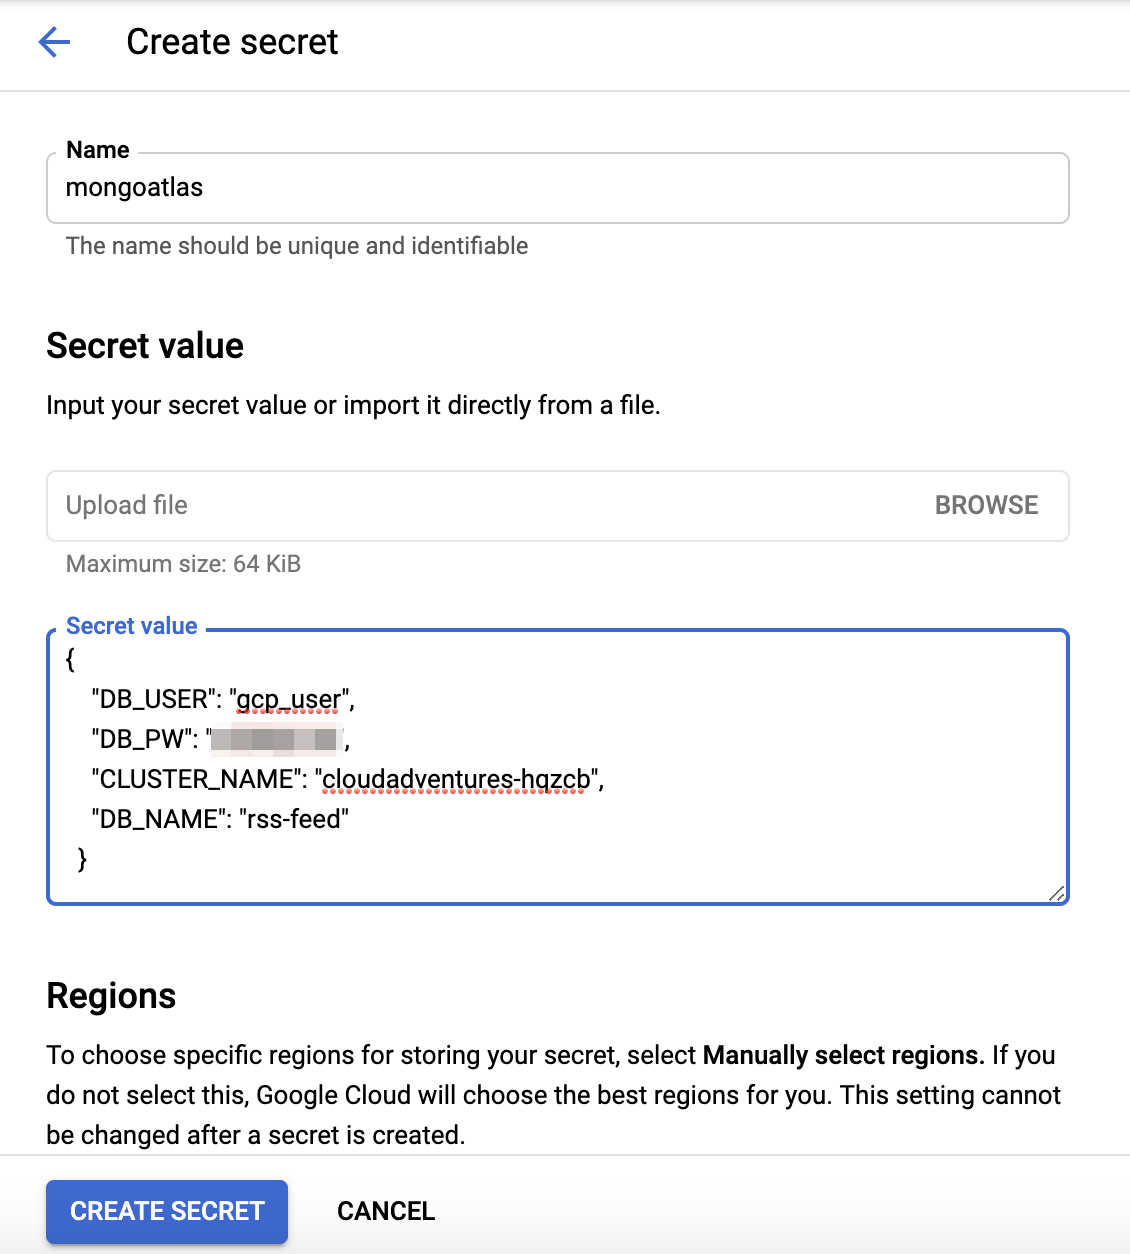
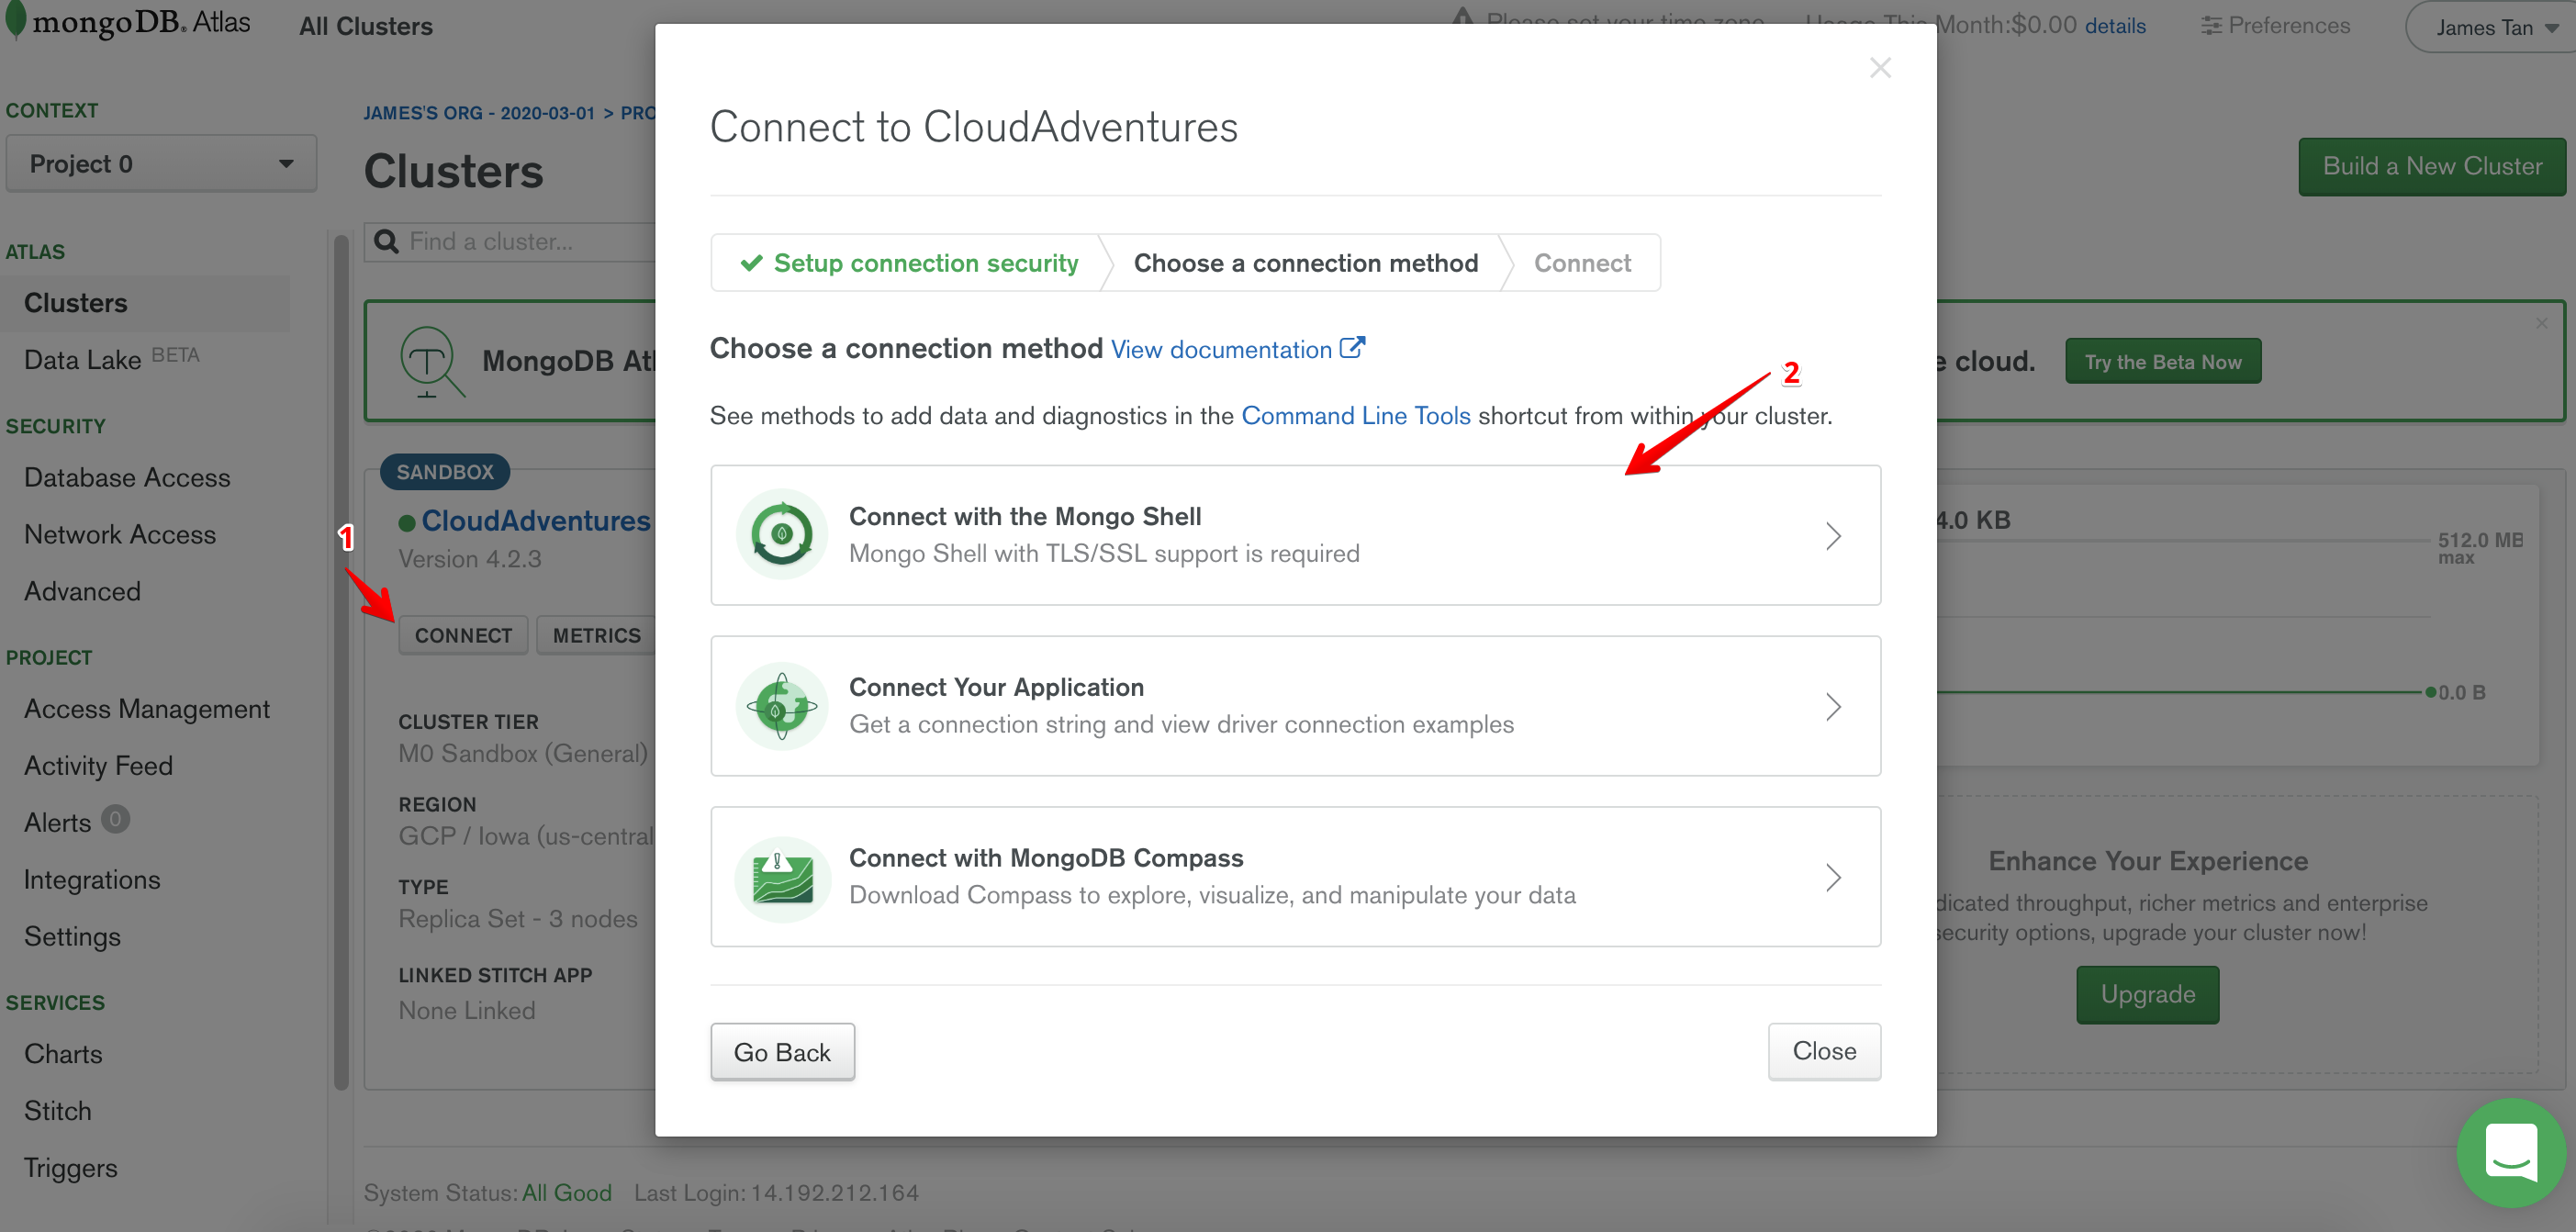
To find the cluster name, follow the steps below.

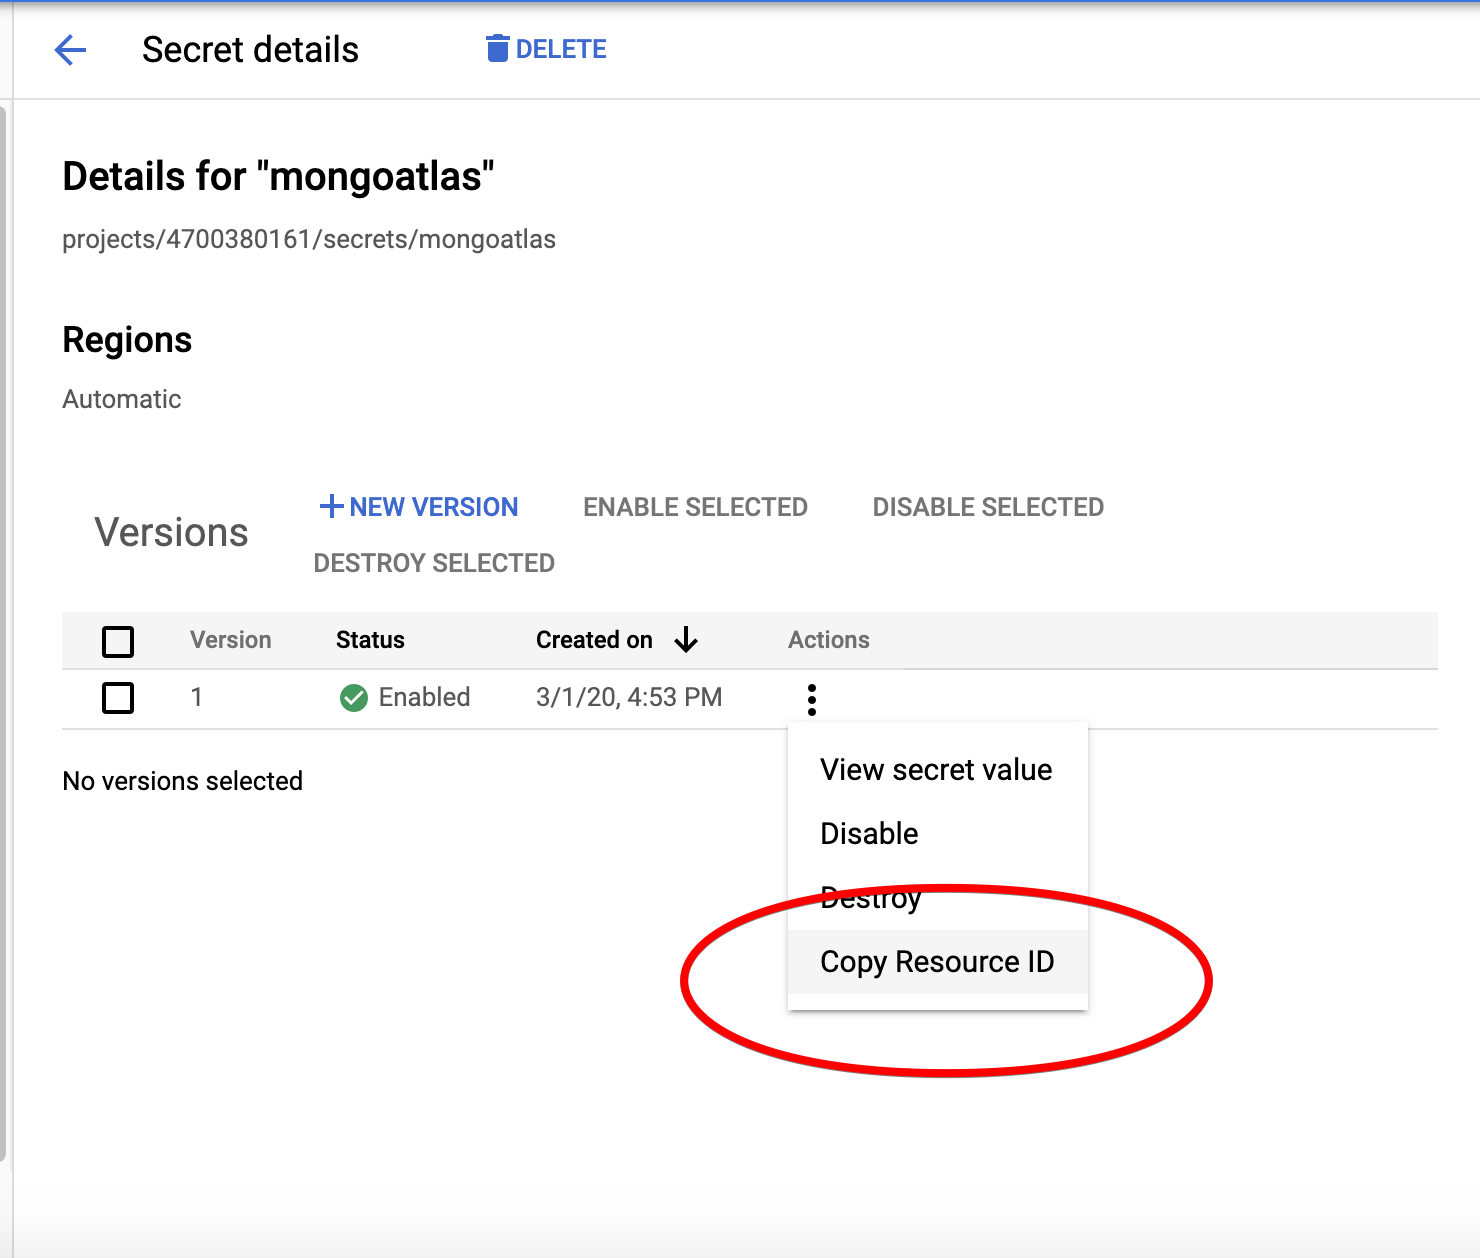
Lastly, we need to take note of the resource ID of our secret.
Serverless Framework x Google Cloud Function
Now that we have MongoDB successfully configured, we can finally start building our Serverless function! I think now is also a good time to share my Git repository for this project.
Installing Serverless Framework
If you do not already have npm installed on your machine, this should help you get started. And once you do, you should be able to install the Serverless framework by running the following
npm install -g serverless
Initialising Serverless Project
We will largely be following the steps of the Quick Start guide by Serverless. I shall make a few modifications here and there based on our requirements. Now we will create a new Serverless project, starting with a ready made template.
serverless create --template google-python --path news-rss
cd news-rss
npm install
With this, you should have all the required dependencies for a Serverless project.
Google Credentials
In order for Serverless framework to be able to deploy GCFs on our behalf, we will need to give it the required credentials. As such, I recommend following the official guide to set up your credentials. Follow the steps described in the guide, I will also assume that you followed the recommendation of the guide to save your credentials in the ~/.gcloud/keyfile.json directory.
Configuration in serverless.yml
There are several configurations we have to make, I will elaborate further as we go along.
Part 1
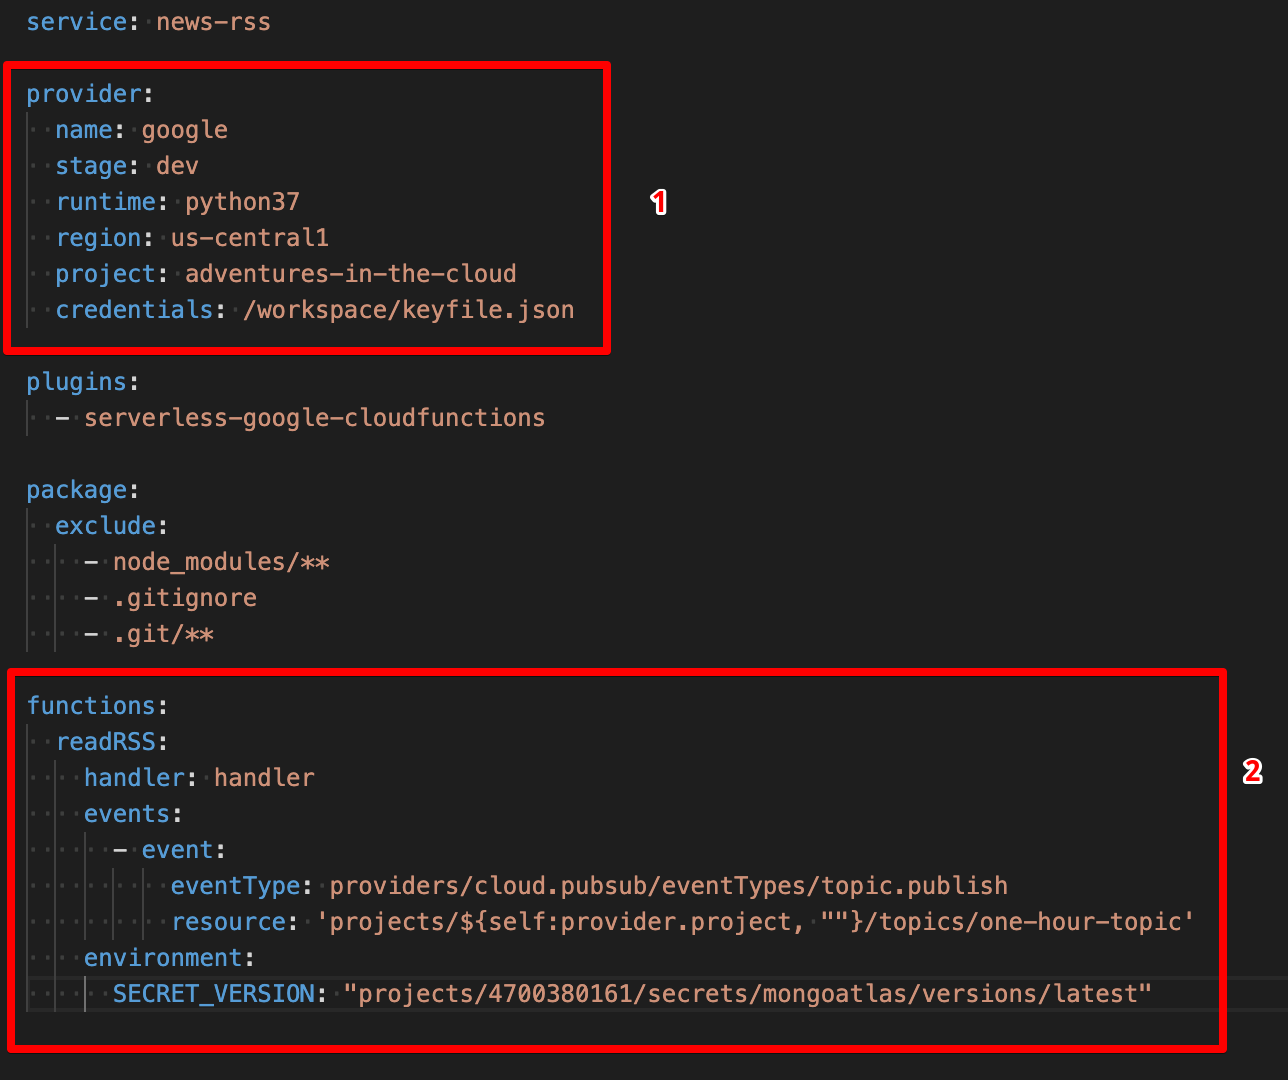
The region can be any GCP region that you fancy (remember we mentioned earlier that our MongoDB cluster should be in a region close to our GCF?). project should be our GCP project ID that we mentioned at the start of this tutorial. As for credentials, you might be wondering why is the path here not the same as the one we mentioned before, i.e. ~/.gcloud/keyfile.json. There is a very good reason for this, we are not going to build and deploy our GCF locally, we are instead going to let Google Cloud Build handle this for us, this is something we will come back to momentarily, just bear with me for now.
Part 2
The first argument here is in fact the name we are giving our GCF, I named mine as readRSS but you are free to make this whatever you prefer. handler simply refers to the function within our main.py file that will handle requests.
events is slightly more tricky, we basically defining events that will trigger our cloud function. For our case, it would make sense for our function to be invoked routinely. The GCP way of handling is by subscribing your function a Google Pub/Sub topic, and whenever something is published to that topic (we shall handle this using Google Cloud Scheduler) the function will be invoked. Wow, that was a real mouthful! We will elaborate on that later, for now just pay attention to the resource parameter, the last part should be the name of a Pub/Sub topic. In my case, I called it one-hour-topic (because something is published hourly). It is alright if this topic has not been created yet, we will first subscribe our function to it and we shall complete the set up in the end.
environment simply allows us to set up environment variables that can be accessed within our function. Here I set up an environment variable called SECRET_VERSION, which is basically the resource ID of our secret that I mentioned earlier.
Database Adapter
Remember the database credentials we set up in Secret Manager, we need to be able to retrieve it now. Hence if you look at the helper.py file in my repo, I have defined a function that retrieves the secret from Google Secret Manager.
from google.cloud import secretmanager_v1beta1 as secretmanager
import os
import json

def get_secret():
    client = secretmanager.SecretManagerServiceClient()
    SECRET_VERSION = os.environ['SECRET_VERSION']
    response = client.access_secret_version(SECRET_VERSION)
    payload = response.payload.data.decode('UTF-8')
    return json.loads(payload)
The question might arise here that we seem to have been able to retrieve our secret a little too easily. Actually, things can get a little more sophisticated than this! Because the administrator that is in charge of IAM roles is able to restrict access to this secret to only selected service accounts. Hence, although the secret exists in the ecosystem, not every user/service is able to access it.
To be able to connect to our MongoDB database, we will require the help of a Python library called pymongo. In our main.py file, we will load the secret and initiate a database connection as such. We shall call this during the execution of the GCF so that the connection to the database will only be active during the execution time of the GCF.
from helper import DatabaseAdapter
secret = get_secret()
DB_URL = f"mongodb+srv://{secret['DB_USER']}:{secret['DB_PW']}@{secret['CLUSTER_NAME']}.gcp.mongodb.net/test?retryWrites=true&w=majority"
DB_CONN = pymongo.MongoClient(DB_URL).get_database(secret['DB_NAME'])
In our helper.py file, we have also defined a DatabaseAdapter class to handler all database related operations.
class DatabaseAdapter:
    def __init__(self, db_conn, col_name):
        self.conn = db_conn
        self.col_name = col_name
        self.collection = self.conn.get_collection(col_name)

    def write_many_to_db(self, data):
        num_items = len(data)
        if num_items > 0 : self.collection.insert_many(data)

    def id_not_exists(self, id):
        return self.collection.count_documents({'id': id}) == 0
This class needs to be instantiated with a pymongo Database Connection object and a collection name.
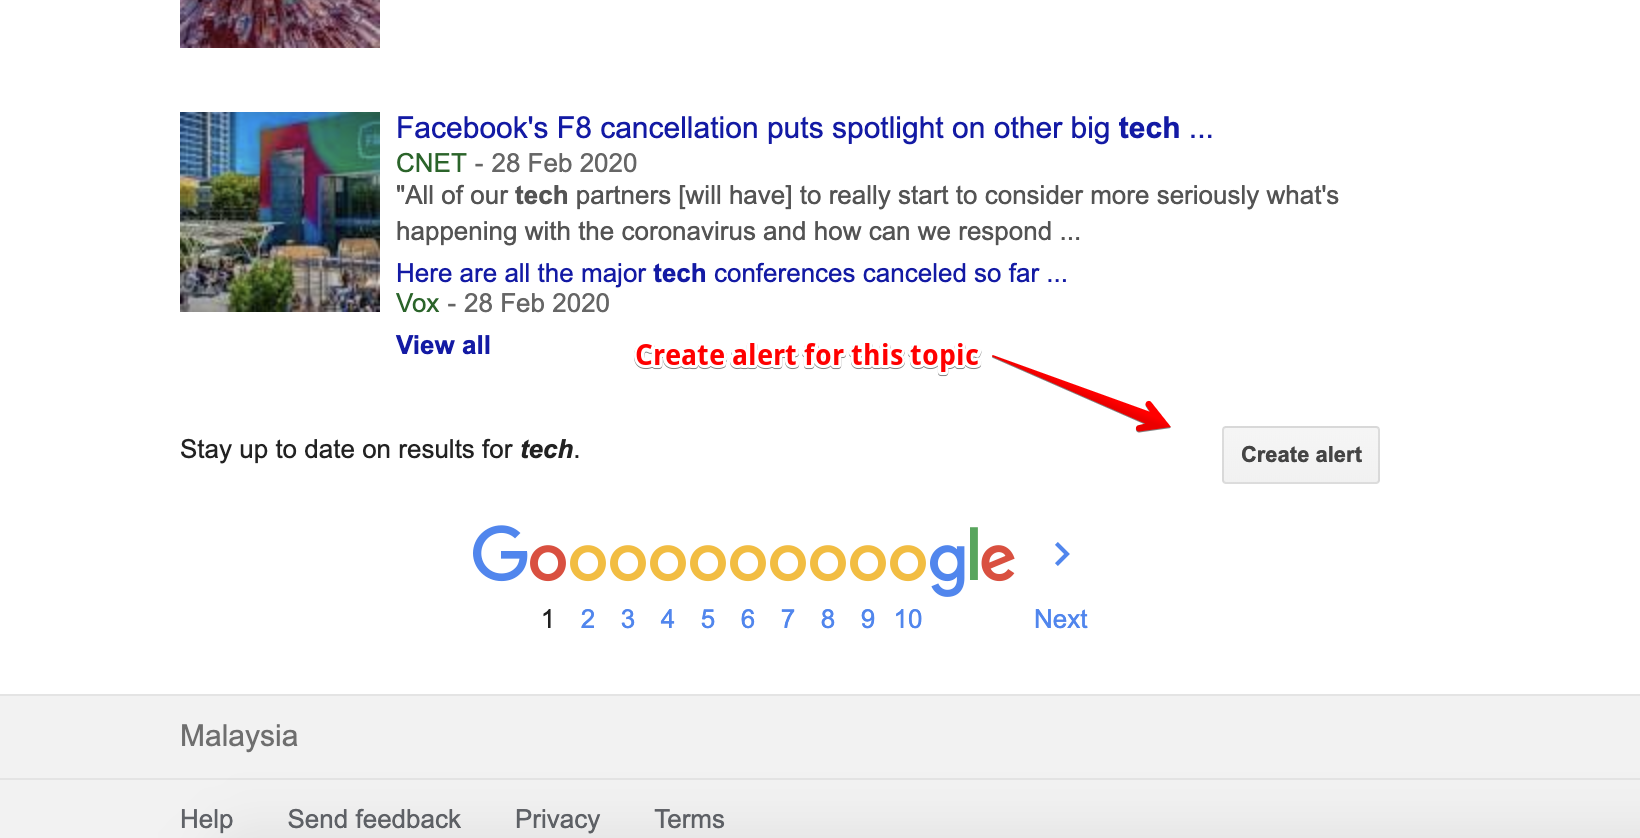
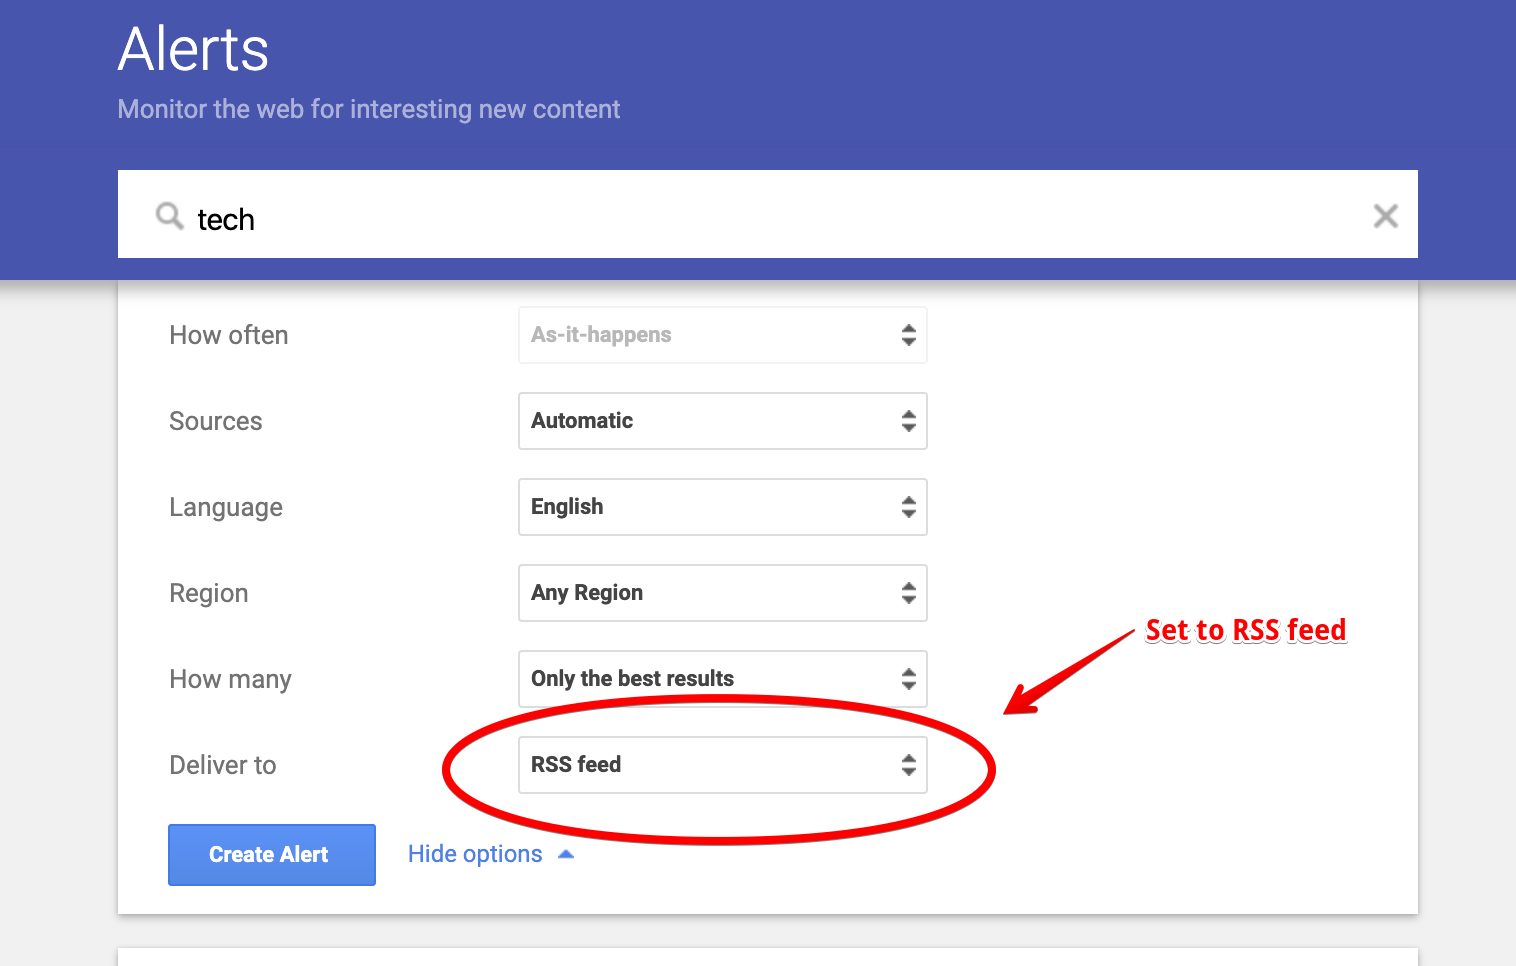
RSS Feeds
With all that out of the way, we are finally able to get to the most important part of this project, i.e. fetching and saving news articles. With some research, I realised that Google RSS feeds are a reliable way to find news articles related to a particular topic. The following images should be pretty self-explanatory.

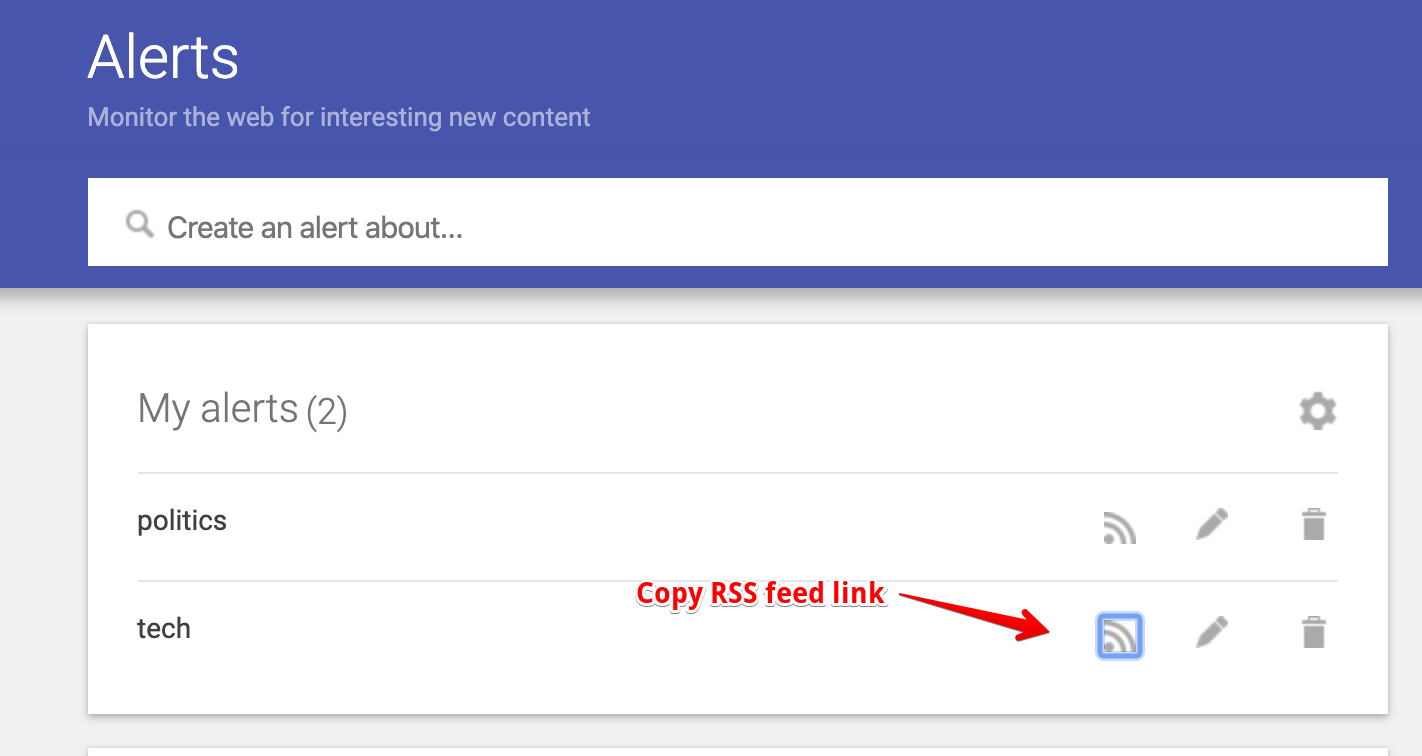
Now that we have a link to a RSS Feed that we can rely on to give us what we need, we write a little more code in helper.py to ingest data from this feed. This time we make use of another Python library called feedparser, what it does shouldn’t come as a surprise. The links to the RSS feeds should be saved in a separate file, i.e. topics.yml.
import re
import feedparser

with open("topics.yml",'r') as f: TOPICS = yaml.safe_load(f)

class RSSReader:
    def __init__(self, db, topic = 'tech'):
        assert topic in TOPICS.keys(), f"Your topic must be one of the following: {TOPICS.keys()}."
        self.topic = topic
        self.url = TOPICS[topic]
        self.id_regex = re.compile('feed\:(.*)$')
        self.url_regex = re.compile(r'url=(.*)&ct=')
        self.db = db

    def make_request(self):
        response = feedparser.parse(self.url)
        entries = response['entries']
        data = [self.filter_dict(entry, ['id', 'link', 'title', 'summary' , 'published']) for entry in entries]
        return data

    def filter_dict(self, dirty_dict, keys):
        res = {k:v for k,v in dirty_dict.items() if k in keys}
        res['id'] = self.parse_id(res['id'])
        res['link'] = self.parse_url(res['link'])
        res['topic'] = self.topic
        return res

    def parse_id(self, id_string):
        match = self.id_regex.search(id_string)
        return match[1] if match else id_string

    def parse_url(self, url_string):
        match = self.url_regex.search(url_string)
        return match[1] if match else url_string

    def fetch_and_write(self):
        docs = self.make_request()
        data = [doc for doc in docs if self.db.id_not_exists(doc['id'])]
        self.db.write_many_to_db(data)
This class will be instantiated with a instance of a DatabaseAdapter and a topic, it will then parse the Google RSS feed for news articles that haven’t already been inserted into the database and insert them in bulk to the relevant collection.
Cloud Build
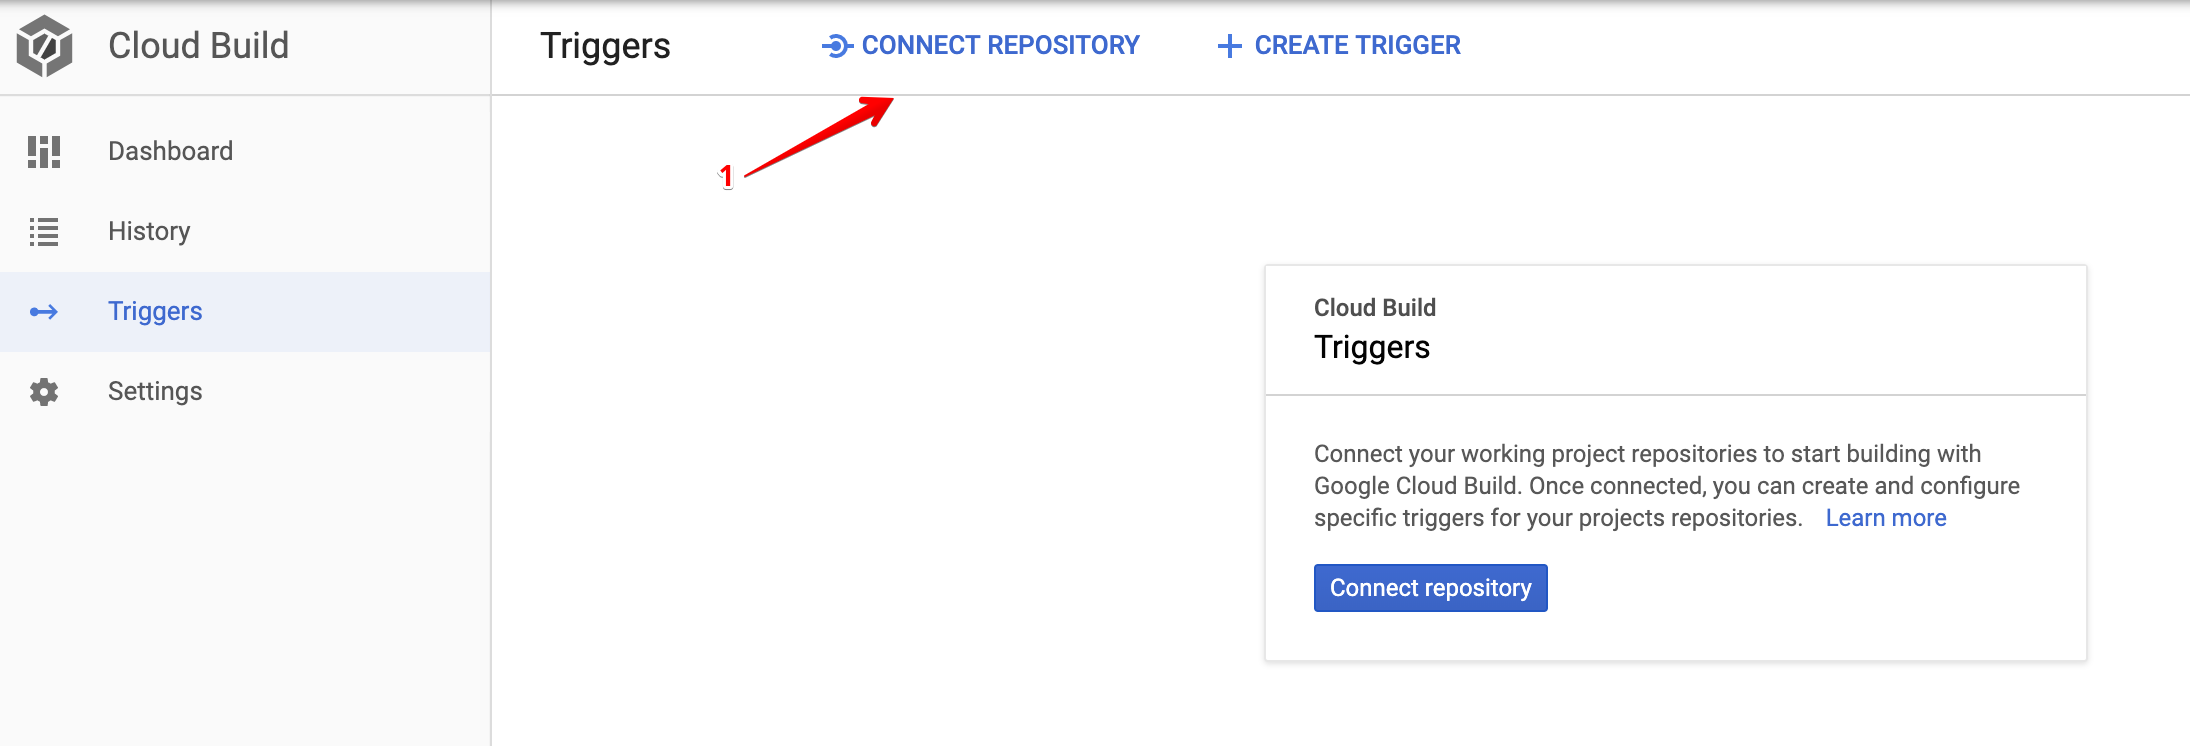
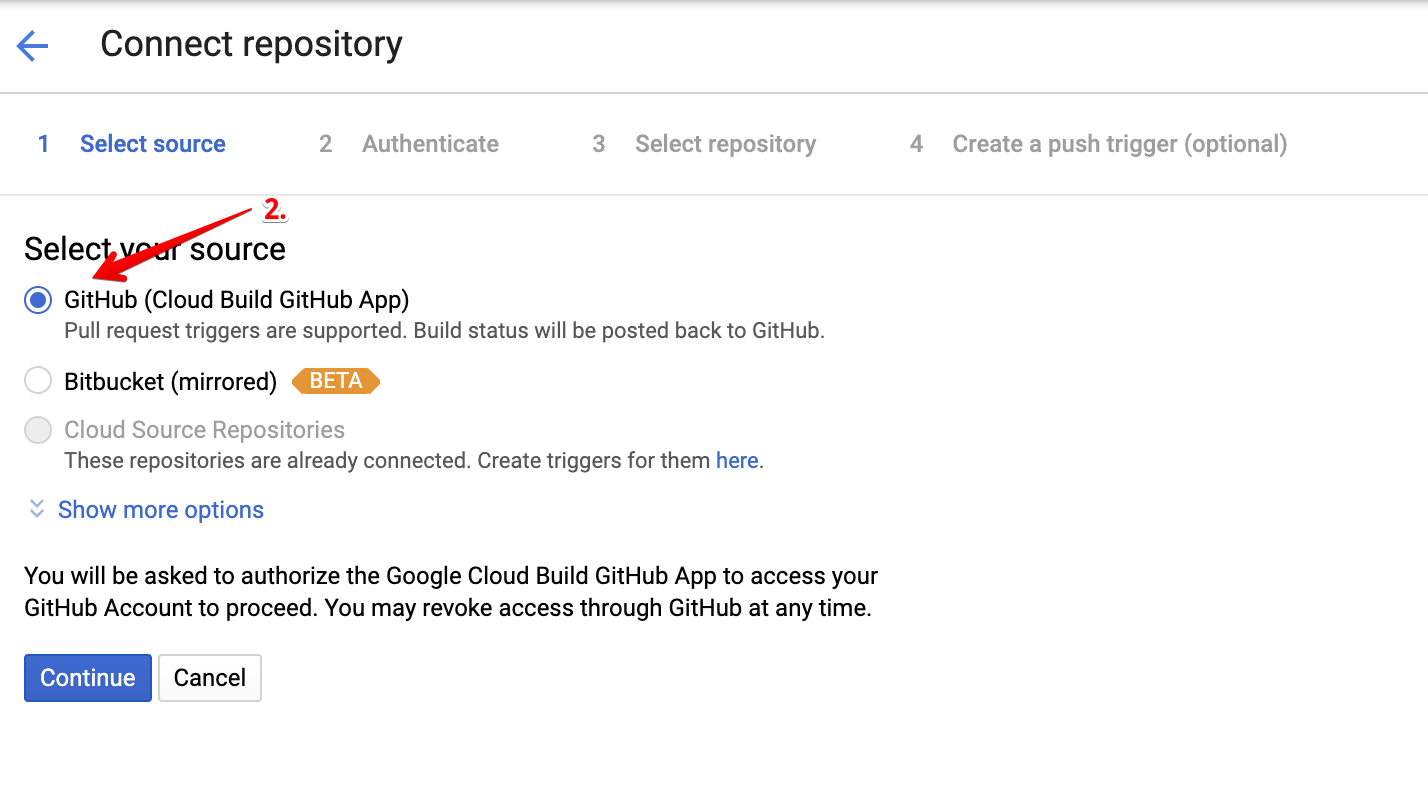
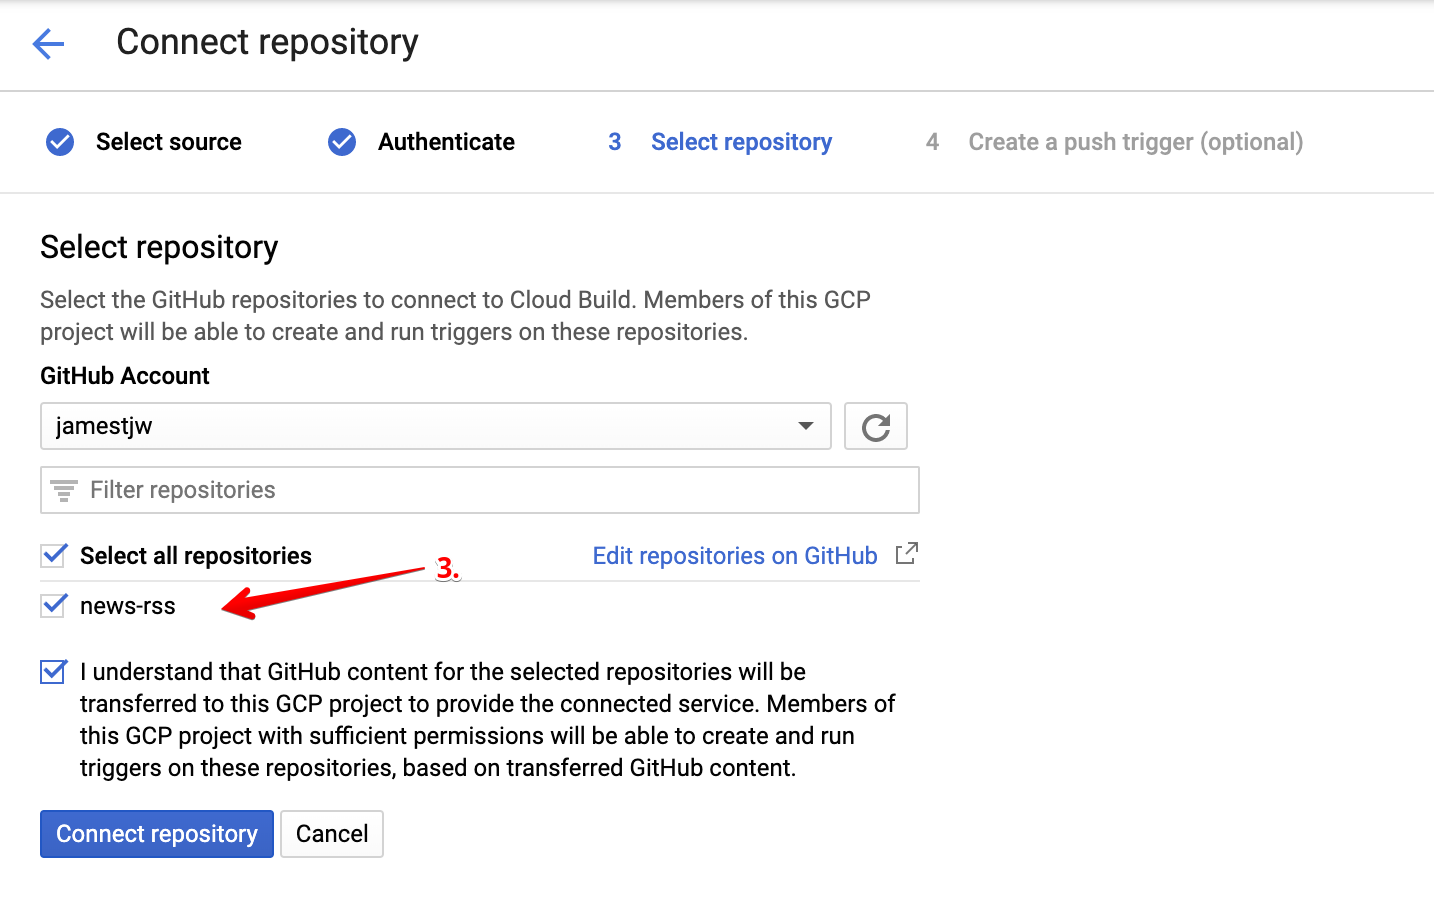
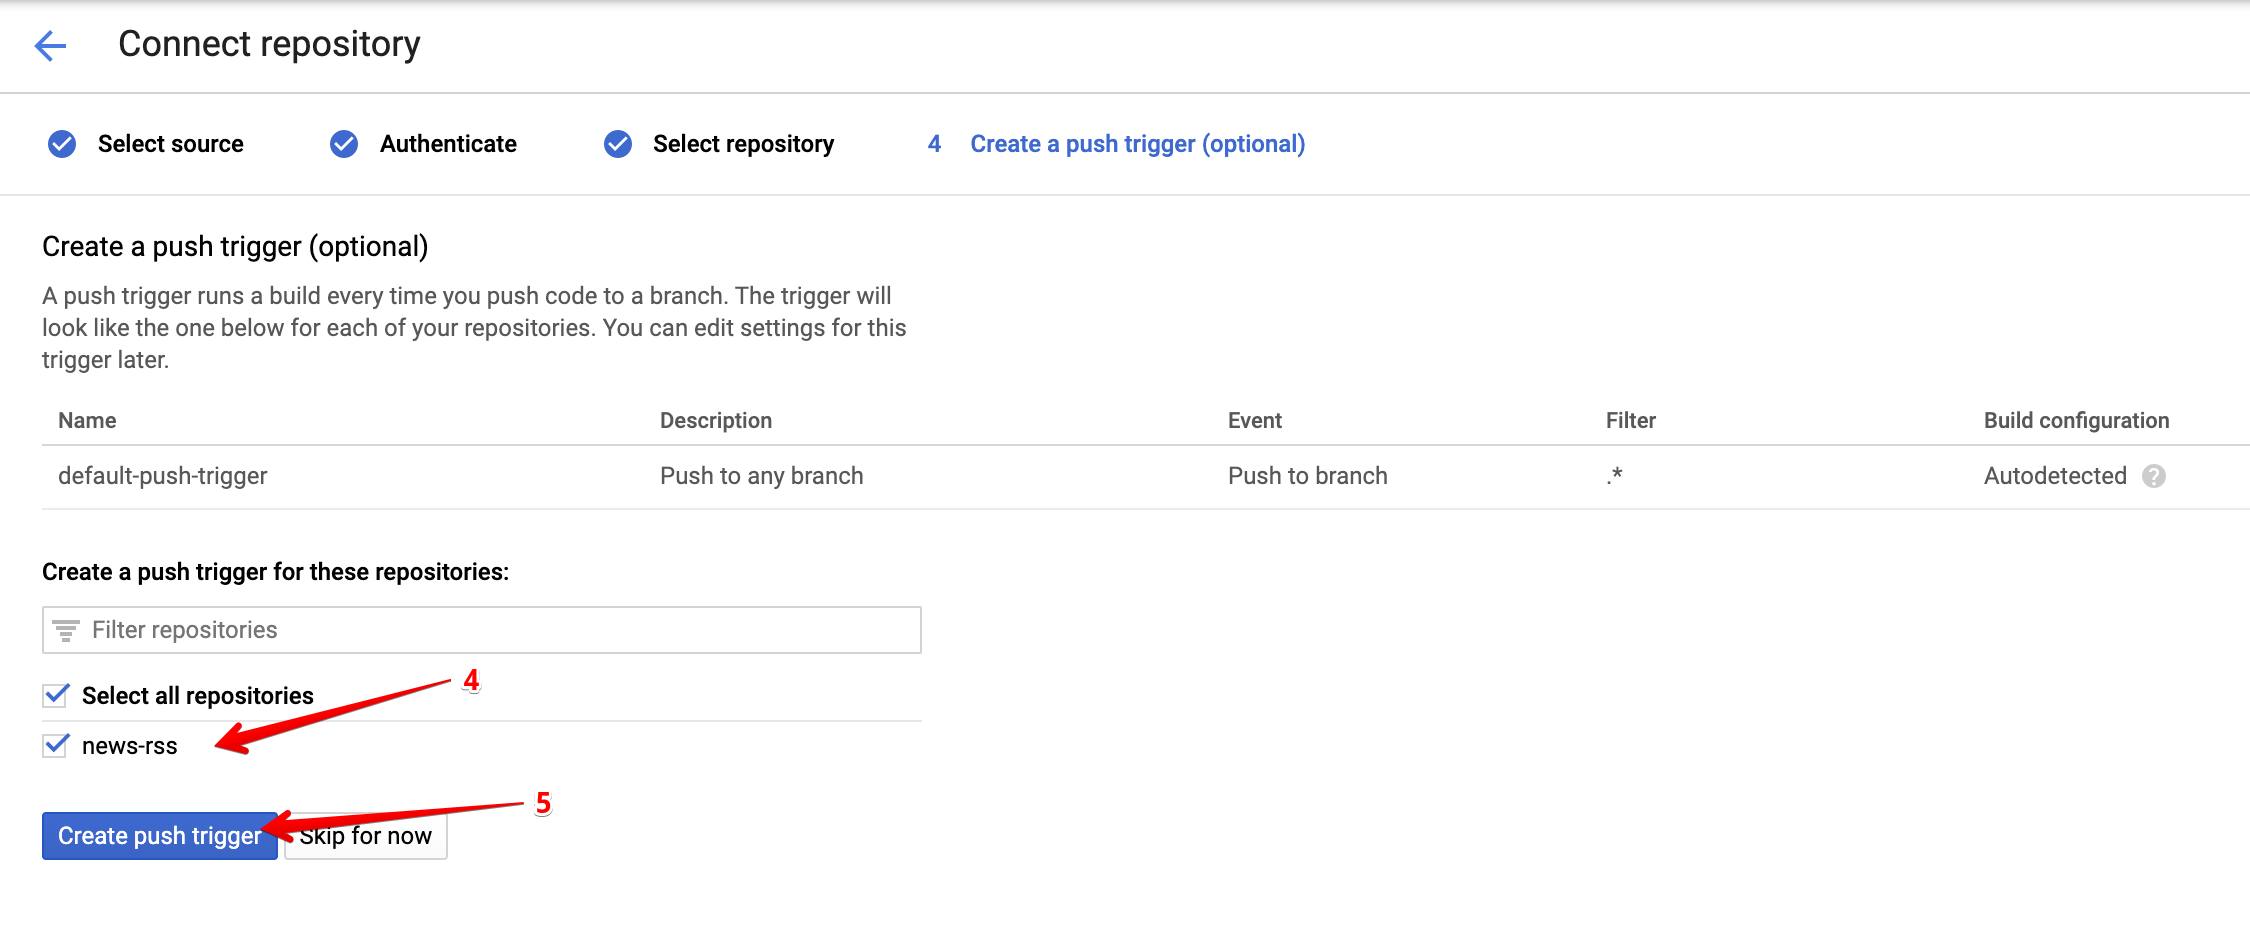
Our GCF is now ready to be deployed! But as we mentioned before, we do not want to build and deploy it locally. Instead, we will push all of our code in a Git repository and let Google Cloud Build do all the hard work for us! Whenever new changes are pushed to the repository, Cloud Build will automatically redeploy a new version of our GCF with the changes that we have made, how cool is that?
First, push your code to a Github repository, consult this tutorial if you are new to this. Next, follow the steps below to connect your repo to Code Build.
Deployment Service Account
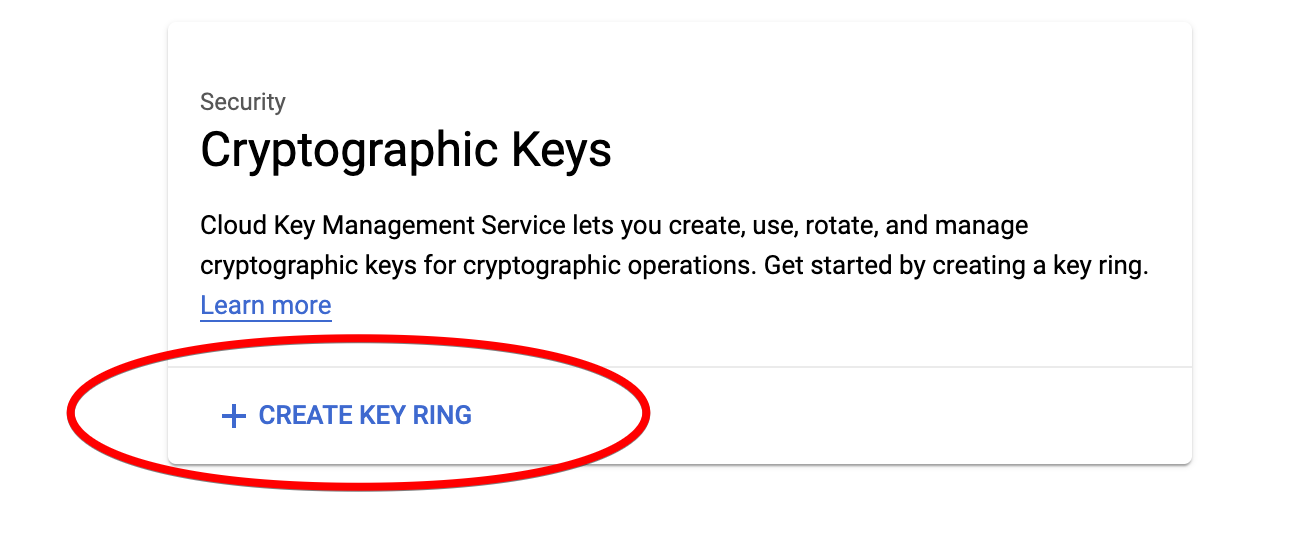
Remember the service account that you created earlier (based on the Serverless guide), i.e. the one that produced the credentials that you have stored at ~/.gcloud/keyfile.json? Since our deployment happens in Cloud Build, we need to provide Cloud Build with the credentials of a service account that is capable of deploying our function. HOWEVER, we do not want to push the json file with our credentials into a Git repo. What we will do instead is push an encrypted version of it to our repo, and let Cloud Build decrypt it right before deploying our function.
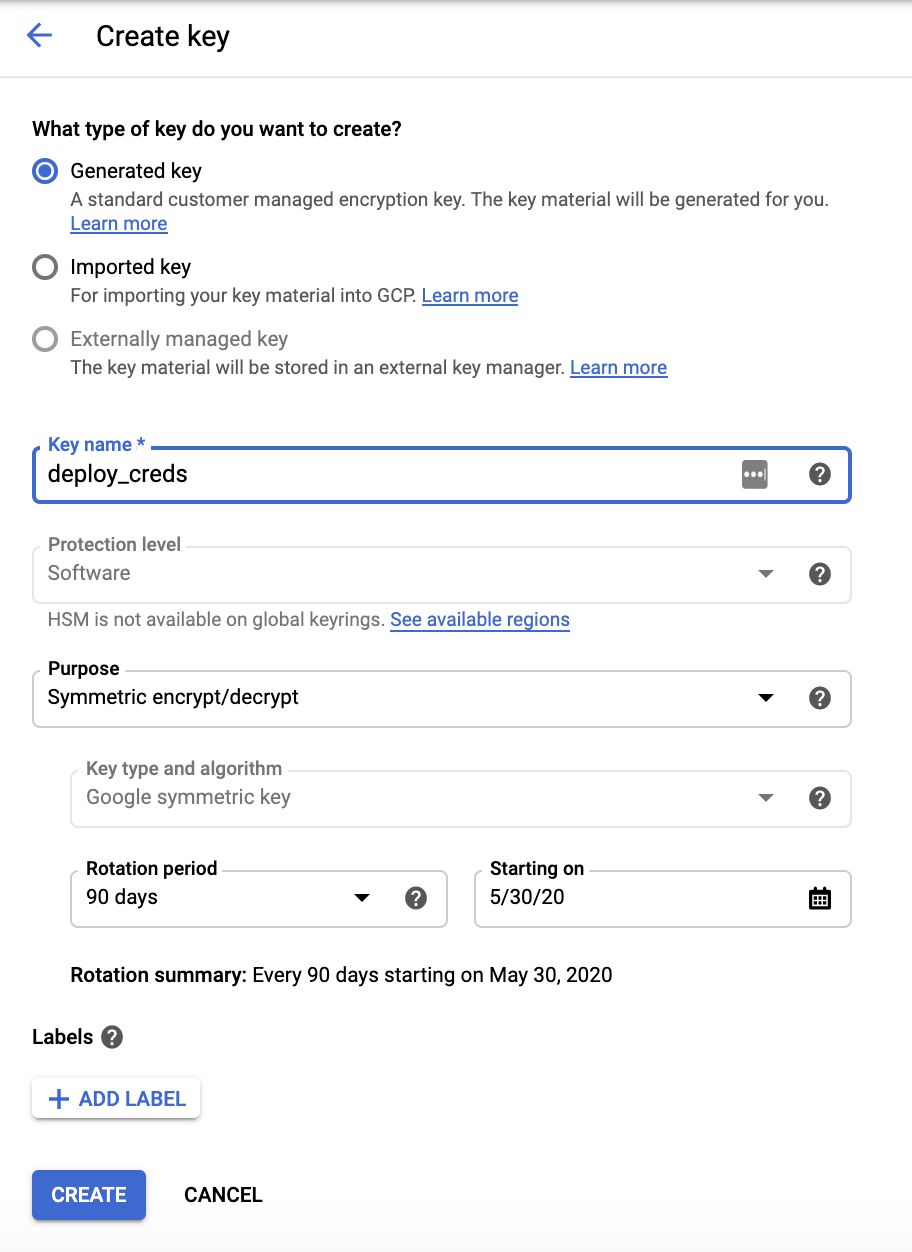
To encrypt our key, we will need the help of Cloud Key Management Service. Follow the steps below to create a keyring for this purpose.
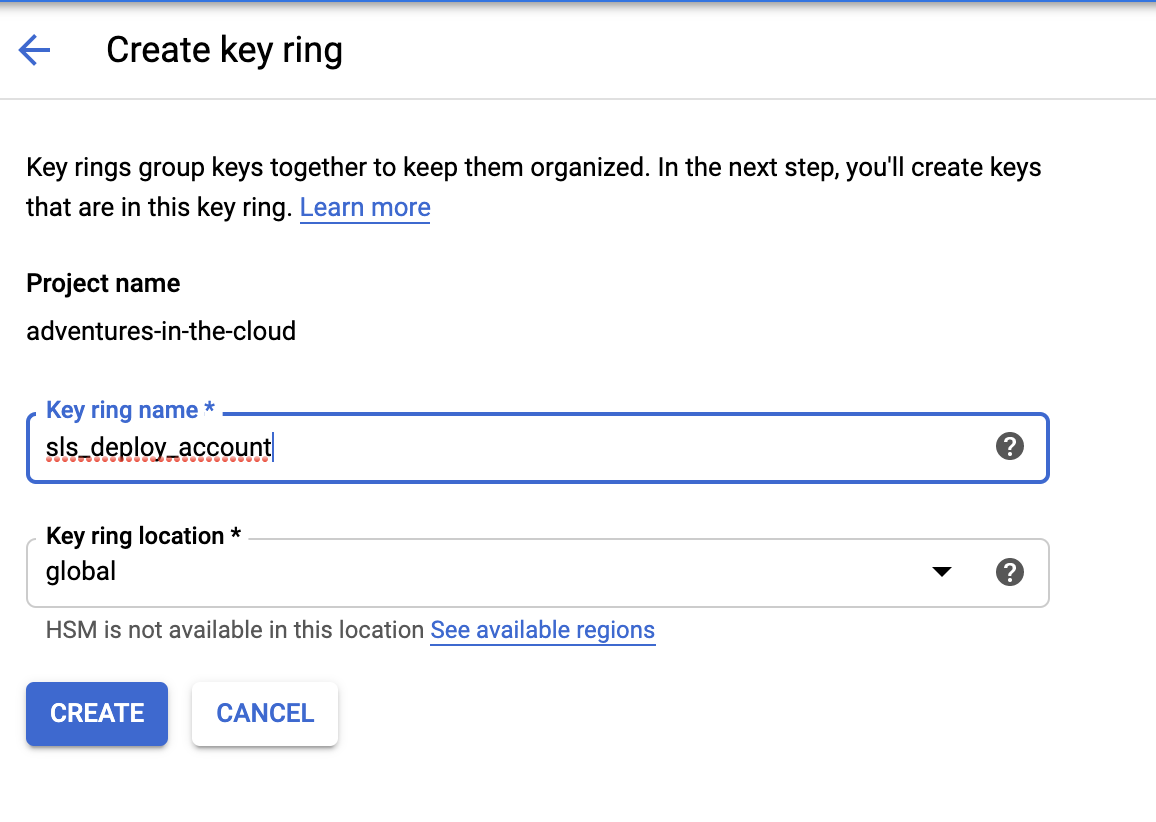
Encrypt keyfile.json
Now that we have KMS successfully setup, we need to use our new key to encrypt our credentials. There are numerous ways to do this, personally I did it in the CLI. You will have to use the Key ring name and Key name you set above.
gcloud kms encrypt \
  --location global \
  --keyring sls_deploy_account \
  --key deploy_creds \
  --plaintext-file ~/.gcloud/keyfile.json \
  --ciphertext-file keyfile.json.enc
This should produce a keyfile.json.enc file that should be placed in the root directory of the repository. We can safely push this file into the repo since one would need a special key to be able to decrypt it.
Configure cloudbuild.yaml
The next time you push changes to your repository, Cloud Build will search for a cloudbuild.yaml file in your repository and do its thing. Clearly, the next step is for us to put the right configurations in the cloudbuild.yaml file.
steps:
  # STEP 1
  - name: 'gcr.io/cloud-builders/npm'
    id: 'Install node_modules based on package.json'
    args: ['install']
  # STEP 2
  # NOTE: npx is used as workaround to allow serverless command to be found
  # https://github.com/serverless/serverless/issues/4889
  - name: 'gcr.io/cloud-builders/npm'
    id: 'Install npx'
    args: ['install', '-g', 'npx']
  # STEP 3
  - name: 'gcr.io/cloud-builders/npm'
    id: 'Install Serverless framework using npm'
    args: ['install', '-g', 'serverless@1.61.0']
  # STEP 4
  - name: gcr.io/cloud-builders/gcloud
    args:
      - kms
      - decrypt
      - --ciphertext-file=keyfile.json.enc
      - --plaintext-file=keyfile.json
      - --location=global
      - --keyring=${_KEYRING}
      - --key=${_KEY}
  # STEP 5
  - name: 'gcr.io/cloud-builders/npm'
    id: 'Deploy serverless framework'
    entrypoint: bash
    args: ['-c', 'npx serverless deploy -v']
substitutions:
  _KEYRING: sls_deploy_account
  _KEY: deploy_creds
Once again, you will have to put your Key ring name and Key name in this file. These are the exact steps that will be run by codebuild in order to deploy your Serverless function.
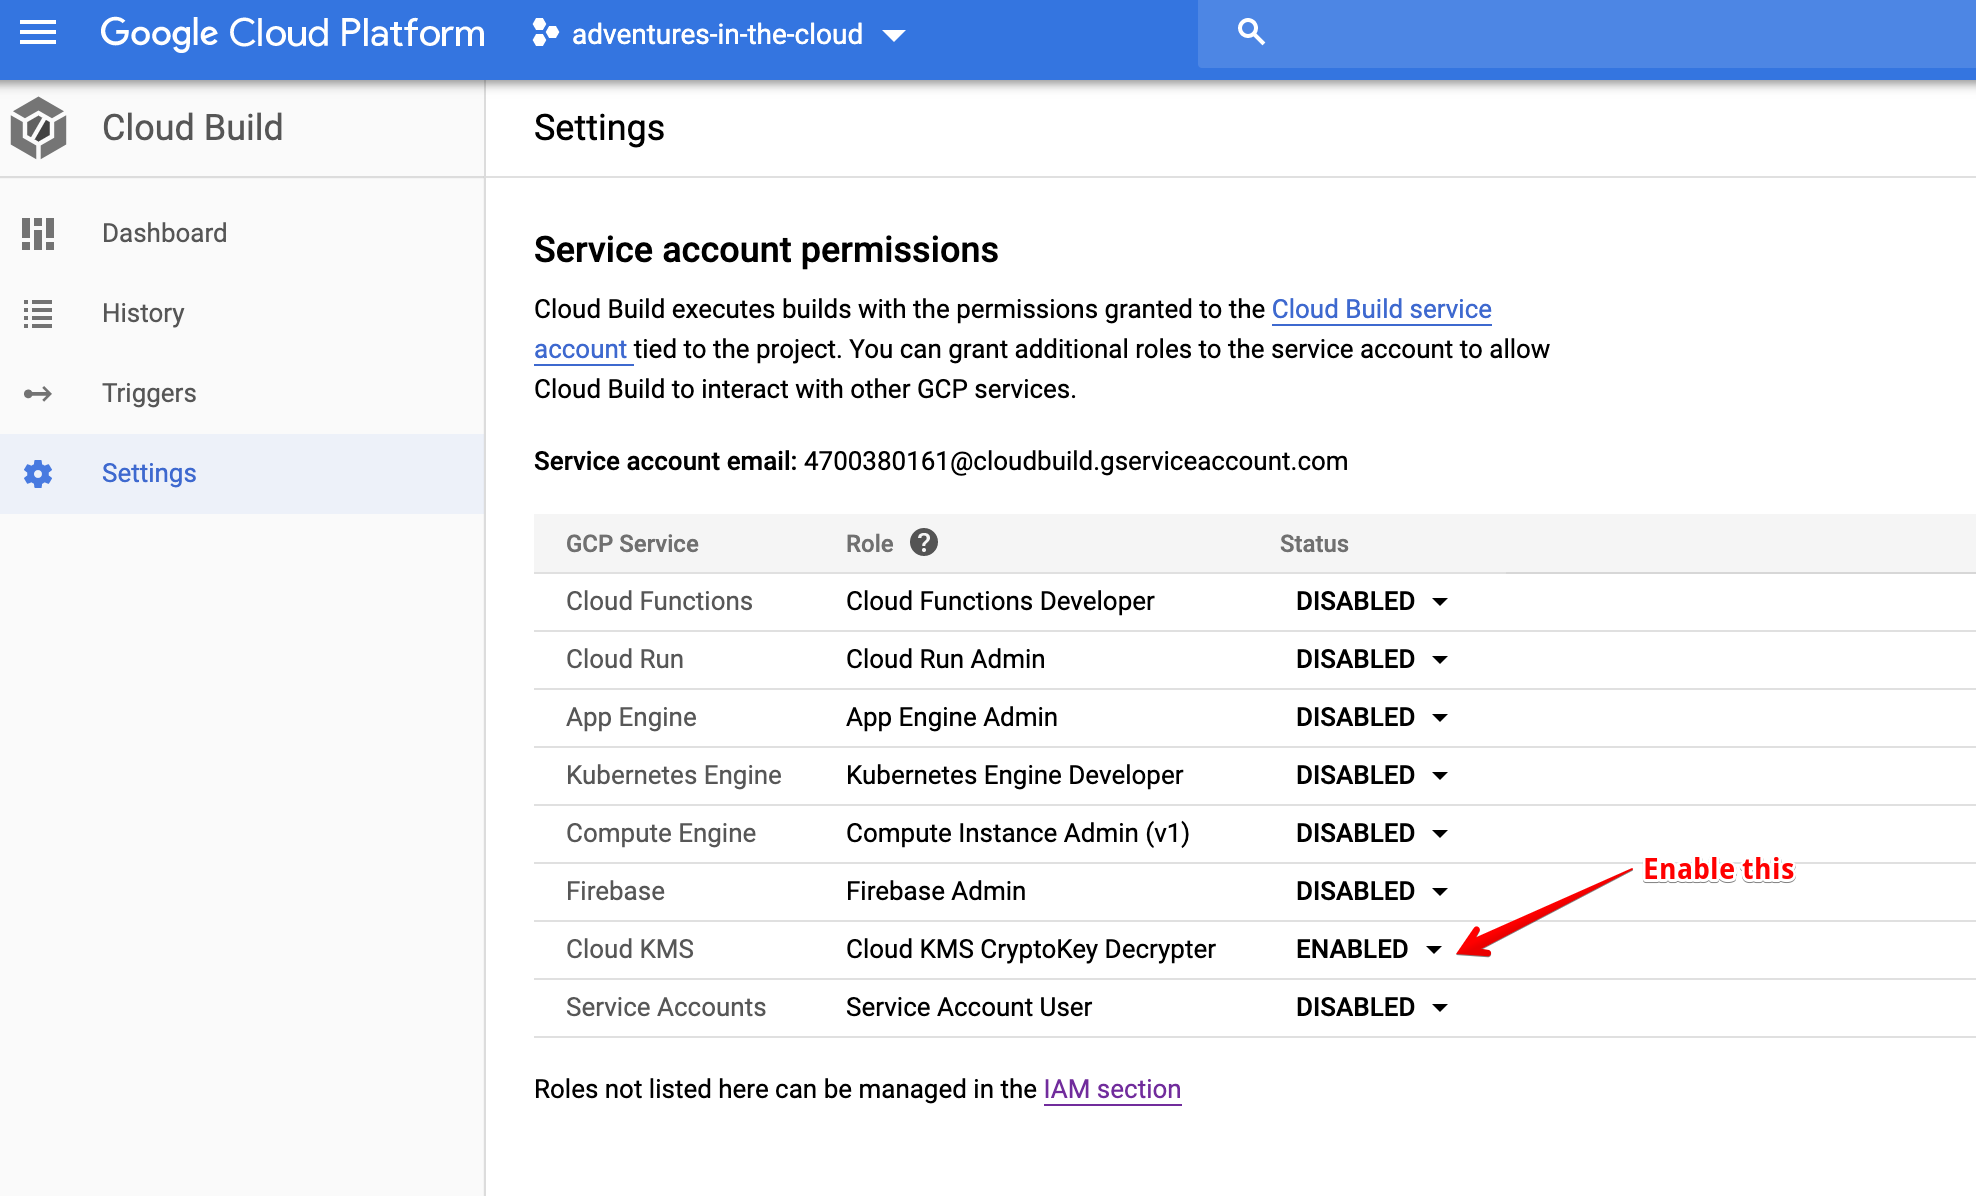
As you can see, the 4th step decrypts the encrypted key that we have in our repository. Code Build does all its work in the /workspace/ directory, and this explains why at the start we mentioned that the decrypted keyfile should be able to be found at /workspace/keyfile.json.
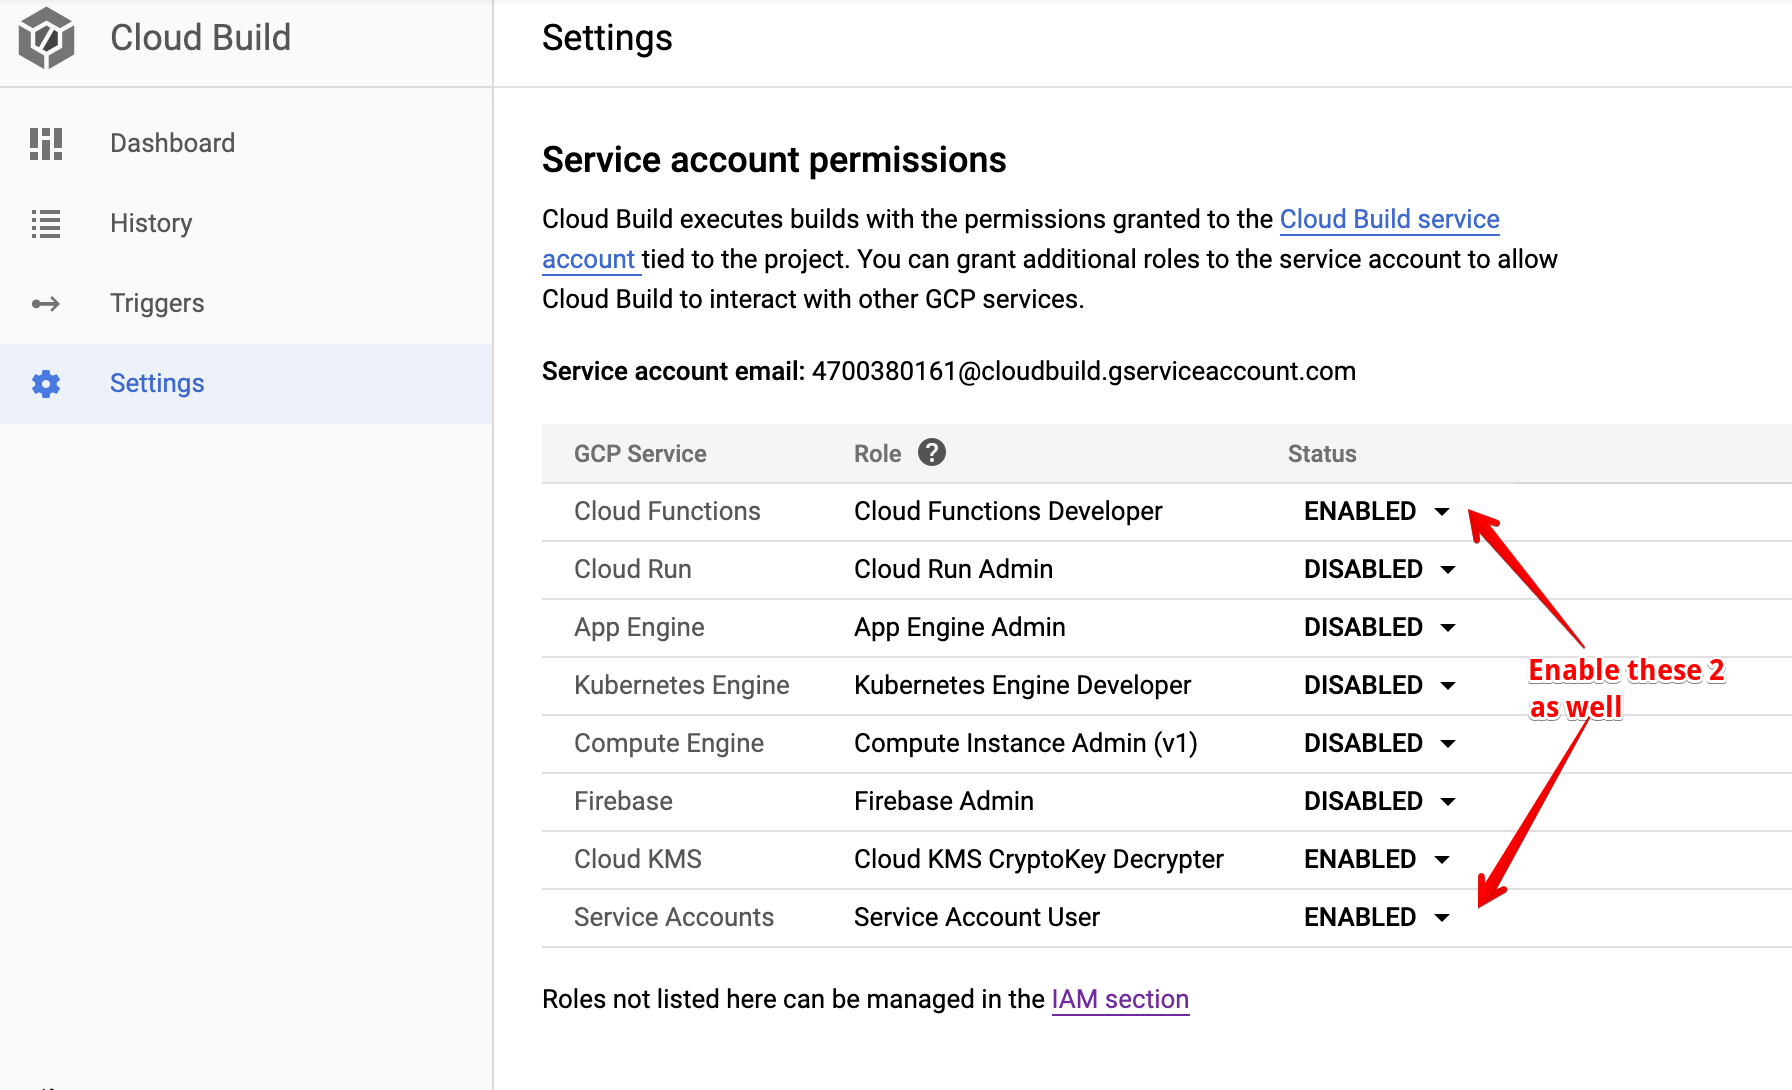
Enable Cloud Build to Decrypt Key We also need to give Cloud Build permission to decrypt our credentials using KMS, we can do it in the Settings section of Cloud Build.
We are Done Almost Done!
We are at the last leg of the race, now that we have made the necessary changes, we should push it to our repo (to trigger a deployment in Cloud Build). After making a push, you can visit the Cloud Build console to track the progress of your build.
And halfway through the build process, UH-OH what just happened!??
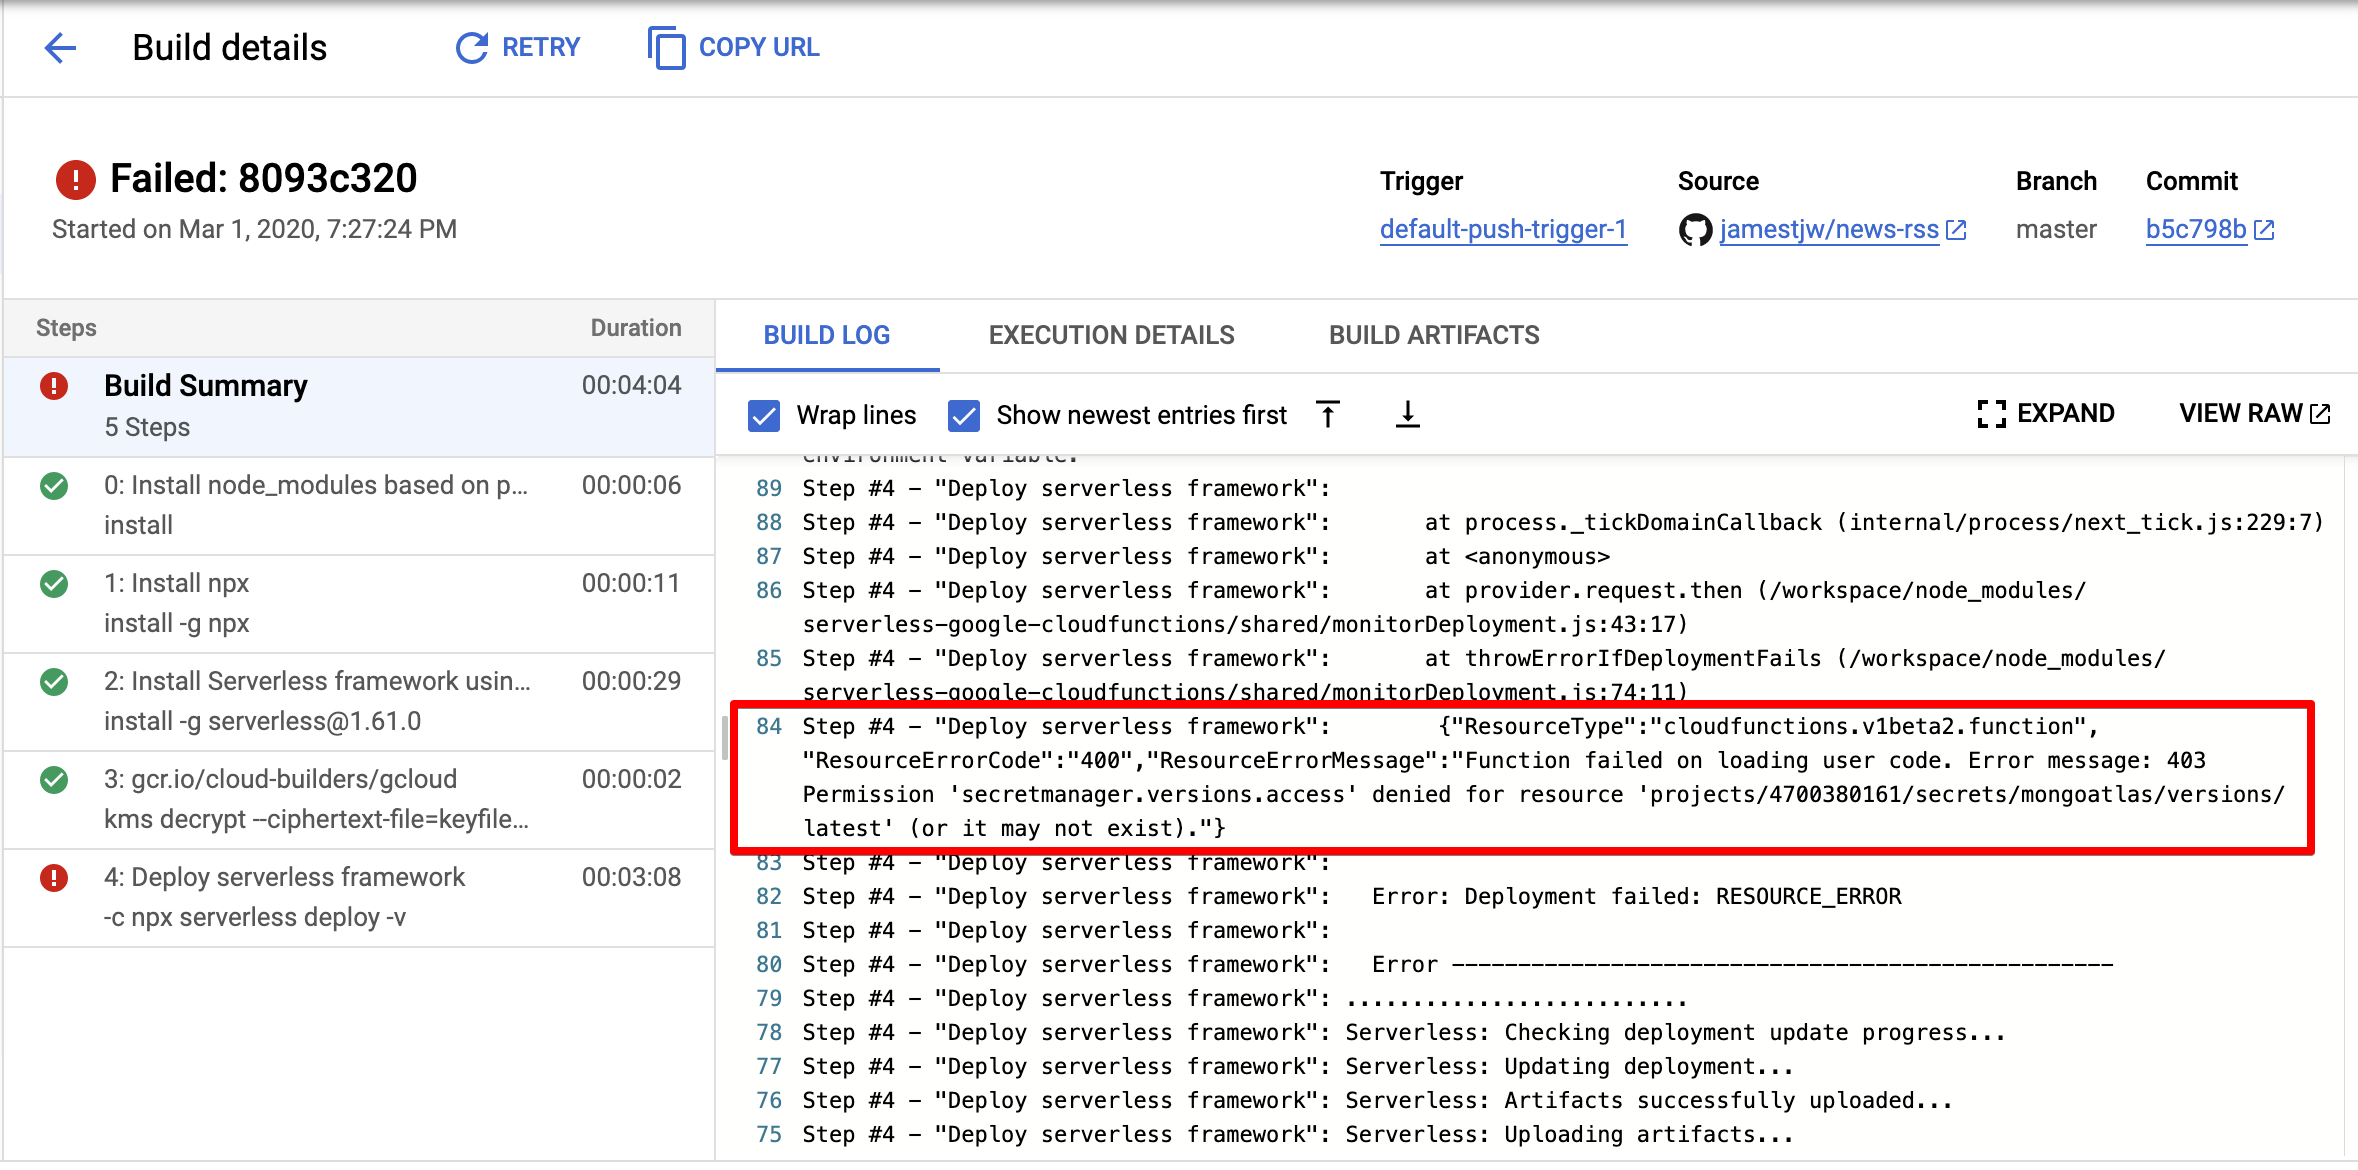
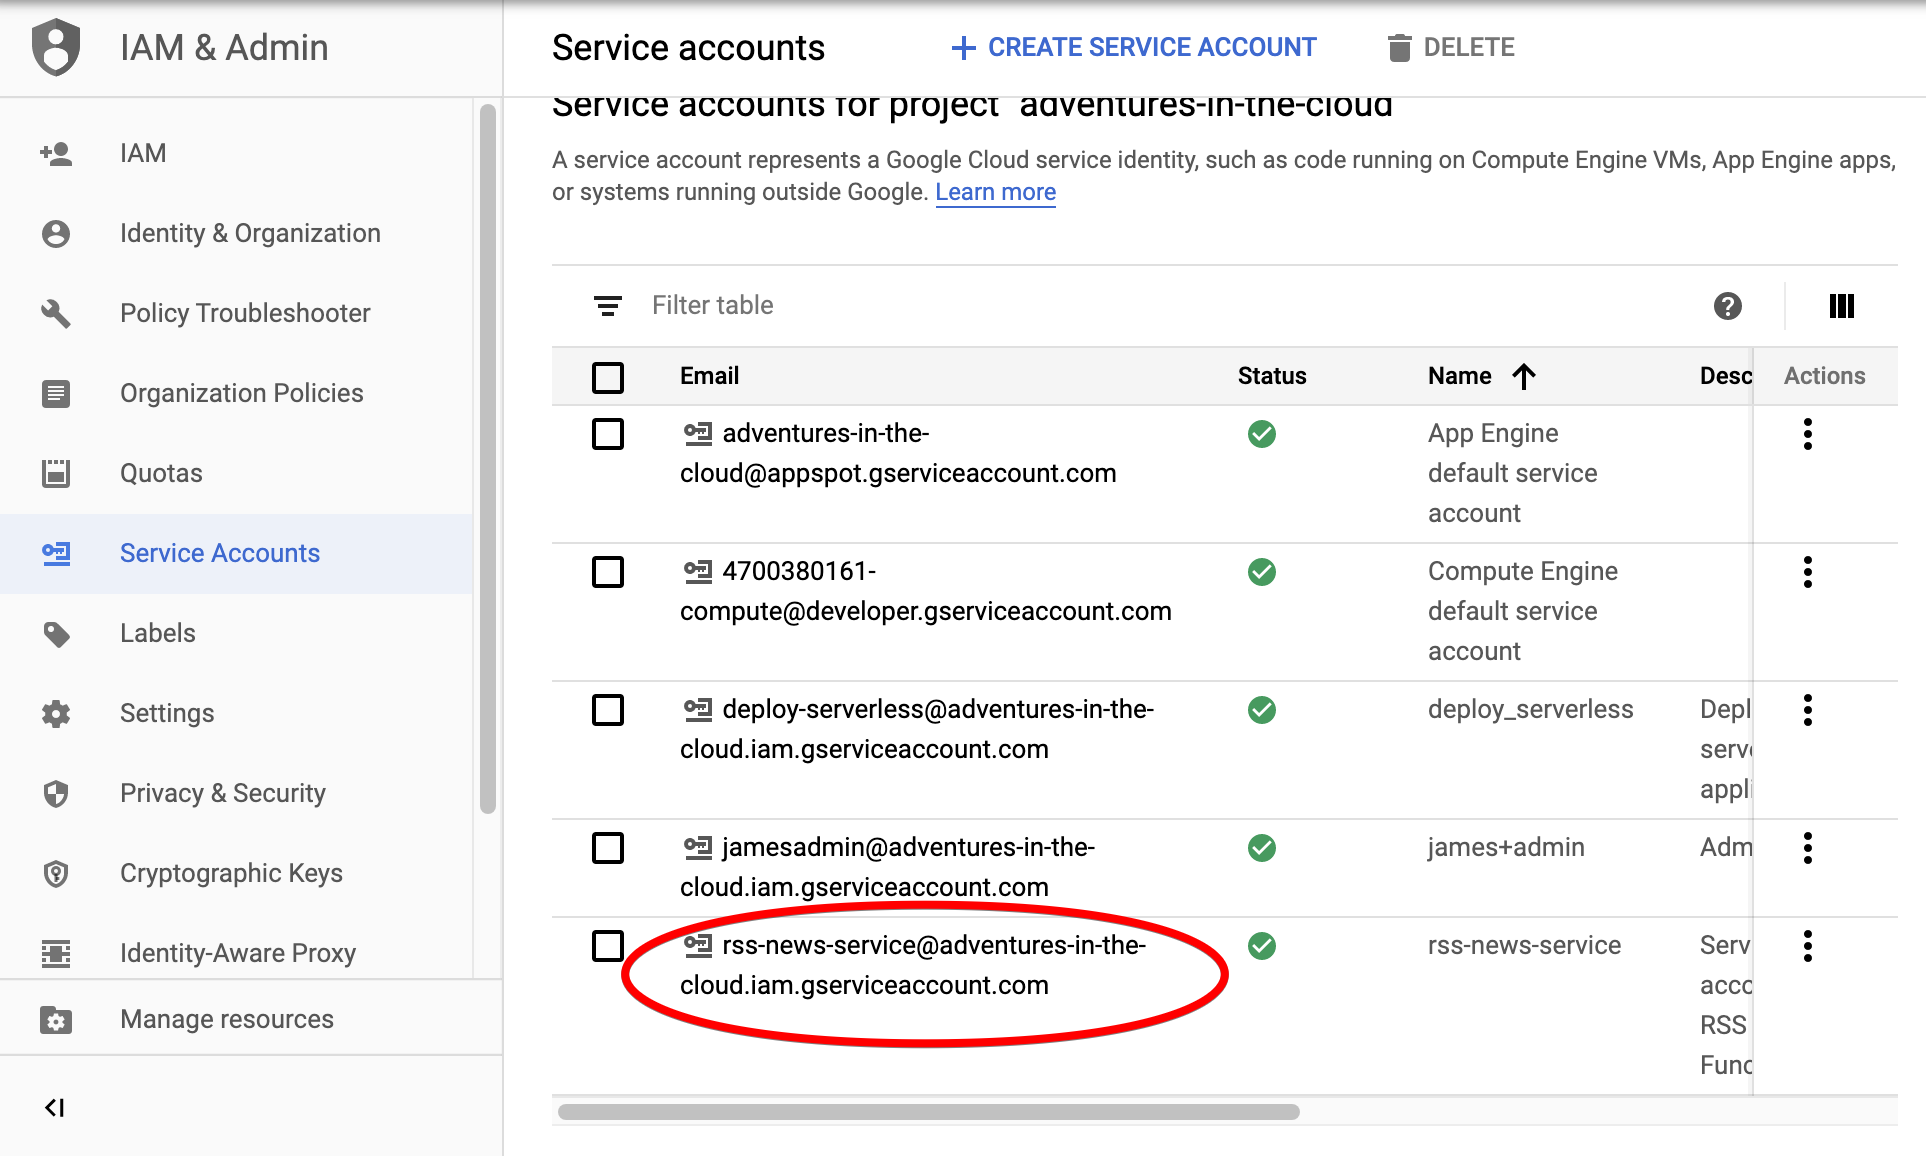
New Service Account
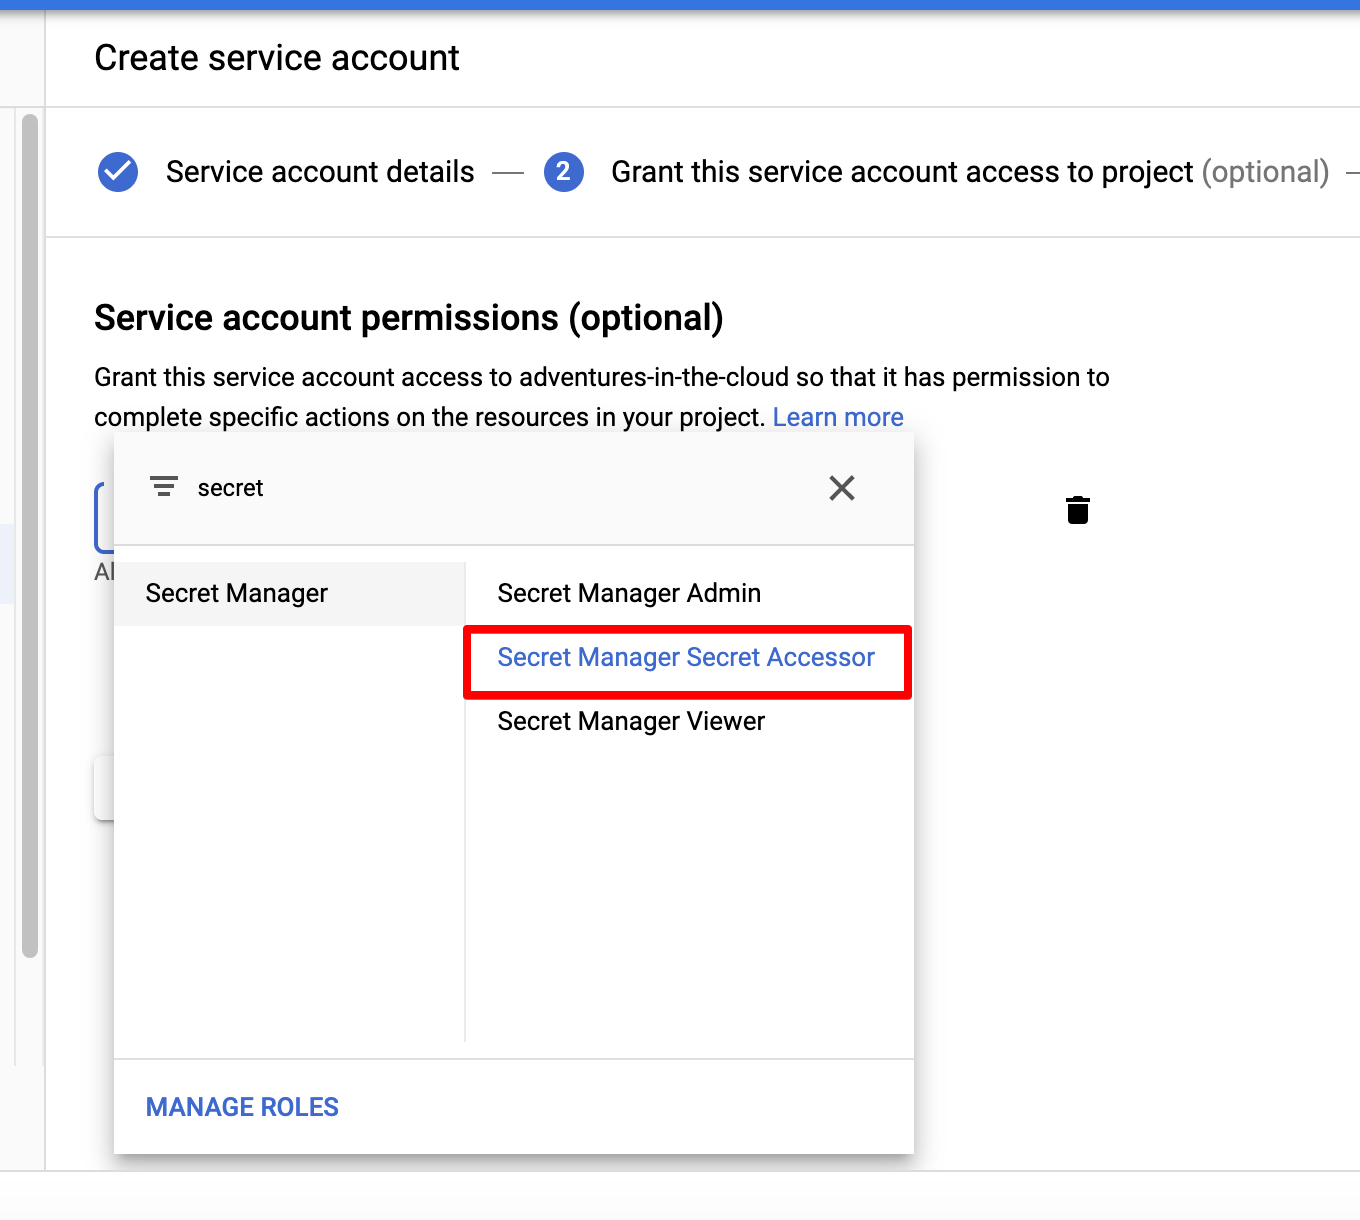
And this shouldn’t come as a surprise, remember that our Cloud Function fetches the credentials of our database from Secret Manager? Each new Cloud Function by default gets assigned a default Service Account, this default Service Account is not authorised to access secrets in Secret Manager.
The solution is simple, we shall create a new Service Account and assign it to our function. The steps required to achieve this are simple:
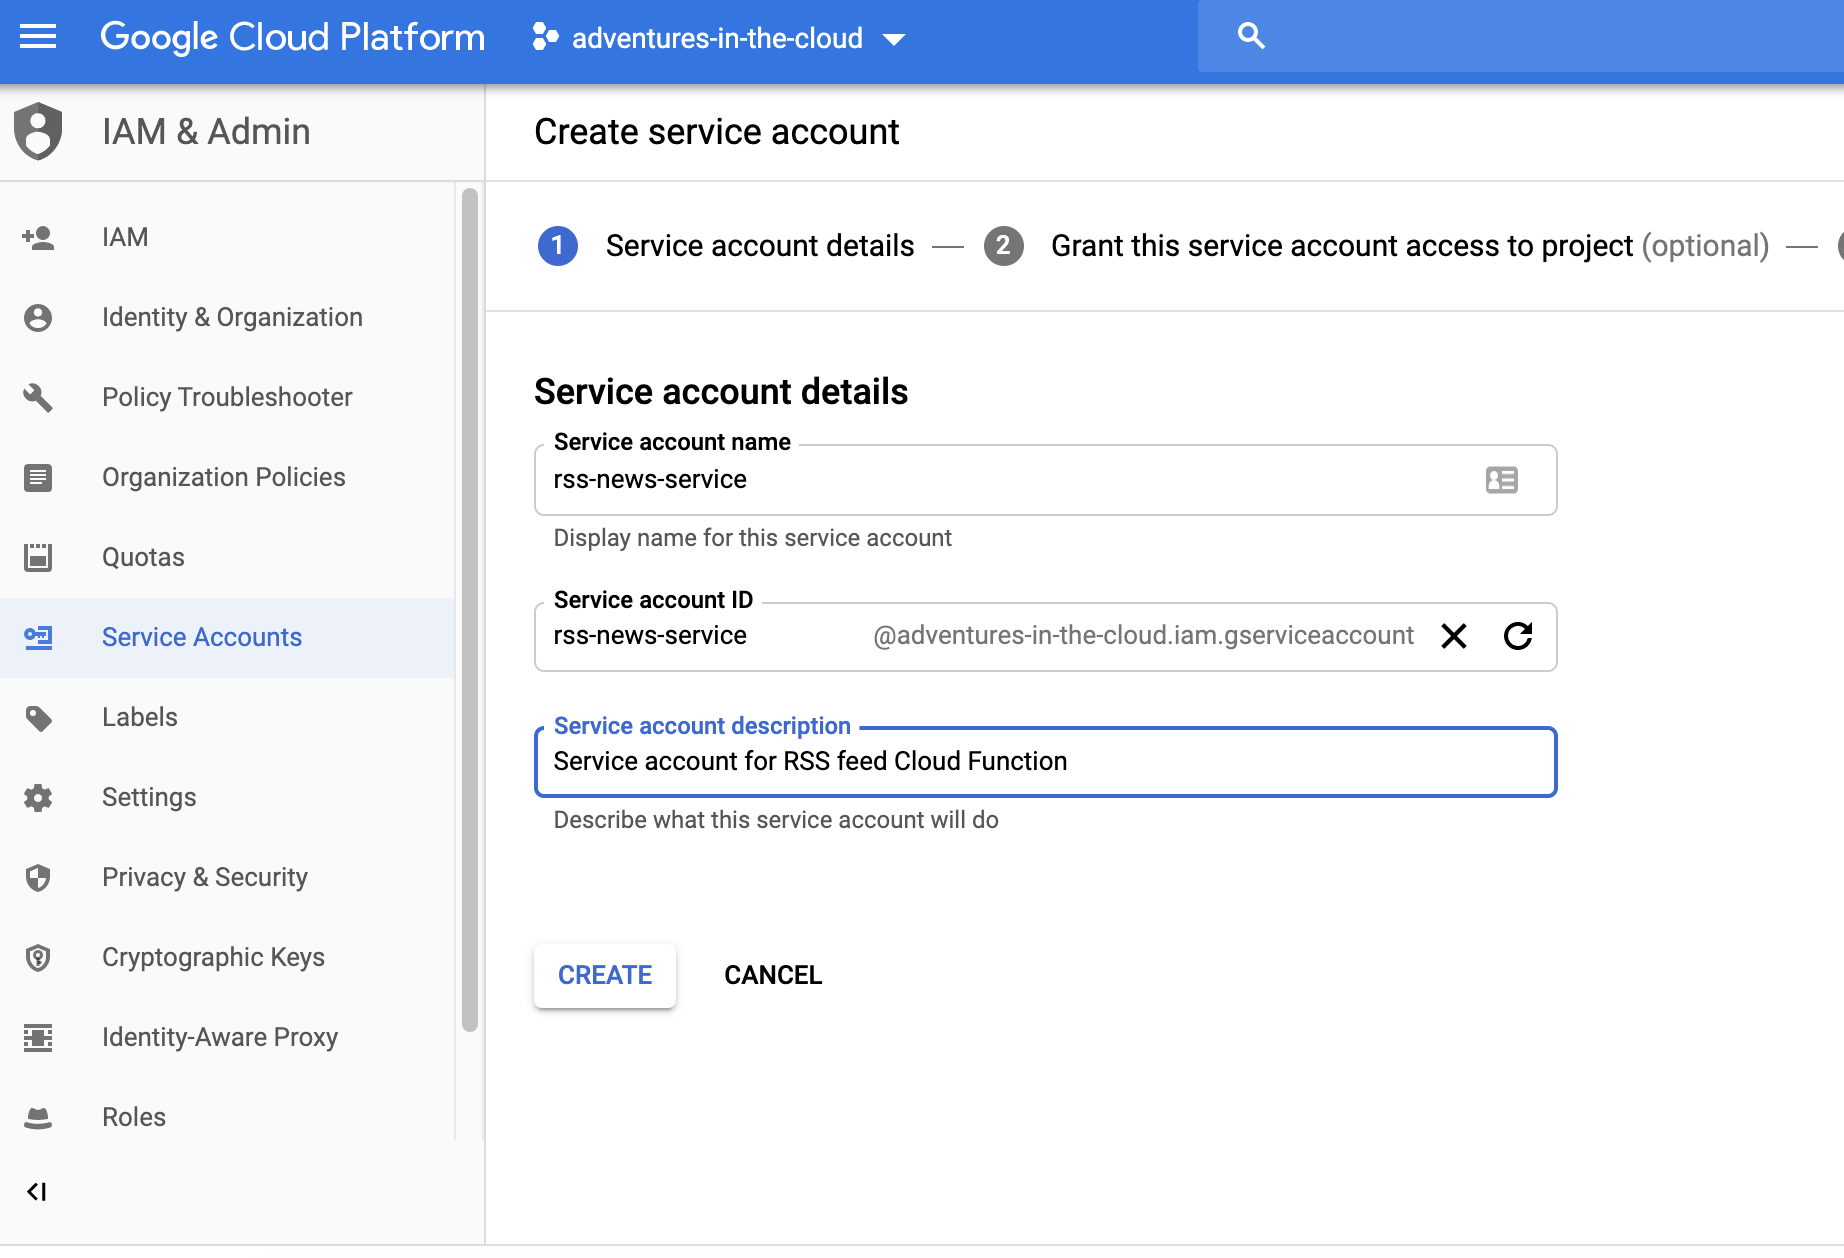
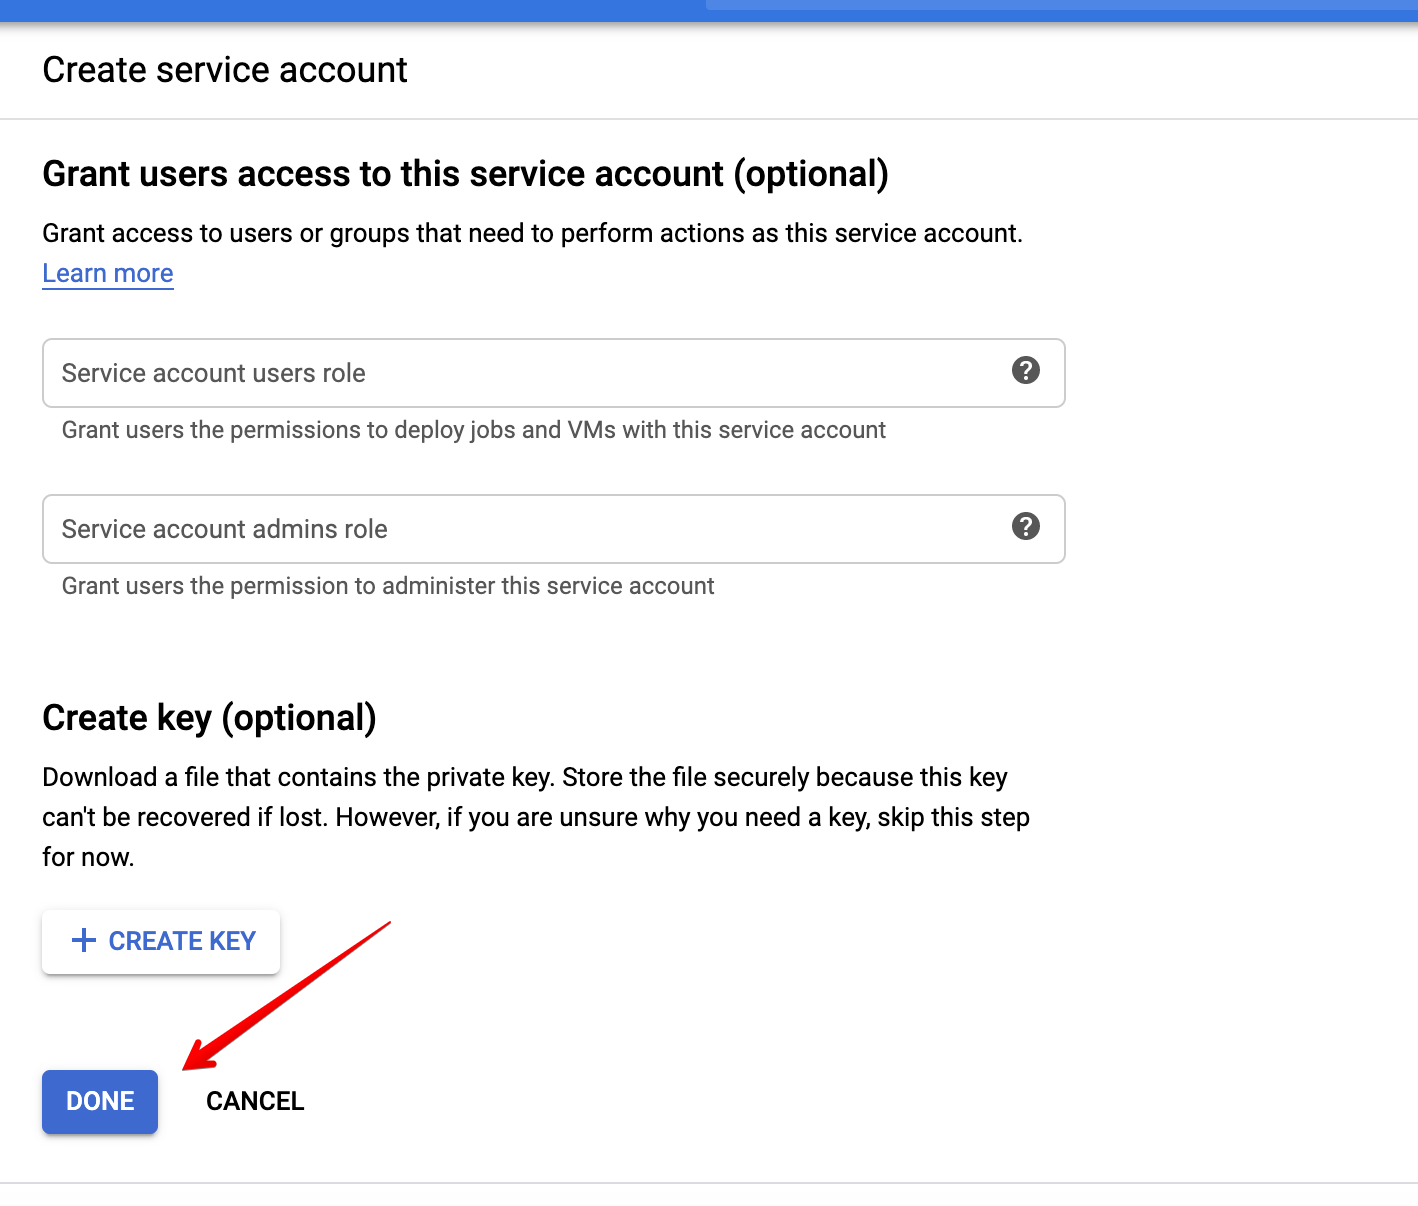
All that is left to do is assigning this Service Account to our function. Edit the existing function that was unsuccessfully deployed and attach this new account to it like below.
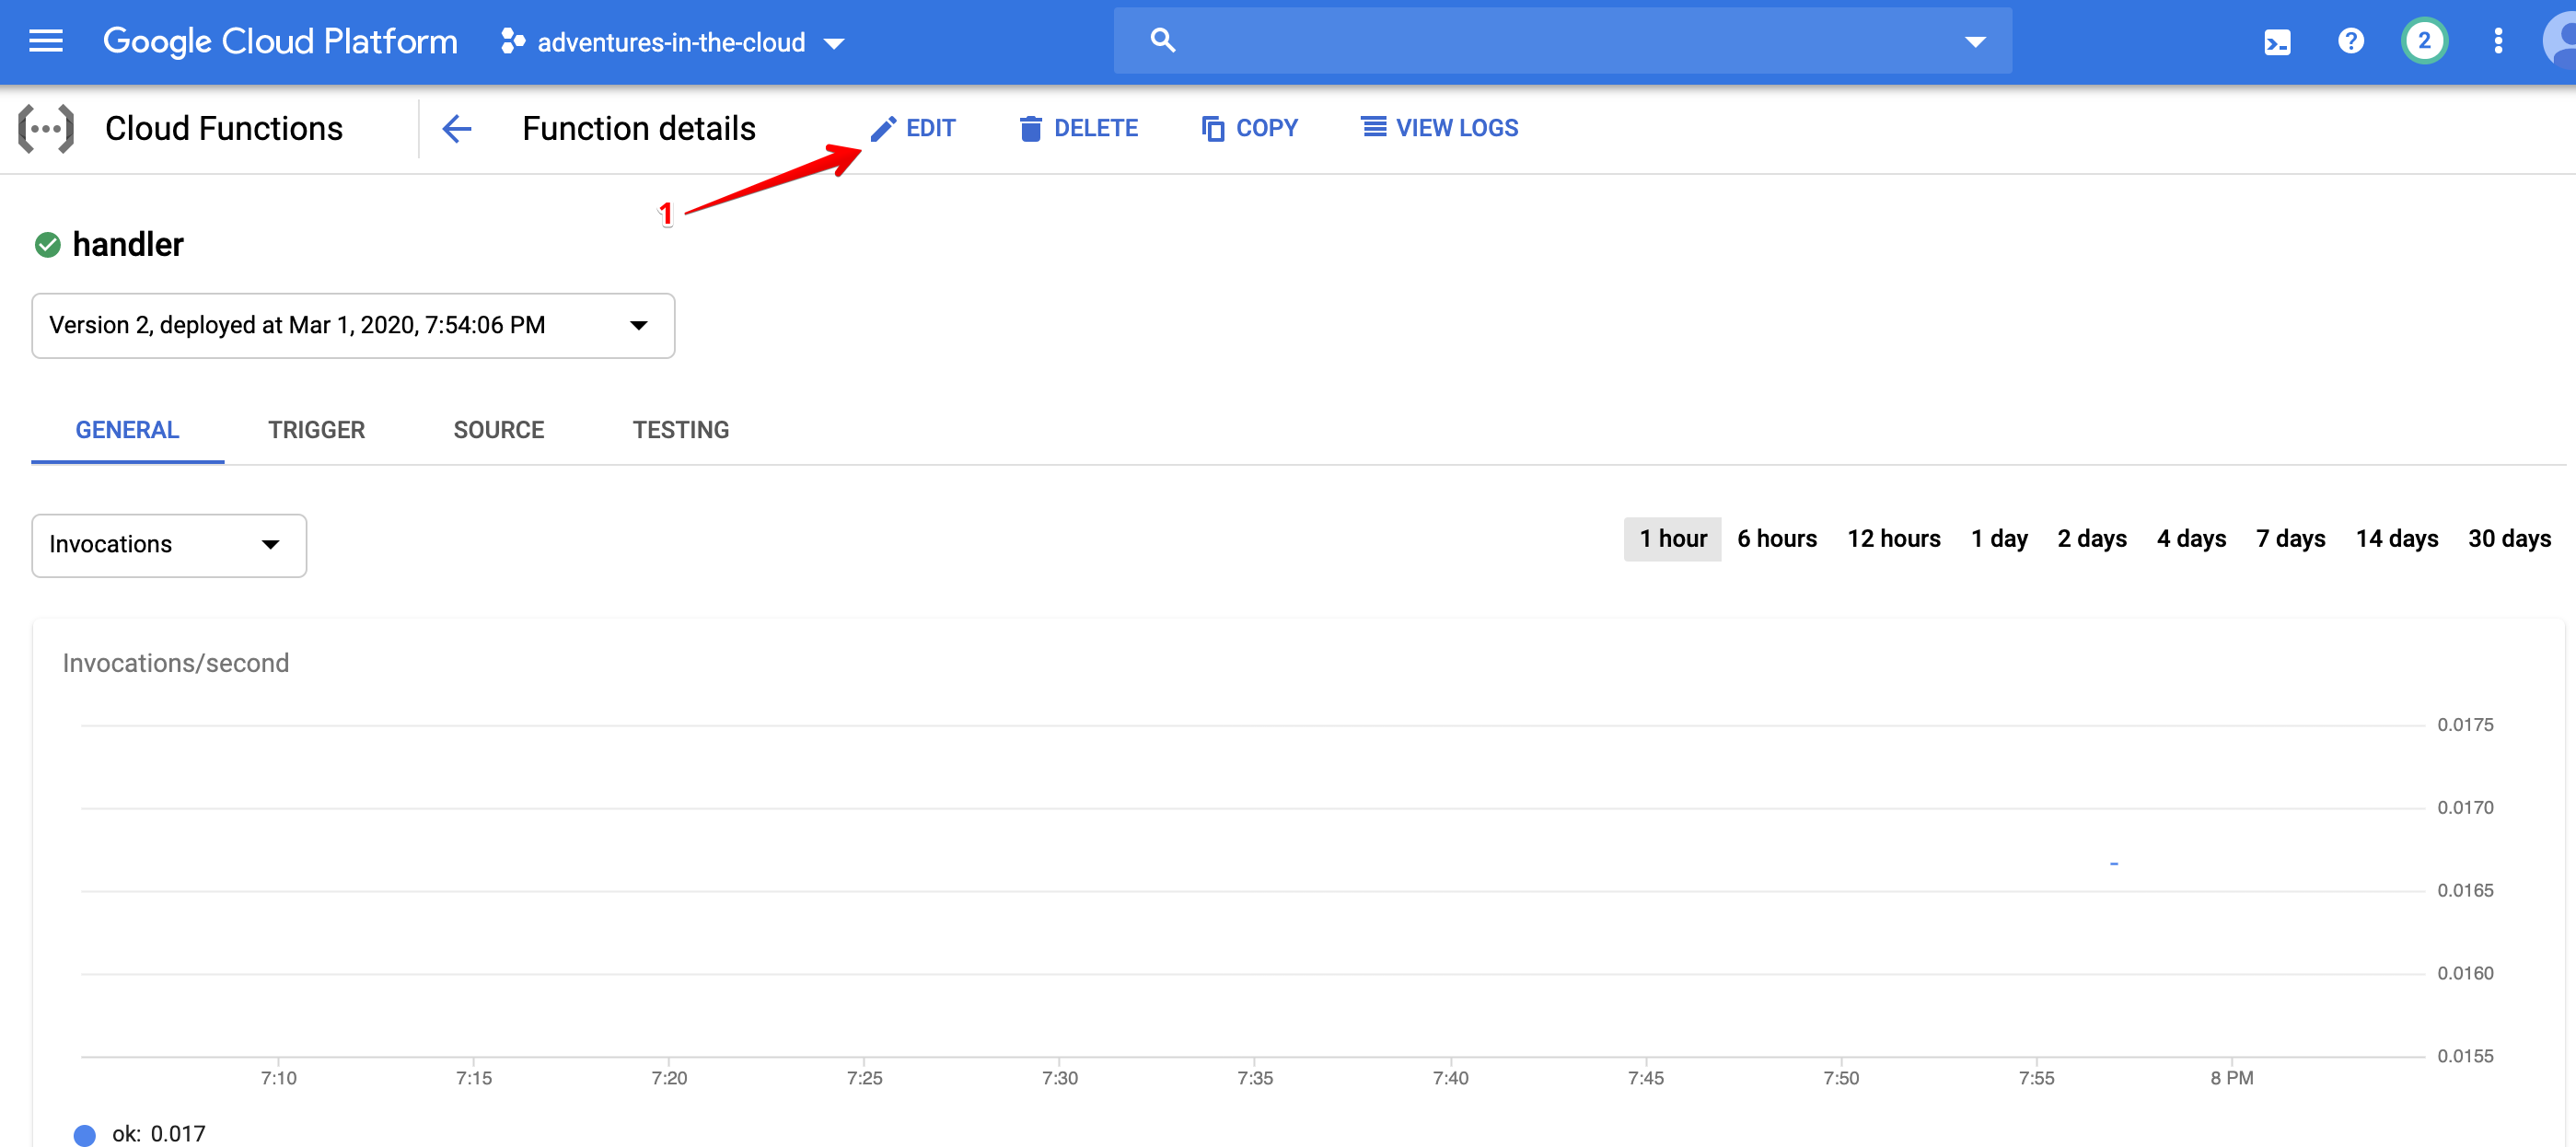
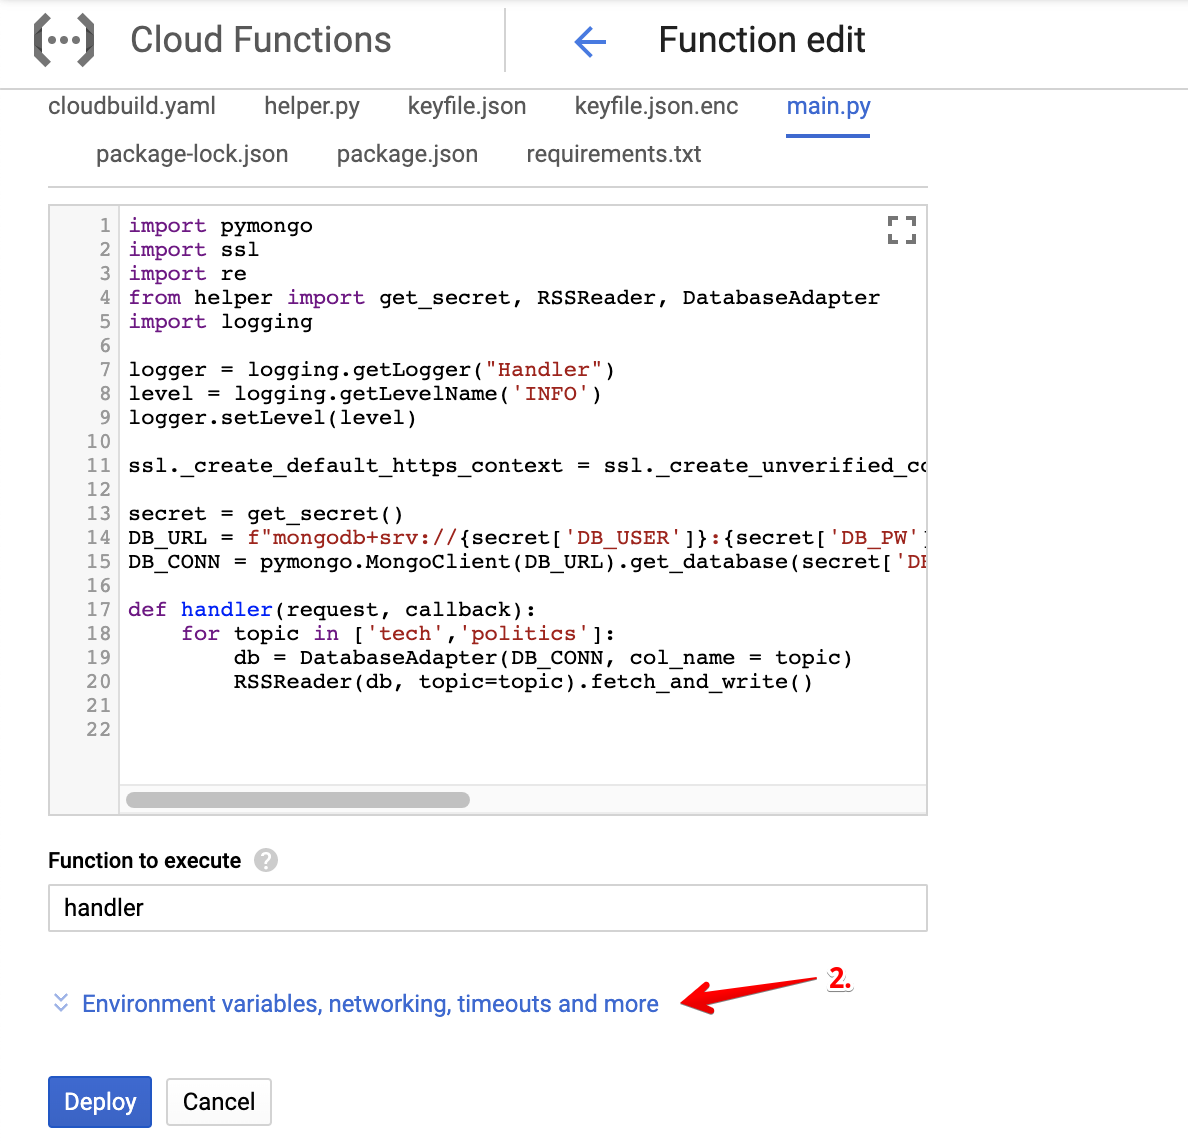
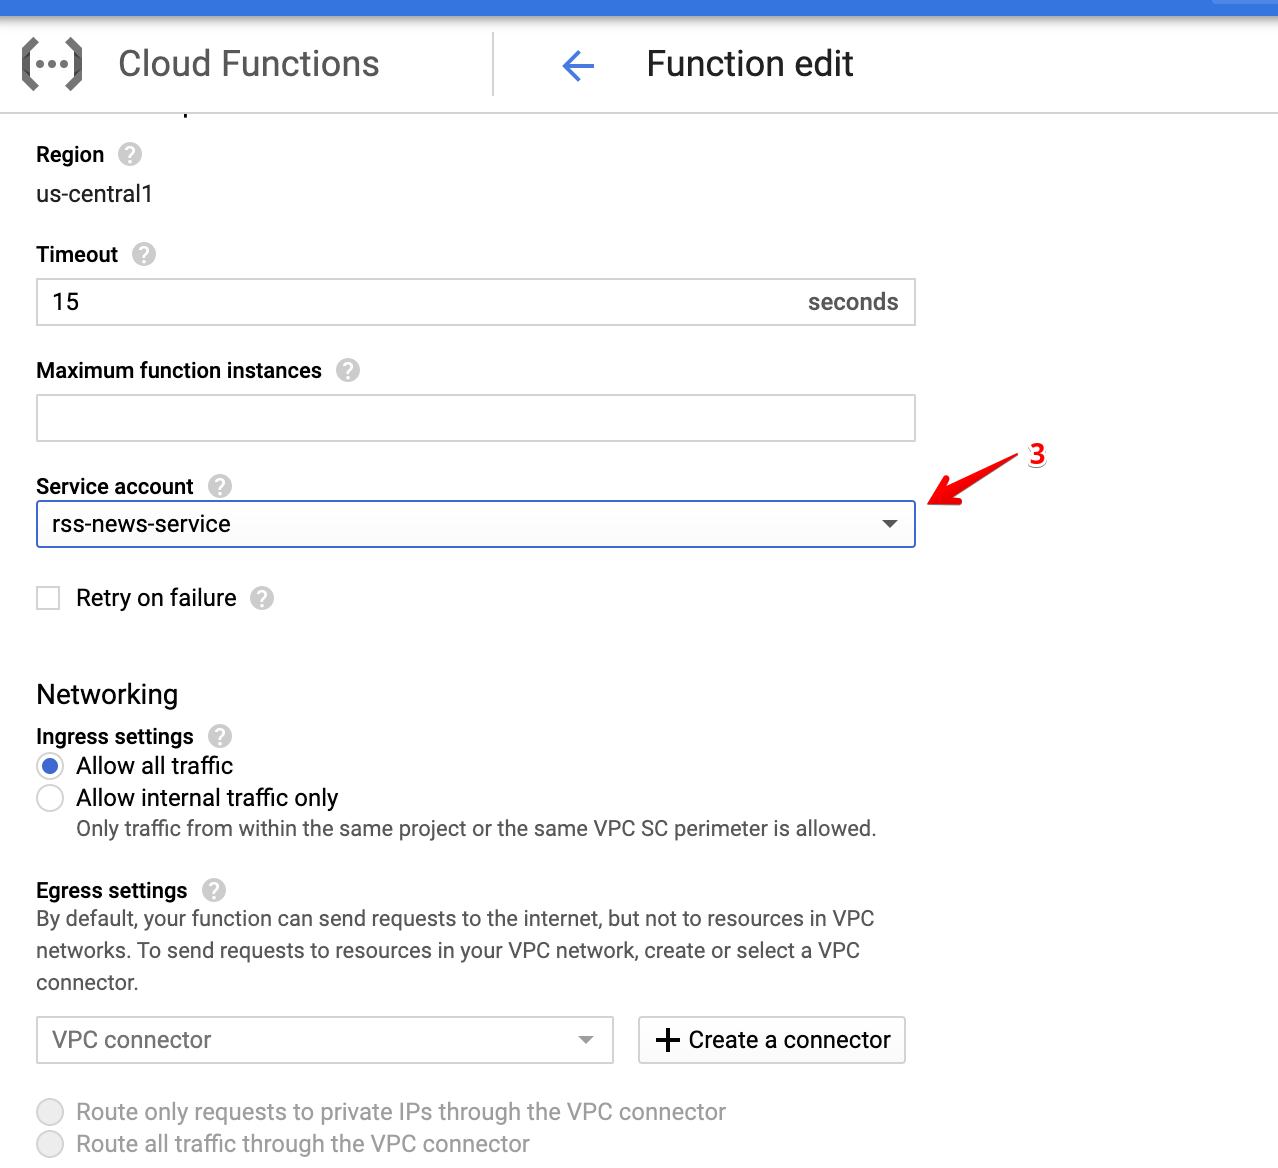
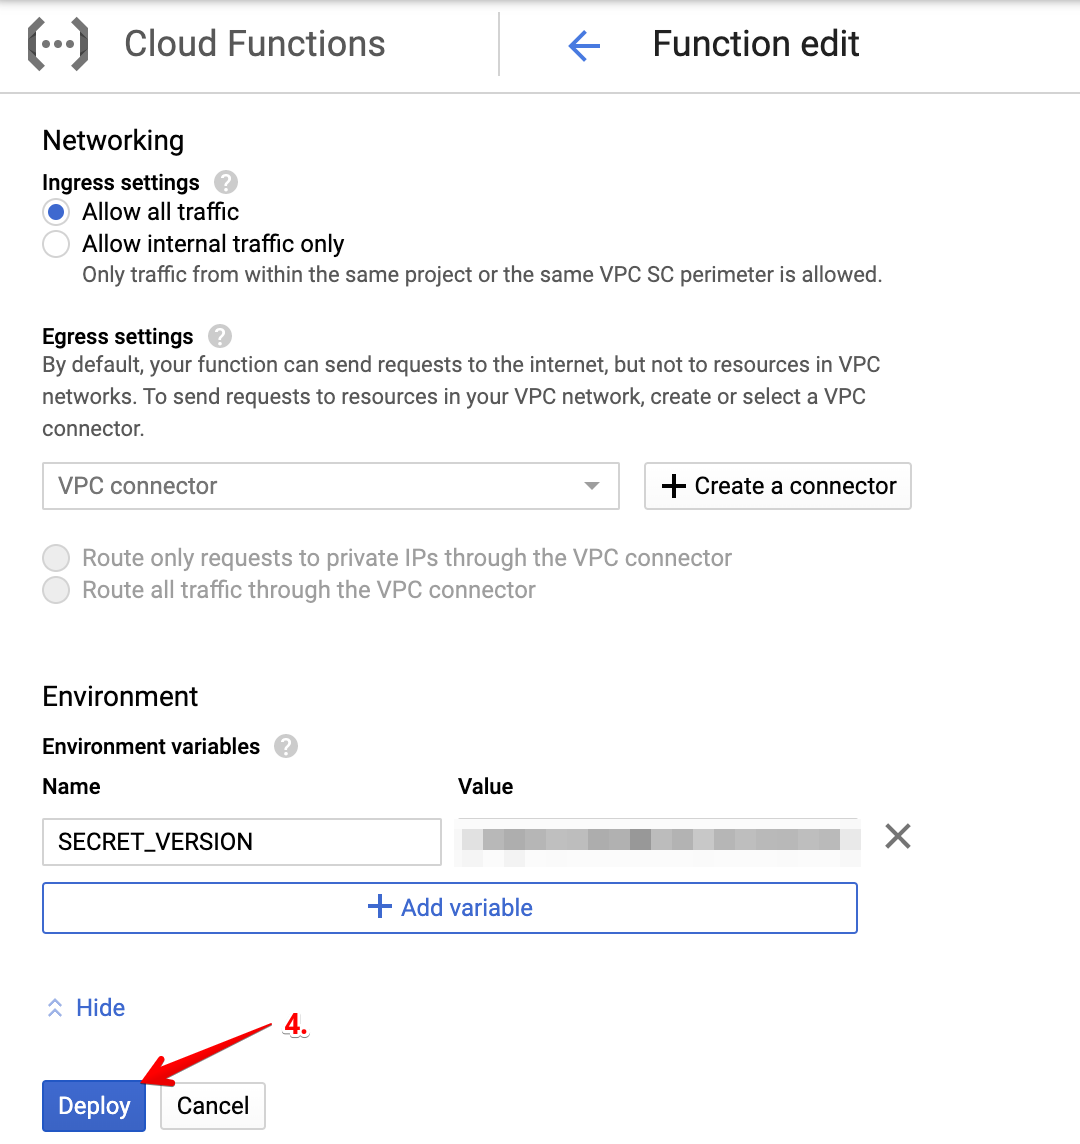
After several moments, the deployment of your function should be successful!
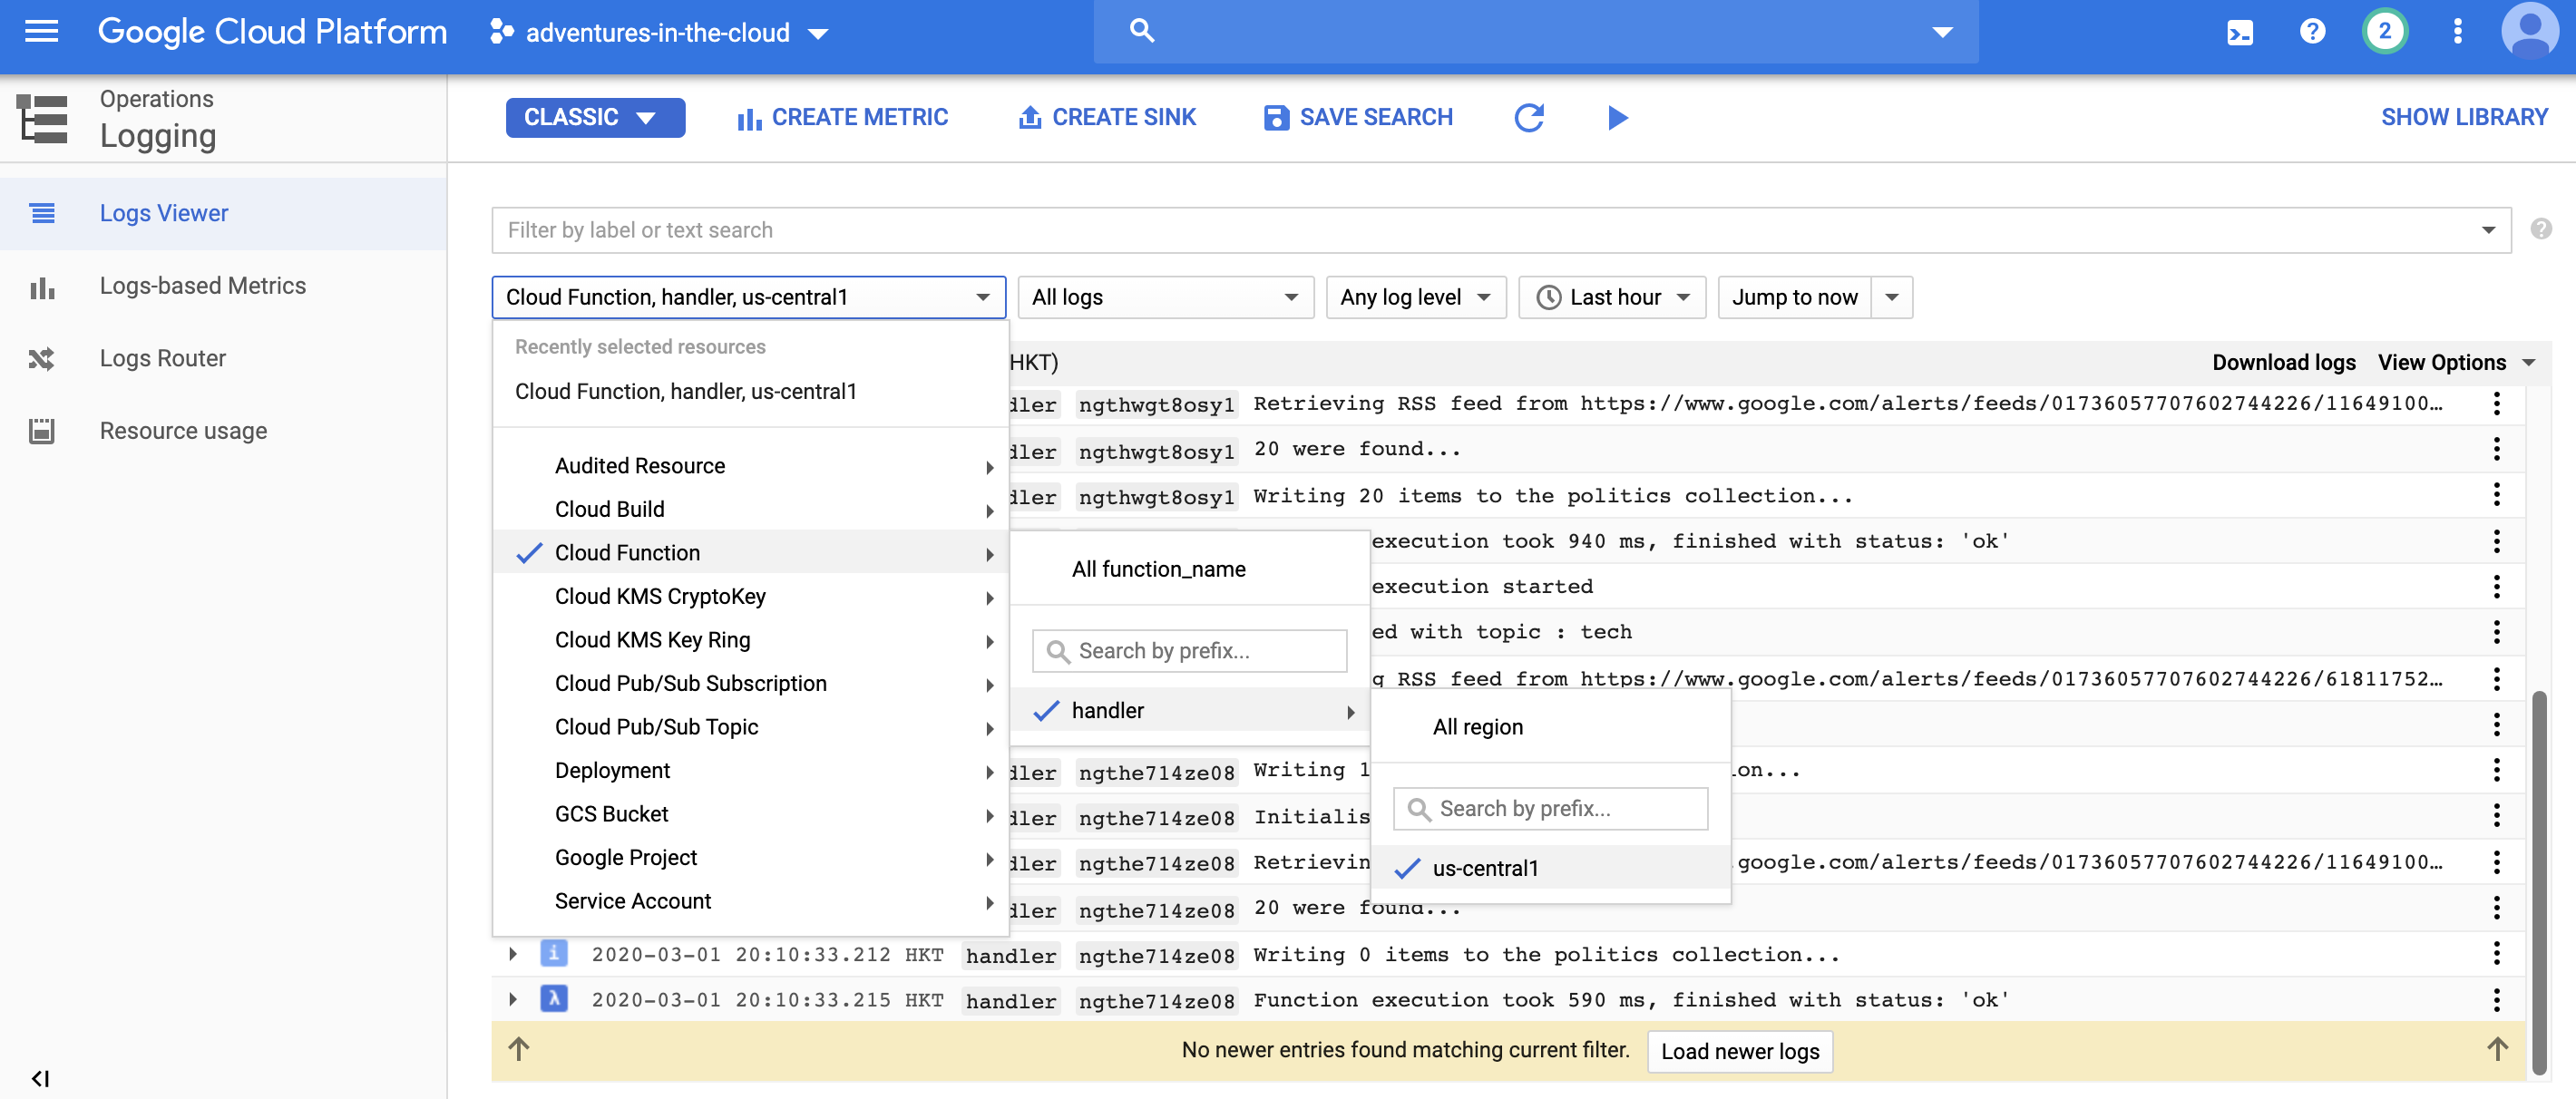
Testing the Function
To be convinced that all is well, we should definitely test out the function.

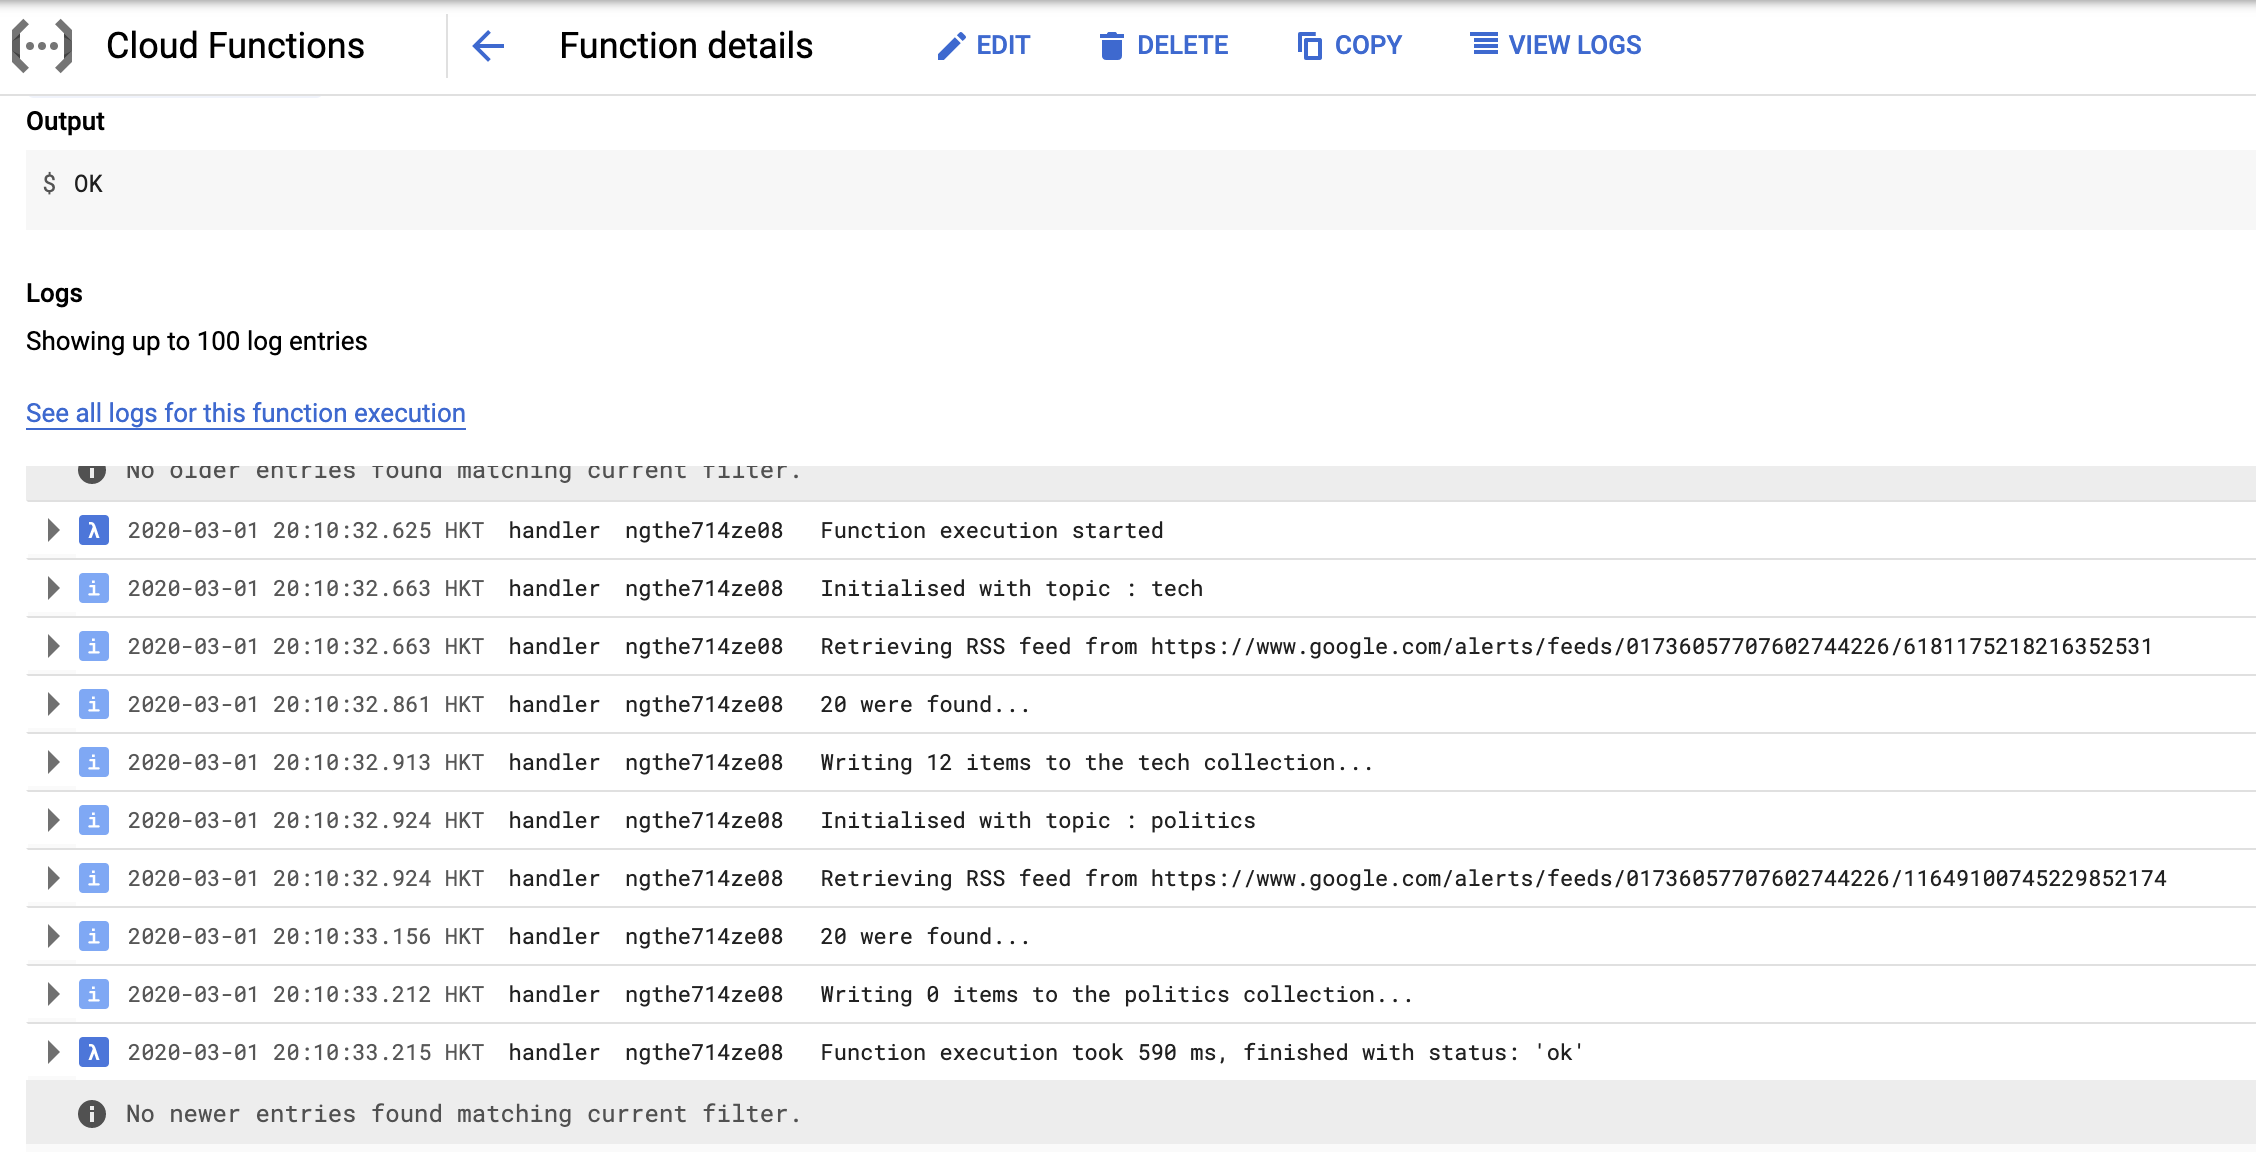
Viewing the logs that were produced by the function, we are convinced that things are working as they should. The same logs can also be viewed in the Logging service.
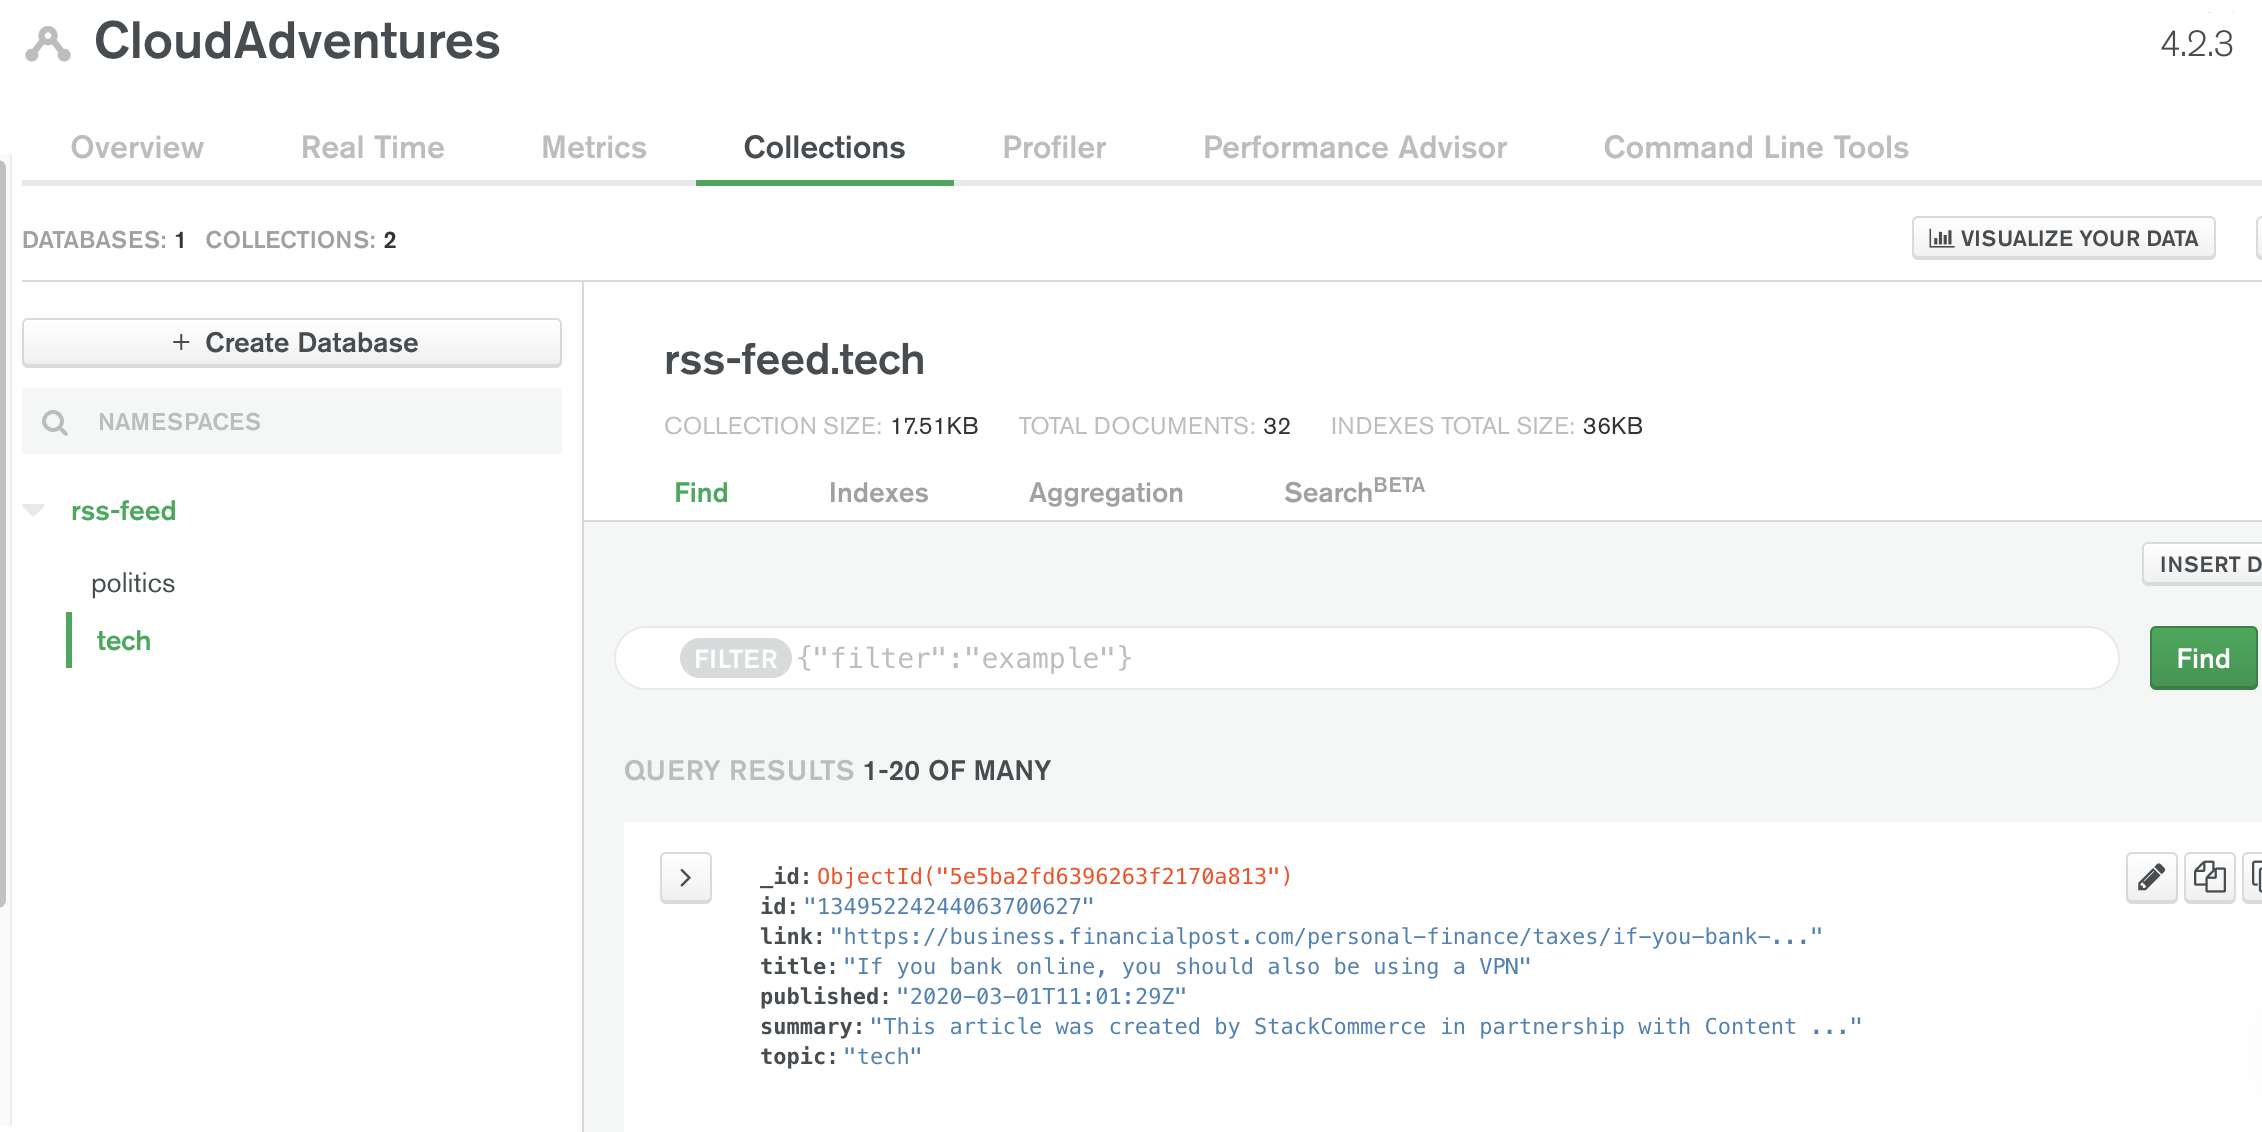
If we check out our MongoDB console, we should also be able to find the new documents that were written to it.
Ensuring the Service Account Is Used For Future Deployments
Unfortunately, the service account that we created above cannot be attached to the GCF while deploying, there is already an open pull request to Serverless to add such a functionality. But until then, our best hope is to add a step to Cloud Build to make the Function assume the role of the Service Account we created after deployment. We add the following to cloudbuild.yaml,
.
.
.
  - name: 'gcr.io/cloud-builders/npm'
    id: 'Deploy serverless framework'
    entrypoint: bash
    args: ['-c', 'npx serverless deploy -v']
  - name: gcr.io/cloud-builders/gcloud
    id: 'Assign service account to function'
    args:
      - functions
      - deploy
      - readRSS
      - --service-account=${_SERVICE_ACCOUNT}
substitutions:
  _KEYRING: sls_deploy_account
  _KEY: deploy_creds
  _SERVICE_ACCOUNT: rss-news-service@adventures-in-the-cloud.iam.gserviceaccount.com
Note that the service_account email can be found in the Service Account list.
And now for all this to work, we also need to add permissions to Cloud Build as follows:
Now that everything is working, future deployments when pushes are made to the repository should also be successful.
Last Step
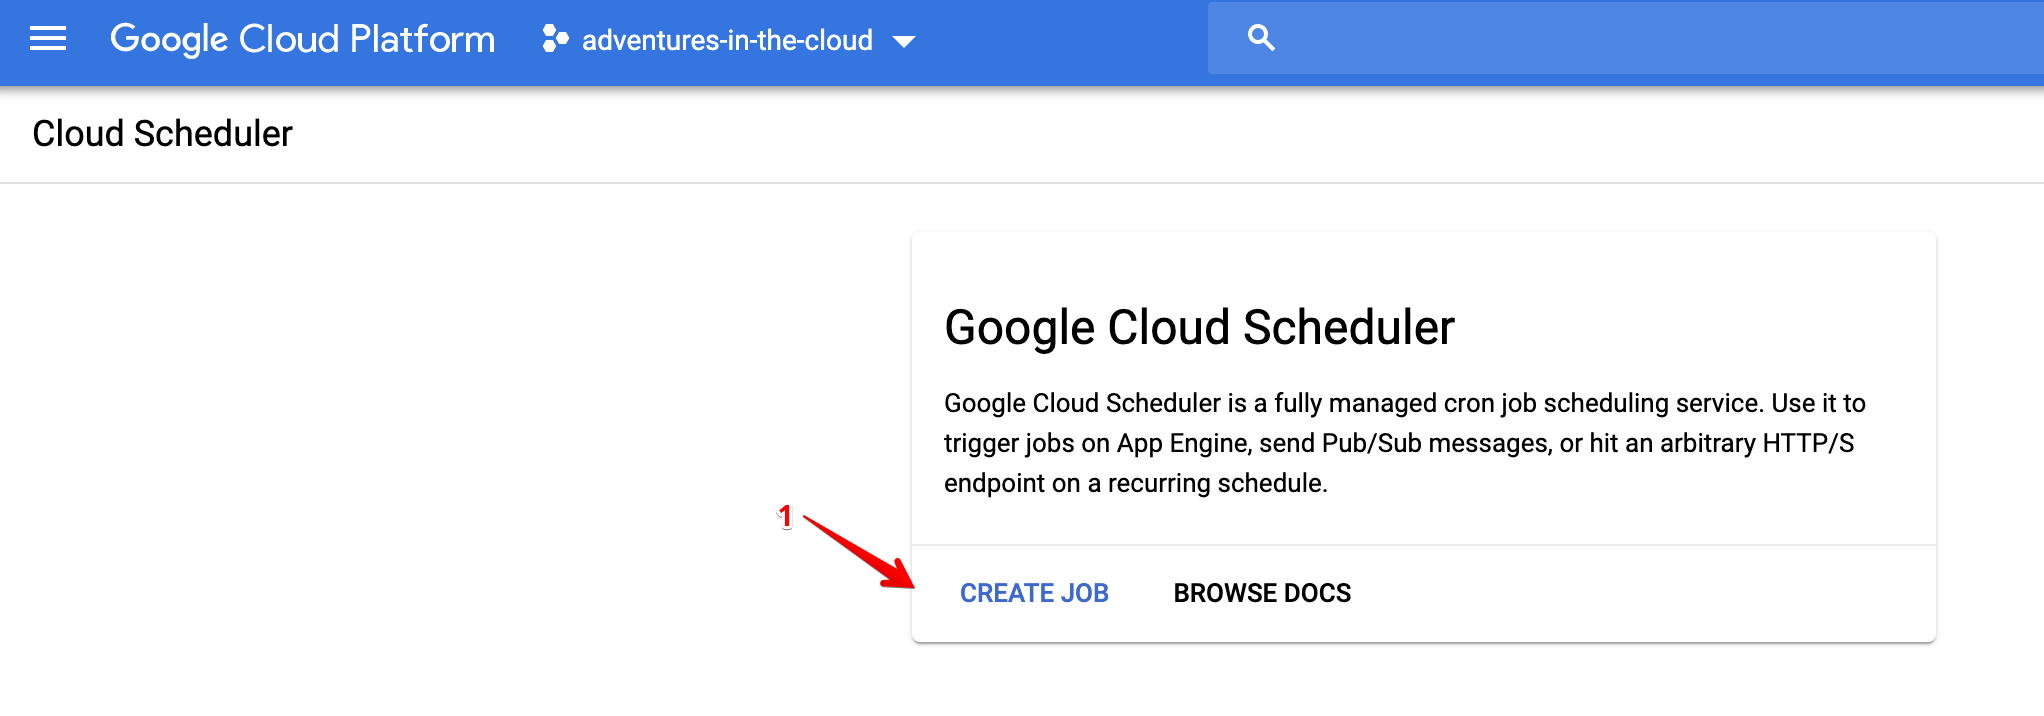
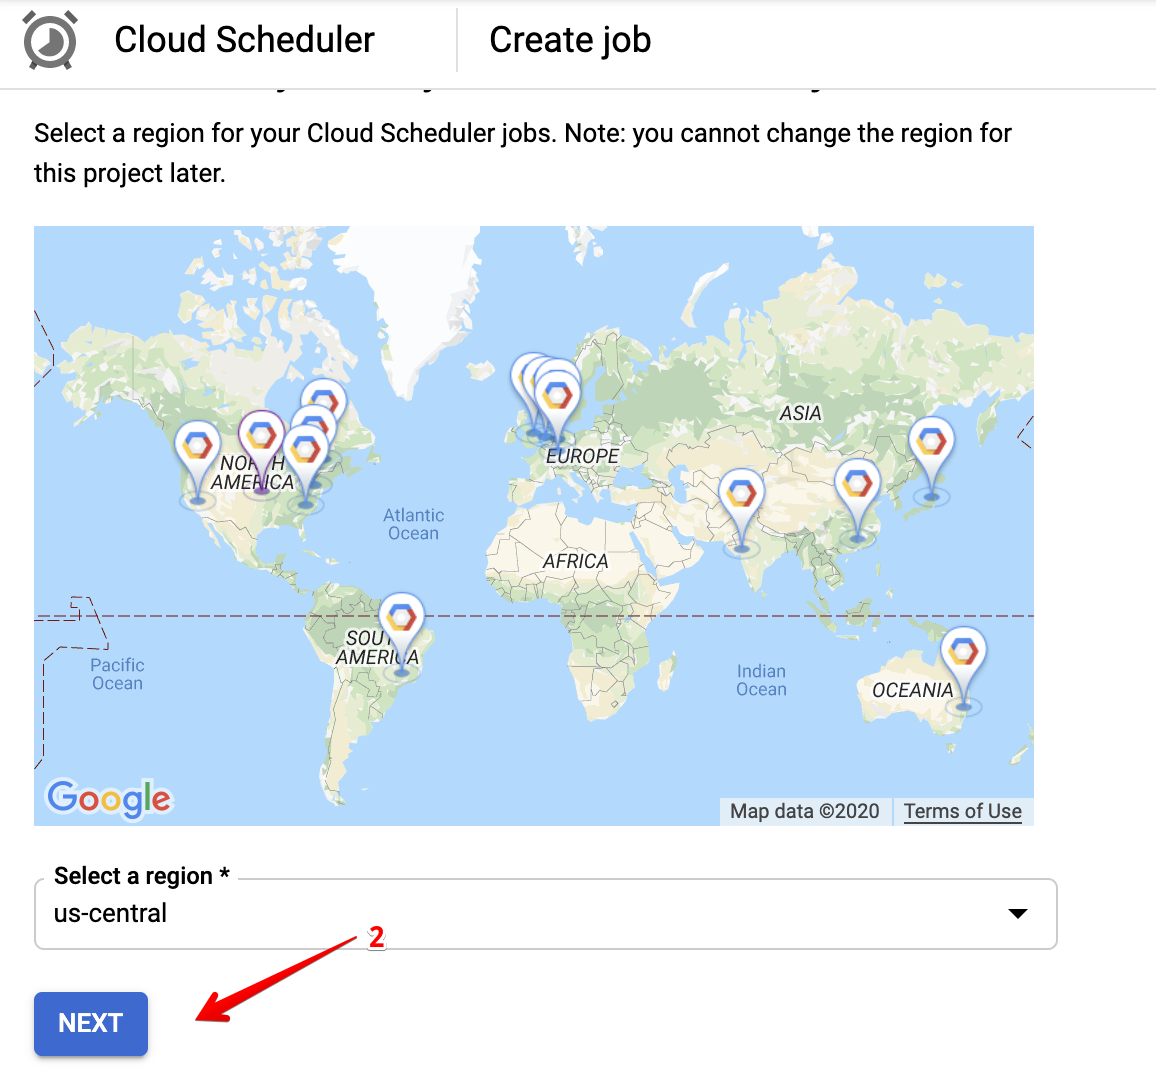
Phew, we have finally made it here. There remains one thing that we have not done yet, we need to ensure that our function runs on a schedule! All we have to do is head over to the [Cloud Scheduler], and create a job to publish to the Pub/Sub topic that we set earlier.
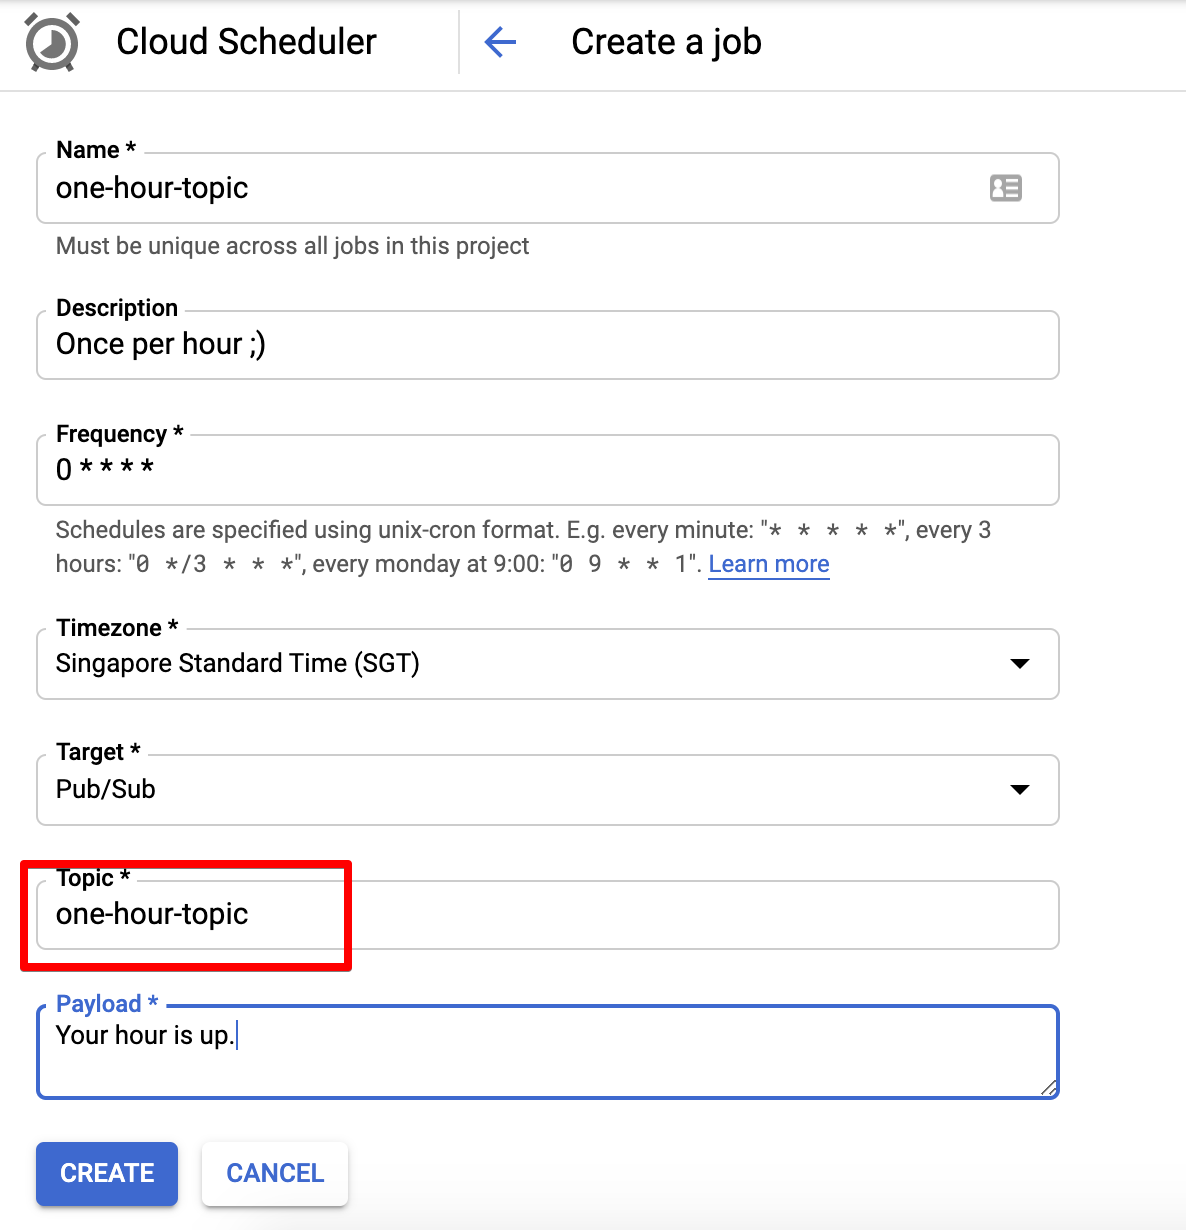
There are only two things here that matter, the topic and the frequency. The topic should be the one that we set in our serverless.yml file, i.e. one-hour-topic. The frequency is simply just a cron schedule, and it is scheduled to run once per hour.
To verify that your scheduler job is working, test it out in the console by invoking it manually.

You can then check the logs of your cloud function to verify that it was indeed invoked.
That’s a Wrap!
Wow this turned out to be pretty long! The bulk of the time was arguably spent on securing credentials and building a maintainable deployment pipeline. But as a result, we do have ourselves something neat that works well and elegantly😉. Building a solution that’s meant to last isn’t easy, it requires a lot of effort at the beginning. However, this will all pay for itself in due time, our effort will be rewarded by easy of maintenance and future collaboration! Thanks for reading.